Configuring Windows BMR Rescue ISO
EnterpriseBacula Enterprise Only
This solution is only available for Bacula Enterprise. For subscription inquiries, please reach out to sales@baculasystems.com.
Important
Customizing the Recovery Image is optional.
You can preset your Bacula configuration inside the Recovery Image
itself to simplify the restore procedure. To customize your rescue
CD-ROM, you must use winbmr-iso-configurator.exe. Start the program,
locate your ISO file, and edit the fields you want to customize. When
done, you can restart the program to check the values and change them
whenever needed.
None of these fields are mandatory and setting a value for one will only pre-fill the field in the rescue application. You will still be able to modify this value at recovery time.
Any of these fields can also be initialized using the command line with
the appropriate option. Run the program with the -h option to get a
list of all these options. The name of the options are also included
under parenthesis below for reference. You can see how the GUI looks
like at figure SetupConfig.
The first field is the keyboard.
Keyboard(
–keyboard, “US” by default). You can get a list of available keyboard layouts using the option–list-kb. Don’t forget to use quote for name that contains spaces.
Then come the fields related to your Bacula setup. These are identical to the fields shown in the configuration screen of the rescue program, figure BaculaConfig.
Your Director’s Catalog (
–catalog, set to “MyCatalog” in this document). If you have only one catalog, you can keep it blank because this catalog will be automatically selected by the rescue program even if you have given another name here.Rescue client name (
–cli-name, set to “rescue-fd” in this document), this is the name of the bacula-fd client running on the machine being restored.Rescue client password (
–cli-pass, set to “password” in this document)Rescue client port (
–cli-port, 9102 by default)Director’s name (
–dir-name, set to “zbackup-dir” in this document))Director’s address (
–dir-address, set to “zbackup” in this document))Director’s port (
–dir-port, 9101 by default)Rescue console password (
–cons-pass, set to “password” in this document)Client version (
–cli-version, auto by default). To support a wider range of infrastructures, multiple versions of the Bacula FileDaemon are embedded into the image. You can select one specific version or select “auto” and let WindowsBMR choose the appropriate version regarding your director version at recovery time. You can get a list of available client versions using the option–list-cli-version). “auto” selects the latest version of the client compatible with your Director.
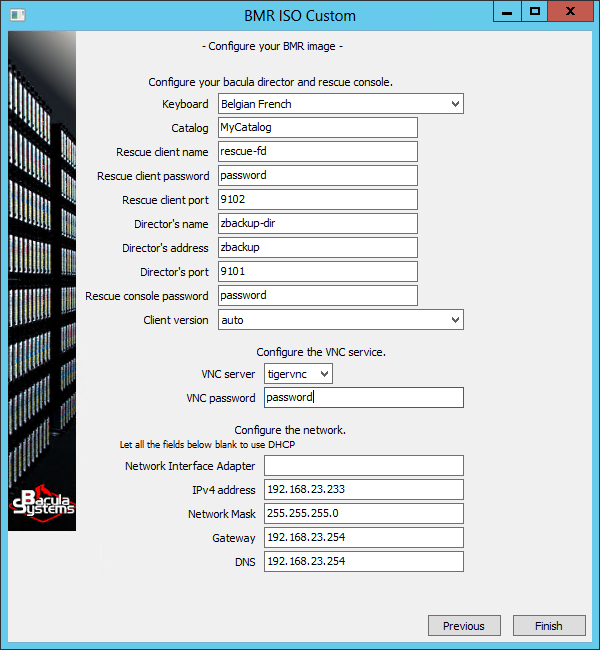
Customize the ISO Image
Next is the VNC configuration data:
VNC Server (
–vnc-server, set to “tigervnc” in this document). You can keep VNC disabled or choose between TightVNC and TigerVNC . If you have some refresh issues with one VNC server, try the other. However, only TigerVNC supports IPv6 and SSL.VNC password (
–vnc-password, set to “password” in this document).
You can assign a static IP address to the machine booted from the Windows BMR ISO.
To use DHCP instead, leave the IPv4 address field blank.
Network Interface Adapter (
–net-ifname, set to “<blank>” in this document). When left blank, the rescue program will assign the address to the first adapter that is connected.IPv4 address (
–net-ipaddr, set to “192.168.23.233” in this document).Network Mask (
–net-netmask, set to “255.255.255.0” in this document).Gateway (
–net-gateway, set to “192.168.23.254” in this document).DNS (
–net-dns, set to “192.168.23.254” in this document).
The command line interface has some special options
–iso FILENAMEuse the given ISO image filename.–no-guiwill not show theGUIinterface.–list-kbshows a list of known keyboard layouts.–list-cli-versionshows a list of known client versions.
For example to setup some parameters of your ISO image without starting the GUI, you can use:
C:\> winbmr-iso-configurator.exe --no-gui --iso winbmr-rescue-3.4.0.iso
   --cli-name=rescue-fd --cli-pass=xxx --cli-port=9102 --cons-pass=xxx
   --dir-address=10.10.1.2 --dir-name=bacula-dir.lan --dir-port=9101
See also
Previous articles:
Next articles:
Go back to: Preparing Recovery Environment.