Note
You can download this article as a PDF
BCloud Service
Executive summary
IT organizations are constantly being challenged to deliver high quality solutions with reduced total cost of ownership.
This document is intended to provide insight into the considerations and processes required to implement BCloud Service with your Bacula Enterprise installation.
Note
The below sections describe how to install and configure BCloud by the backup
administrator. The BCloud User Manual is available as a PDF file:
PDF
Features Summary
BCloud Service is a user oriented web frontend (sometimes also called panel) that is designed to delegate backup administrator tasks to the end user. BCloud Service offers the following features:
Based on Bacula Enterprise REST API
The web interface can be translated into different languages
Simple user oriented web interface (compatible with Chrome and Firefox)
System administrator can customize BCloud using php hook scripts
System administrator can limit the number of Client, Job, Schedule and Pool size per user
All communications are encrypted by default
Ordinary users are authenticated via LDAP
Ordinary users can start, monitor or abort backup/restore jobs
Ordinary users can register their own clients
Ordinary users can add and schedule their own backup jobs
Ordinary users can select files to restore
Ordinary users can choose the restore client
Ordinary users can see a dashboard with useful information about previous and currently running jobs
Ordinary users can download installation programs and documentation
Architecture
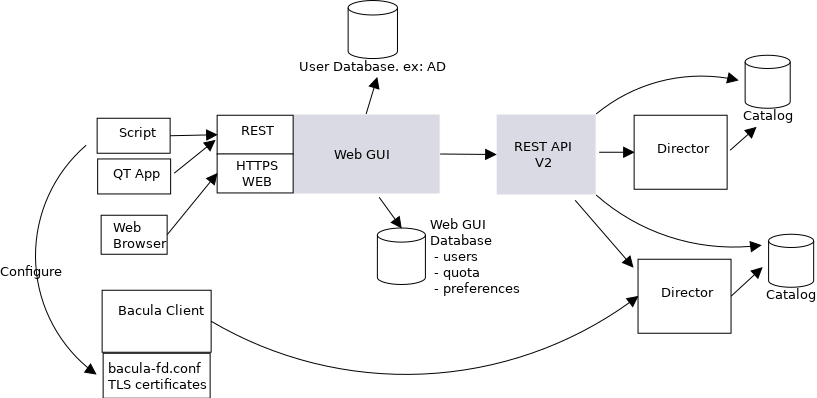
BCloud Service Architecture
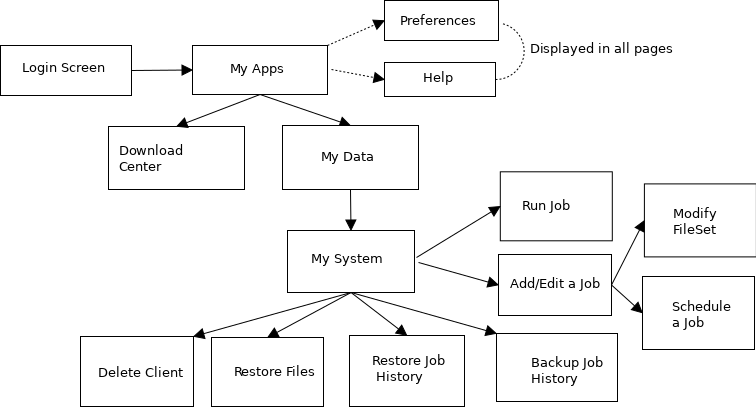
Screen Organization
Installation
Packages and Programs
You can install the Bacula Enterprise BCloud Service by extending the
repository file for your package manager to contain a section for the
programs. For example, /etc/yum.repos.d/bacula.repo:
[baculasystems]
name = Red Hat Enterprise  - baculasystems
baseurl = https://www.baculasystems.com/dl/@customer@/rpms/bin/@version@/rhel7-64
enabled = 1
protect = 0
gpgcheck = 0

[baculasystems-bweb]
name = Red Hat Enterprise  - baculasystems
baseurl = https://www.baculasystems.com/dl/@customer@/rpms/bweb/@version@/rhel7-64
enabled = 1
protect = 0
gpgcheck = 0

[baculasystems-bcloud]
name = Red Hat Enterprise  - baculasystems
baseurl = https://www.baculasystems.com/dl/@customer@/rpms/bcloud/@version@/rhel7-64
enabled = 1
protect = 0
gpgcheck = 0
yum install bacula-enterprise-postgresql
yum install bacula-enterprise-bcloud-service
If you experience dependency issues while installing (like missing lighttpd packages) you could try adding the EPEL repository configuration, if not already present, to your system by issuing the following command:
yum install epel-release
YUM will install the packages and the various dependencies that are needed such as:
bacula-enteprise-bweb
bacula-enteprise-rest-api
php, php-bcmath, php-json, php-ldap, …
To install php-zip, please refer to Section install-php-zip.
If you prefer to manually install the packages, you may also download
them from your download area and use one of the low level package
manager tools such as rpm to do the plugin installation.
Initial Configuration
The following steps are required to setup PostgreSQL, Bacula Enterprise, Bacula Enterprise REST API, and Bacula Enterprise BCloud Service. The following scenario assumes that the commands and the Internet browser are started from the system that hosts Director, PosgreSQL, BWeb, RESTAPI and BCloud.
Stop or configure the Firewall (network-setup)
service firewalld stop
Stop or configure selinux
setenforce 0
Install and configure Bacula Enterprise PostgreSQL
yum install postgresql-server
Install and configure PostgreSQL
Configure
postgresql.confCreate (
initdb) the PostgreSQL cluster and start the servicepostgresql-setup initdb systemctl start postgresql
Execute Bacula catalog scripts located under
/opt/bacula/scripts:# su - postgres postgres $ /opt/bacula/scripts/create_bacula_database postgres $ /opt/bacula/scripts/make_bacula_tables postgres $ /opt/bacula/scripts/grant_bacula_privileges
Change bacula database ownership and assign a password to the bacula user:
# su - postgres
postgres $ psql
postgres> ALTER DATABASE bacula OWNER TO bacula;
postgres> ALTER USER bacula WITH PASSWORD '<SOME_PASSWORD>';
Edit
/var/lib/pgsql/data/pg_hba.confto use md5 instead of ident for local usersRestart the PostgreSQL service
systemctl restart postgresql
Set the
baculaSQL user password in the/opt/bacula/etc/bacula-dir.conf# Generic catalog service Catalog { Name = MyCatalog dbname = "bacula"; dbuser = "bacula"; dbpassword = "<SOME_PASSWORD>" }Try to connect the PostgreSQL service with
psql -U bacula -d bacula -W -h localhost
Install php-zip extension
yum install php-pear php-devel zlib-devel libzip-devel gcc-c++ wgetwget https://pecl.php.net/get/zip-1.12.5.tgzpecl install zip-1.12.5.tgzecho 'extension=zip.so' > /etc/php.d/zip.ini
Configure the PHP Timezone.
Edit
/etc/php.inito configure thedate.timezoneparameter according to your physical location and the table http://php.net/manual/en/timezones.php.# grep timezone /etc/php.ini date.timezone = Europe/Paris
Configure REST API, edit the
/opt/bacula/rest-api/etc/lighttpd.confand change the port from 443 to 4443. Optionally, it is possible to change limit the connectivity of the REST API service to thelocalhostinterface once everything is setup correctly. (It simplifies the setup if thebindparameter is changed at the end of the installation process).server.bind = "localhost"
Start all services
systemctl start bacula-fd
systemctl start bacula-dir
systemctl start bacula-sd
systemctl start bweb
/opt/bacula/rest-api/bin/lighttpd.redhat start
/opt/bacula/bcloud/bin/bcloud start
Verify that the Director can access the Catalog
/opt/bacula/bin/bconsole
* status dir
Enable services at boot
systemctl enable bacula-fd
systemctl enable bacula-dir
systemctl enable bacula-sd
systemctl enable bweb
systemctl enable postgresql
echo /opt/bacula/rest-api/bin/lighttpd.redhat start >> /etc/rc.local
echo /opt/bacula/bcloud/bin/bcloud start >> /etc/rc.local
chmod a+x /etc/rc.d/rc.local
Initialize BWeb Mangement Suite SQL tables
/opt/bweb/bin/install_bweb.sh
Configure BWeb http://localhost:9180, click Configure and Bacula Configuration to initialize the BConfig tool
In BWeb, click on the Security Center and setup master CA certificate and generate certificates for each of daemons. Once done, commit the workset and restart all daemons.
Configure REST API via https://localhost:4443/panel/
Add a REST API User via the REST API Panel
Keep the User ID and User Secret for Bcloud configuration
Set the Redirect URI to https://localhost/?page=Callback&directorid=1
Install and configure LDAP server or use the file driver auth backend (See file-auth).
Configure the BCloud Service (See section configure-bcloud).
Configure BCloud Service
You must edit the BCloud Service configuration file:
cat  /opt/bacula/bcloud/www/protected/conf/settings.conf
[db]
type = "pgsql"
dbname = "bacula"
address = "127.0.0.1"
user = "bacula"
password = "<SOME_PASSWORD>"

[api]
auto_commit = "1"

[app]
log_file = "/opt/bacula/bcloud/log/web_app.log"
log_level = "1"
auth_module = "ldap"
ldap_server = "ldap://localhost:389/"
ldap_base_dn = "dc=ok"
ldap_additional_user_dn = "ou=People"

[frs]
download_dir = "/opt/bacula/bcloud/downloads"

[notification]
admin_email = root@localhost
mail_headers = "From: BCloud Service <root@localhost>\r\n"
Database Connection
db section of the configuration file. The database can be specific
to BCloud or be shared with the Bacula catalog.
type The database type is
pgsqladdress Address of the database
dbname Name of the database
user Database user name
password Password for the database
Application Settings
app section of the configuration file.
log_level is the bcloud log level. Can be 1 to 10
log_file is the full path of the bcloud log file on disk
New in Bacula Enterprise 12.8.1
auth_module specifies the authentication module. Possible values are: “ldap”, “ldap2”, or “file”
ldap_server a full LDAP URI of the form ldap://hostname:port
ldap_base_dn a base LDAP distinguished name, ex. dc=lan. Please note, that at least one part of the domain must be used in the username field. For example for a domain defined as: dc=mydomain,dc=lan, the ’ldap_base_dn’ should define ’dc=lan’ and the username should be ’mydomainusername’.
ldap_additional_user_dn additional LDAP user distinguished name. ex. ou=People
New in Bacula Enterprise 12.8.1
ldap2_server a full LDAP URI in the form ldap://hostname:port.
ldap2_auth_method supported are two methods:
anonymousandsimple. Theanonymousmethod does not require providing LDAP administrator parameters (ldap2_bind_dnandldap2_bind_pwd) to search for LDAP entries. The LDAP server must support the anonymous method. Thesimplemethod uses credentials defined in theldap2_bind_dnandldap2_bind_pwdoptions.ldap2_bind_dn defines the administrator account distinguished name. This option is mandatory for the
simpleauthentication method and it is not used for theanonymousmethod.ldap2_bind_pwd stores the administrator account password. This option is mandatory for the
simpleauthentication method and it is not used for theanonymousmethod.ldap2_base_dn determines the starting point the LDAP server uses when searching for users to authenticate within the directory.
ldap2_filter is the filter when searching for users. It uses the
%userkeyword that is replaced by the username that was entered during log in. The filter can be simple such as:(uid=%user), or more advanced such as:(&(uid=%user)(|(ou:dn:=People)(ou:dn:=OtherPeople))). More information about filters can be found in RFC 4515 (http://www.faqs.org/rfcs/rfc4515.html)
user_registration can hide/show the Client registration button on MyData page. Can be 0 or 1.
generate_console determines what kind of console configuration is generated for the registration. If the value is set to 0 (default value), then a Console resource configuration will be generated with full access. If the value is set to 1, a check is performed to see if this is the first registered File Daemon. If yes, BCloud will create a new console in the Director configuration automatically and BCloud will prepare the appropriate Console resource with restricted access for the Jobs, FileSets, Client, and Pools that correspond to the BCloud user and the Client values. If a Console resource already exists for the user, the existing Console configuration will be used for the restricted Console settings without creating new one. If set to 2, the BCloud Service will check the Director configuration to see if there is a Console resource related to the currently logged in user, and if one exists, the prepared console configuration will be generated with the console access.
Download Center Settings
frs section of the configuration file.
download_dir is the full path to the directory of the download area
Notification Settings
notification section of the configuration file.
admin_email is the email of the bcloud administrator
mail_headers is the headers of the email that is sent
REST API Settings
api section of the configuration file.
auto_commit will control if BCloud can automatically commit changes made from the user interface. If auto_commit is set to 0, the BWeb administrator will recieve email notifications and will have to commit changes in the BWeb configuration interface. If the auto_commit is set to 1, end user modifications will be automatically applied to the Director.
BCloud Service SQL Schema
The BCloud Service SQL schema must be loaded into the database described
in the settings.conf file.
psql -U bacula -d bacula -h localhost -W \
  -f /opt/bacula/bcloud/www/protected/conf/bcloud_service-pgsql.sql
BCloud Service REST API Connection
A Director must be registered within the BCloud Service. The command
bcloud-add-director.php will populate the bcloud_director table
in the catalog. The name of the Director must exactly match the name of
the Director defined in bacula-dir.conf.
php  /opt/bacula/bcloud/www/protected/tools/bcloud-add-director.php
  /opt/bacula/bcloud/www/protected/tools/bcloud-add-director.php:
                --name
                --api_server_uri
                --authorization_uri
                --access_token_uri
                --refresh_token_uri
                --client_id
                --client_secret
                --redirect_uri
                --scope
                --restricted
                --admin_email
                --confirm_registration
                --confirm_new_jobs
                --confirm_deletion
                --template_dir

php  /opt/bacula/bcloud/www/protected/tools/bcloud-add-director.php \
 --name=centos7-64-dir                                        \
 --api_server_uri=https://localhost:4443/                     \
 --authorization_uri=https://localhost:4443/v2/authorize/     \
 --access_token_uri=https://localhost:4443/v2/request_token/  \
 --refresh_token_uri=https://localhost:4443/v2/refresh_token/ \
 --client_id=XXXXXXXXXXXXXXXXX                                \
 --client_secret=XXXXXXXXXXXXXXXXXXXXX                        \
 --redirect_uri="https://localhost/?page=Callback&directorid=1" \
 --scope="/*"                 \
 --restricted=0               \
 --admin_email=root@localhost \
 --confirm_registration=0     \
 --confirm_new_jobs=0         \
 --confirm_deletion=0         \
 --template_dir=/opt/bacula/bcloud/www/protected/conf

         ====    Director added successfully.    ====
File Based Authentication
For test purposes, it is possible to use file based authentication instead of LDAP authentication. To use file based authentication, the following file must be created:
/opt/bacula/bcloud/www/protected/conf/auth
Inside this file there must be one row per user with the following format:
userid1,username1,password_hash1
userid2,username2,password_hash2
userid3,username3,password_hash3
Example:
1,john,a51dda7c7ff50b61eaea0444371f4a6a9301e501
2,paul,a027184a55211cd23e3f3094f1fdc728df5e0500
3,admin,d033e22ae348aeb5660fc2140aec35850c4da997
The password hashes must be generated with the following command:
echo -n 'yourpasss' | sha1sum
In the settings.conf configuration file, the auth_module must be
set to file.
[app]
auth_module = "file"
BCloud Service Administrator
It is possible to promote a particular user as BCloud Service Administrator.
# psql -U bacula -d bacula -h localhost -W
bacula> SELECT name,userid from bcloud_user;
bacula> UPDATE bcloud_roles SET roles = 'user,admin' WHERE userid=3;
If the user is not listed in the bcloud_users table, try to first
login to the BCloud Service with the user and then try the SQL queries
again.
The BCloud Service Administrator will have access to advanced options to edit user properties like:
Max Clients (default 1, SQL field
max_clients)Max Jobs (default 3, SQL field
max_jobs)
It is possible to edit Bcloud Service users properties via a SQL query, and a set of user definable hooks will be available in a next version.
For the moment, it is possible to change default user attributes by modifying the file:
/opt/bacula/bcloud/www/protected/class/User.php
The user quota cannot be set via a SQL. The initial value can be set via the Pool.tpl template file described Sec PoolTPL, or via the admin page.
BCloud Service Customization
To change the company logo, replace the current logo file in the location below with a custom logo.
/opt/bacula/bcloud/www/images/logo.png
The logo, buttons and link style settings are can be customized in the following file:
/opt/bacula/bcloud/www/css/custom.css
Additional CSS with detailed interface styles can be found in the following files:
/opt/bacula/bcloud/www/css/style.css
/opt/bacula/bcloud/www/css/restore.css
It is not recommended to modify these files directly.
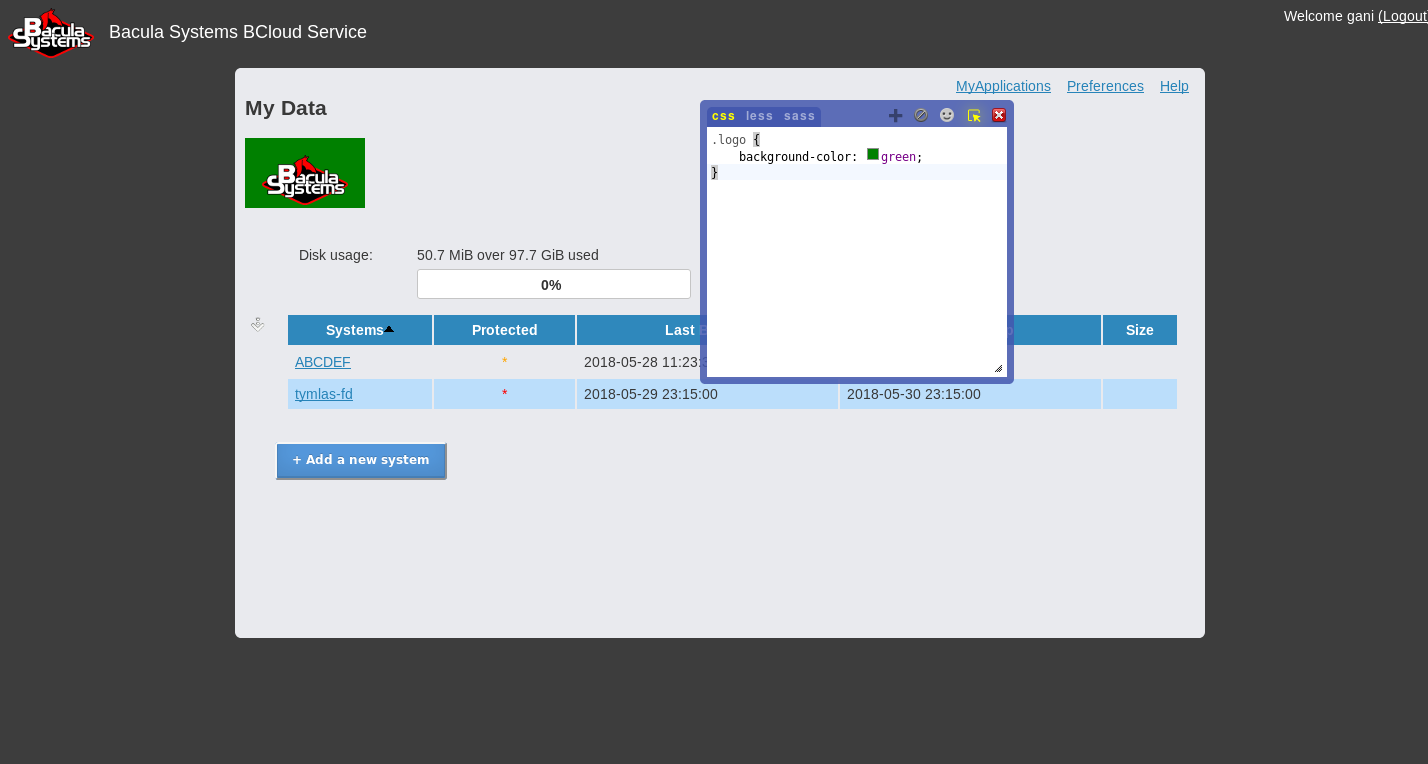
To customize the BCloud Service CSS files, the firefox plugin “Live editor for CSS, Less / Sass - Magic CSS” can be used. It is available on https://addons.mozilla.org/en-US/firefox/addon/live-editor-for-css-and-less/
Once the Firefox plugin is installed, it is possible via the HTML inspector to select the BCloud element and to change and define attributes in a special window CSS styles.
At the end of session with the BCloud Service customization, you can
copy and paste the CSS result into the custom.css file located in
the BCloud Service web directory.
Screen Customization
Network Configuration
The following TCP network ports should be accessible to ordinary users:
https/443BCloud Service interface9103Bacula Enterprise Storage Daemon
The following TCP network ports can be optionally accessible to ordinary users:
9101Bacula Enterprise Director Daemon
The following TCP network ports should be accessible to system administrators
9102Bacula Enterprise File Daemon4443Bacula Enterprise REST API9180Bacula Enterprise BWeb Management Suite
The following UDP network port is optional and should be accessible to ordinary users if the VPN is used:
1194 udpOpenVPN
To properly confure the firewall on RHEL 7, please check the following documentation: https://access.redhat.com/documentation/en-us/red_hat_enterprise_linux/7/html/security_guide/sec-configuring_firewalld
VPN Configuration
OpenVPN Server Confguration
Install the
openvpnpackage
yum install openvpn
yum install ca-certificates
Indentify the Root CA certificate and root key from the Security Center in the BWeb.
/opt/bacula/etc/conf.d/ssl/keys/root_key.pem
/opt/bacula/etc/conf.d/ssl/certs/root_cert.pem
Prepare server certificate
Set the current directory to openvpn
cd /etc/openvpn/server
Generate key:
openssl genrsa -out ukey.pem 4096
Generate certificate request:
openssl req -new -batch \
  -subj "/C=<COUNTRY>/ST=<STATE>/O=<COMPANY>/CN=<ADDRESS>/emailAddress=<EMAIL>" \
  -key ukey.pem -out ucert.csr

COUNTRY - two letter country name such as 'EN'
STATE - region in COUNTRY
COMPANY - company name
ADDRESS - hostname or address for the certificate (Common Name)
EMAIL - e-mail address
Generate certificate using certificate request:
# cat > extra.cnf << EOF
[KUE]
extendedKeyUsage = serverAuth
keyUsage = digitalSignature,keyEncipherment
EOF

# openssl ca -keyfile /opt/bacula/etc/conf.d/ssl/keys/root_key.pem \
  -batch -policy policy_anything \
  -enddate YYYYMMDDHHIISSZ \
  -config <(cat /etc/pki/tls/openssl.cnf extra.cnf) \
  -extensions KUE -out ucert.pem \
  -cert /opt/bacula/etc/conf.d/ssl/certs/root_cert.pem \
  -infiles ucert.csr

YYYYMMDDHHIISSZ - date and time after which certificate expires (ex. 20180813162412Z)
For this step, it is possible that some files will be needed, such as:
touch /etc/pki/CA/index.txt /etc/pki/CA/index.txt.attr
echo "01" > /etc/pki/CA/serial
Use
root_cert.pem,ucert.pemandukey.pemin the OpenVPN server configuration as below:# cat /etc/openvpn/server/server.conf # OpenVPN Server Config port 1194 proto udp dev tun sndbuf 0 rcvbuf 0 dh dh.pem tls-auth ta.key 0 #crl-verify crl.pem auth SHA512 topology subnet server 10.8.0.0 255.255.0.0 ifconfig-pool-persist ipp.txt keepalive 10 120 cipher AES-256-CBC comp-lzo user nobody group nobody persist-key persist-tun client-config-dir /etc/openvpn/ccd status /var/log/openvpn-status.log log /var/log/openvpn.log log-append /var/log/openvpn.log verb 3 # custom files ca /opt/bacula/etc/conf.d/ssl/certs/root_cert.pem cert ucert.pem key ukey.pem
The OpenVPN configuration might require some files such as ta.key or
dh.pem.
openvpn --genkey --secret /etc/openvpn/server/ta.key
openssl dhparam -out /etc/openvpn/server/dh.pem 1024
To register clients, the BCloud service process executed under the
bcloud account must be able to excute a script via sudo.
# cat /etc/sudoers.d/bcloud
Defaults:lighttpd !requiretty
lighttpd ALL= NOPASSWD: /opt/bacula/bcloud/www/protected/conf/vpn-post-config-script.sh
On RHEL, the service can be started with
service openvpn-server@server start where server is the name of
the configuration file.
The default subnet 10.8.0.0/16 can be configured in the script
# vi /opt/bacula/bcloud/www/protected/conf/vpn-post-config-script.sh
...
# VPN server address
readonly SERVER_ADDRESS='10.8.0.1'

# OpenVPN server start/stop base command
readonly OPENVPN_START_STOP_CMD='service openvpn-server@server'
...
To start the openvpn service, the following command can be used:
systemctl enable openvpn-server@server
systemctl start openvpn-server@server
If the server configuration is server2.conf, then the command should
be adapted to openvpn-server@server2.
With the default vpn configuration script, only one bacula client can be
configured for each external IP address. Some more advanced OpenVPN
configuration can be done when configuring the
vpn-post-config-script.sh script.
In order for the FD (located behind NAT) to be able to reach the SD on a
different subnet than the OPenVPN server itself, it is needed to insert
a push route rule in the OpenVPN server configuration file in order
to instruct the client to include the target network in the routing
table as reachable through the VPN. Example
push "route 10.254.45.0 255.255.255.0"
where 10.254.45.0 is the remote network address and the 255.255.255.0 is
the remote network netmask. This modification should be done in the
vpn-post-config-script.sh script.
OpenVPN Client Template
To prepare the BCloud OpenVPN client template, it is needed to update the following file:
/opt/bacula/bcloud/www/protected/conf/openvpn-client.template
and add between <tls-auth></tls-auth> a static key shared with the VPN server. It is file that can be generated with the command described here generate-ta.
cat /etc/openvpn/server/ta.key
The HOST_ADDRESS keyword must be replaced with the external host
address in the “remote” option as showed below:
remote HOST_ADDRESS 1194
for example:
remote some.good.company.us 1194
OpenVPN Client Configuration
The Registration Wizard can request an OpenVPN configuration file from the server and use it locally to configure OpenVPN on the client side. OpenVPN must be installed on the computer and discoverable in the PATH.
To use this feature, simply check the Configure VPN box before pressing Register.
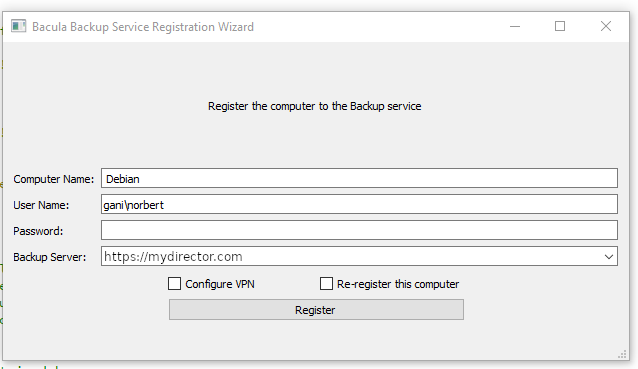
BCloud Registration Wizard
To allow customization, a script is executed to perform the actual VPN
configuration. Under Unix-like platform open_vpn.sh is called while
on Windows its ovpn_config.bat. Two parameters are passed to the
script:
location of the .ovpn config file (can be copied or moved by the script)
OpenVPN executable file location, detected by the Registration Wizard (“None” is no executable could be found).
ovpn_config.sh exemple:
#!/bin/sh
ovpn_config_file_path="$1"
ovpn_executable_path="$2"

if [ "$2" == "None" ]
then
   /usr/sbin/openvpn --config ${ovpn_config_file_path}
else
   ${ovpn_executable_path} --config ${ovpn_config_file_path}
fi
The script can be customized as needed.
Upgrade Notes
10.2.3 to 12.2.0
The major release 12.2 of BCloud Service uses a new catalog format. We provide a SQL script that converts 12.0.x and earlier catalog versions (2) to the new 12.2 format (3). Please apply it to the database using by BCloud Service.
/opt/bacula/bcloud/www/protected/conf/upgrade-10.0_12.2_postgresql.sql
After applying the SQL script, please go to Admin => Directors page on the BCloud Service interface and please fill for each defined Director Address and Port fields.
10.2.1 to 10.2.2
The BCloud version 10.2.2 can now handle multiple clients from the same
external IP address. If you have a customized version of the
vpn-post-config-script.sh script, please revert to the official
version of the script and re-apply your modifications.
10.2.1 and 10.0.8
The BCloud version 10.2.1 and 10.0.8 are now using the default OpenVPN
client directory (/etc/openvpn/ccd) instead of
/etc/openvpn/client.
It is recommended to rename the client directory (or move the existing
configuration files), adapt your custom vpn-post-config-script.sh
script (if any), adapt your OpenVPN server configuration file
(client-config-dir /etc/openvpn/ccd) and restart the OpenVPN server.
The directory must be accessible to the OpenVPN user of your system.
10.0.7
The BCloud version 10.0.7 includes a minor modification of the BCloud catalog. To apply the upgrade, do the following command:
$ psql -U bacula bacula < /opt/bacula/bcloud/www/protected/conf/upgrade-8.10_10.0_postgresql.sql
Bacula Enterprise Configuration
Resource Templates
BCloud Service will automatically generate the necessary Bacula configuration files at the ordinary user request. The following resources are automatically generated when a new system is registered by an ordinary user:
Client
Pool (generated only during the first client registration. The pool is common to all clients)
The following resources are automatically generated when the ordinary user creates new jobs:
Job
Schedule
FileSet
When a new resource is created, BCloud Service will use templates to initialize resources with custom directives.
# ls /opt/bacula/bcloud/www/protected/conf/*.tpl
Pool.tpl
Client.tpl
Job.tpl
FileSet.tpl
Schedule.tpl
Console.tpl
These template files are JSON files with resource names and default values.
# cat /opt/bacula/bcloud/www/protected/conf/Pool.tpl
{
    "PoolType": "Backup",
    "RecyclePool": "Scratch",
    "LabelFormat": "Vol",
    "MaximumVolumeBytes": "50GB",
    "VolumeRetention": "3months",
    "AutoPrune": 0,
    "Recycle": 1
}
We recommend validating the JSON file after any change with the json_pp
command from the perl-JSON-PP package.
# cat protected/conf/Client.tpl | json_pp
Please note, starting from version 12.2 the FileSet.tpl template can have complex structure as show two examples below:
{
    "Include": [{
        "Options": [{
                "Dedup": "BothSides"
        }]
    }]
}
{
    "Include": [{
        "Options": [{
                "Dedup": "BothSides",
                "ReadFifo": 1,
                "Signature": "Sha1"
        },{
                "Compression": "Gzip8"
        }]
    },{
        "Options": [{
                "Sparse": 1,
                "Signature": "Md5"
        },{
                "Compression": "Gzip2"
        }],
        "File": ["/etc/one", "/etc/two"]
    }],
    "Exclude": {
        "File": ["/exclude12", "/exclude34"]
    }
}
Please also note, that in case FileSet.tpl template the first Include section is merged with that Include section created on the BCloud Service interface. Each next Include section is just added to configuration as new Include block.
Additional directives defined in FileSet.tpl template are not visible on the BCloud Service interface except include paths.
Recommended Configuration
Bacula Systems advises the use of the following configuration:
Autopruning
The Auto Pruning process is suitable for small to medium sites. Directors with more than 50 jobs per day should disable Autopruning and schedule a pruning task with an Admin Job once or twice a day.
Job {
  Name = "ADM_TASKS"
  Type = Admin
  Schedule = DailyAt1800
  ...
  ConsoleRunBeforeJob = "prune expired volume yes"
  ConsoleRunBeforeJob = "prune allfrompool allpools volume yes"
  ConsoleRunBeforeJob = ".bvfs_update"
}
Quota and Retention Mangement
The ordinary user storage usage can be limited with a quota. This quota
can be implemented with the MaximumPoolBytes Pool directive. When
the size of the Pool reaches the given limit, jobs will stop and request
that a new volume be created, or that old volumes be manually pruned. By
default, Purged or Recycled Volumes will be counted in the total Pool
size. To avoid that situation, the “RecyclePool” directive must be set.
It is important to configure the original quota to a size that will enable users to rely on the backup system. Various recycling techniques can be configured for Bacula. The Storage directive in the Pool resource is mandatory to use the Quota feature.
[PoolTPL]
# cat /opt/bacula/bcloud/www/protected/conf/Pool.tpl
{
  "VolumeUseDuration": "23h",
  "VolumeRetention": "1month",
  "MaximumVolumeBytes": "50GB",
  "AutoPrune": "no",
  "Storage": "File1",
  "LabelFormat": "Vol",
  "RecyclePool": "Scratch",
  "PoolType": "Backup",
  "AutoPrune": 0,
  "Recycle": 1,
  "MaximumPoolBytes": "50GB",
  "MaximumVolumeJobs": "1"
}

# cat /opt/bacula/bcloud/www/protected/conf/Job.tpl
{
  "Type": "Backup",
  "Storage": "File1",
  "JobDefs": "JobTemplate",
  "MaximumWaitTime": 60
}

# cat /opt/bacula/bcloud/www/protected/conf/Client.tpl
{
  "JobRetention": "5years",
  "FileRetention": "5years",
  "AutoPrune": "no",
  "Catalog": "MyCatalog",
  "TlsCaCertificateFile": "/opt/bacula/etc/conf.d/ssl/certs/root_cert.pem",
  "TlsCertificate": "/opt/bacula/etc/conf.d/ssl/certs/centos7-64-dir_cert.pem",
  "TlsEnable": "yes",
  "TlsKey": "/opt/bacula/etc/conf.d/ssl/keys/centos7-64-dir_key.pem",
  "TlsRequire": "yes"
}

# cat /opt/bacula/etc/conf.d/Director/centos7-64/JobDefs/JobTemplate.cfg
JobDefs {
  Name = "JobTemplate.cfg"
  Type = Backup
  Level = Incremental
  Storage = File1
  Messages = Standard
  Priority = 10
  Accurate = yes
  Write Bootstrap = "/opt/bacula/working/%c.bsr"
}
Purge Oldest Volume
It is possible to configure Bacula to automatically purge the oldest
Volumes in the Pool. The Job definition must use the directive
Maximum Full Interval to regularly schedule new Full backups and
avoid a situation where the oldest Volume contains the latest Full
backup.
Client Job Retention
Bacula can be configured to prune Jobs and recycle Volumes
automatically. As with the “Purge Oldest Volume” technique, the Job
definition must use the directive Maximum Full Interval to regulary
schedule new Full backups and avoid pruning the last Full Job.
Progressive Virtual Full, Incremental Forever
With this technique, the last Full job will be merged with subsequent Incrementals into a new Full job. At the end of the Virtual Full Job, old Volumes can be recycled. The downside of this technique is that the Storage Daemon has to read/write the old data into new Volumes frequently. Bacula Enterprise Editiion’s Global Endpoint Deduplication (GED) technology can void this downside, since only the references are copied from one volume to an other when GED is used.
During the Virtual Full Job, the quota of the user might exceed the configured value. To avoid this problem, the copy can be done into a temporary pool, and at the end of the Job, old Volumes will be purged and new Volumes can be moved to the user’s Pool. This technique requires the use of a small script to update the Pool at the end of the VirtualFull Job.
For example:
#!/usr/bin/perl -w
#  Copyright (C) 2000-2018 Bacula Systems SA
#  All rights reserved.
use strict;

use IPC::Open2;
my $jobid = shift or die "Usage: $0 jobid level client";
my $level = shift or die "Usage: $0 jobid level client";
if ($level ne 'Virtual') {
    exit 0;
}
shift;                      # Eat the "Full" keyword

my $client = join(" ", @ARGV) or die "Usage $0 jobid level client";
my $pool;

# Adapt to the client format here, C_<ID>_<NAME>
if ($client =~ /^C_(\d+)_/) {
   $pool = "P_$1";              # The Pool format is P_<ID>
} else {
   print "Client format not recognized\n";
   exit 0;                      # Incorrect format for the pool
}

open2(\*OUT, \*IN, "/opt/bacula/bin/bconsole") or die "Unable to open bconsole $@";
print IN "update job jobid=$jobid pool=\"$pool\"\n";
print IN "quit\n";
close(IN);
while (<OUT>) {
   print;
}
close(OUT);
The Jobs that are migrated by the VirtualFull Job may be automatically deleted and the number of valid backups to keep can be configured in the Job template or in the JobDefs resource.
# cat Job.tpl
{
  "DeleteConsolidatedJobs": "yes",
  "BackupsToKeep": "7",
  "RunsAfterJob": "/opt/bacula/scripts/vbackup.pl %i %l %c"
}
The VirtualFull function can be enabled with the NextPool directive in all new pools.
# cat Pool.tpl
{
  "NextPool": "CommonPool"
}
The CommonPool resource should look like:
Pool {
  Name = CommonPool
  PoolType = Backup
  LabelFormat = Vol
  Storage = File1
  MaximumVolumeJobs = 1
  MaximumVolumeBytes = 50G
  AutoPrune = no
  Recycle = yes
}
The Storage resource should be a Virtual Changer configured with multiple devices.
The VirtualFull Job can be scheduled automatically once a month:
# cat Schedule.tpl
{
  "Run": [
     [
       "WeekOfMonth": [1, 2, 3, 4],
       "DayOfWeek": [1],
       "Hour": [10],
       "Minute": 15,
       "Level": "VirtualFull"
     ]
   ]
}
Limitation
SELinux is not supported and should be disabled.
Clients must have a direct connection to the Director. Clients behind NAT are not directly supported. An optional VPN tunnel can be configured automatically during the registration process.
The underscore character _ is not allowed in Client resource name. It will be replaced by - automatically.
The use of the Registration Wizard cannot be used with the option TLS Verify Peer. The directive TLS Verify Peer should be set to no.
Go back to the Bacula Enterprise User Interfaces.