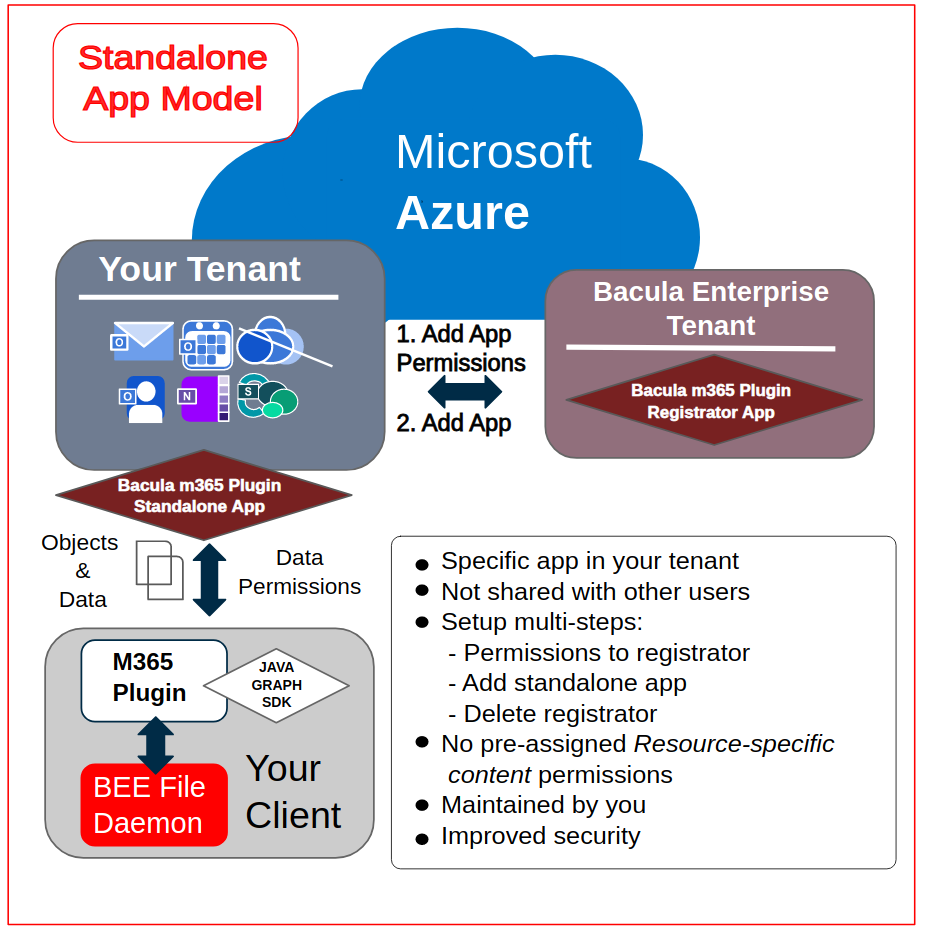
Authorization Method B: Standalone app model with ‘bacula-m365-registrator’ (RECOMMENDED)
EnterpriseBacula Enterprise Only
This solution is only available for Bacula Enterprise. For subscription inquiries, please reach out to sales@baculasystems.com.
Bacula Systems has a registered application in Azure AD named bacula-m365-registrator. This section will show how to authorize it to perform application management operations over your target tenant.
Once you authorize it, you will be able to add a new bacula-m365-plugin-standalone specifically for your tenant that you can directly control and that will be used only in your environment.
This is the recommended authorization method for any production environment.
Below we show a schema of how this authorization method works:
B-1. Authorize bacula-m365-registrator
A tenant admin must run the following query in a web browser, replacing {tenantId} with the value obtained in the first step:
https://login.microsoftonline.com/{your_tenant_id}/adminconsent?client_id=8ed4fad3-3f63-44fb-b7e0-e324895d7df9&state=12345&redirect_uri=https://www.baculasystems.com/m365-plugin-auth/standalone
You can get the exact same URL from the plugin command line itself, once you have installed it in a client named {your_client_name} using the following special Query command.
*.query plugin="m365:" client={your_client_name} parameter=register-registrator:{tenantId}
Here is an execution example where the instructions are displayed and you need to open the provided URI:
*.query client=127.0.0.1-fd plugin="m365:" parameter=register-registrator:57uia43-d107-17a2-a2g2-aa53c10tdahc
console=---- M365 PLUGIN REGISTER COMMAND ----
console=-------------------------------------
console=-------------------------------------
info=Open the following URI in a browser with your tenant admin credentials
console=-------------------------------------
console=-------------------------------------
uri=https://login.microsoftonline.com/57uia43-d107-17a2-a2g2-aa53c10tdahc/adminconsent?client_id=8ed4fad3-3f63-44fb-b7e0-e324895d7df9&state=12345&redirect_uri=https://www.baculasystems.com/m365-plugin-auth/standalone
console=-------------------------------------
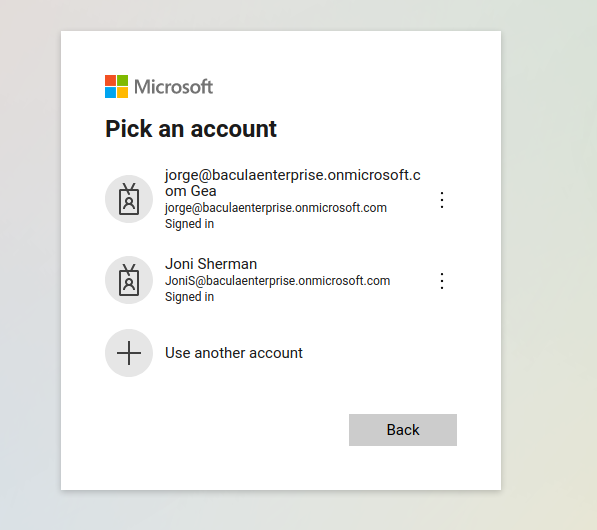
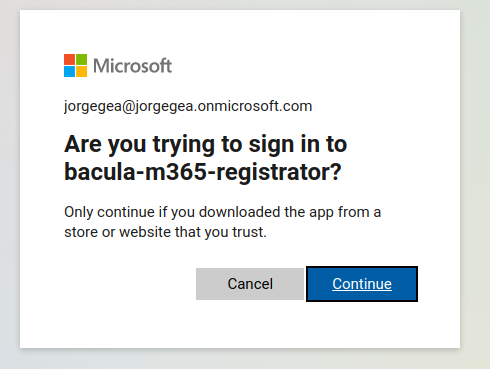
When opening the URI, Microsoft 365 will ask for credentials. You need to authenticate as a tenant admin:
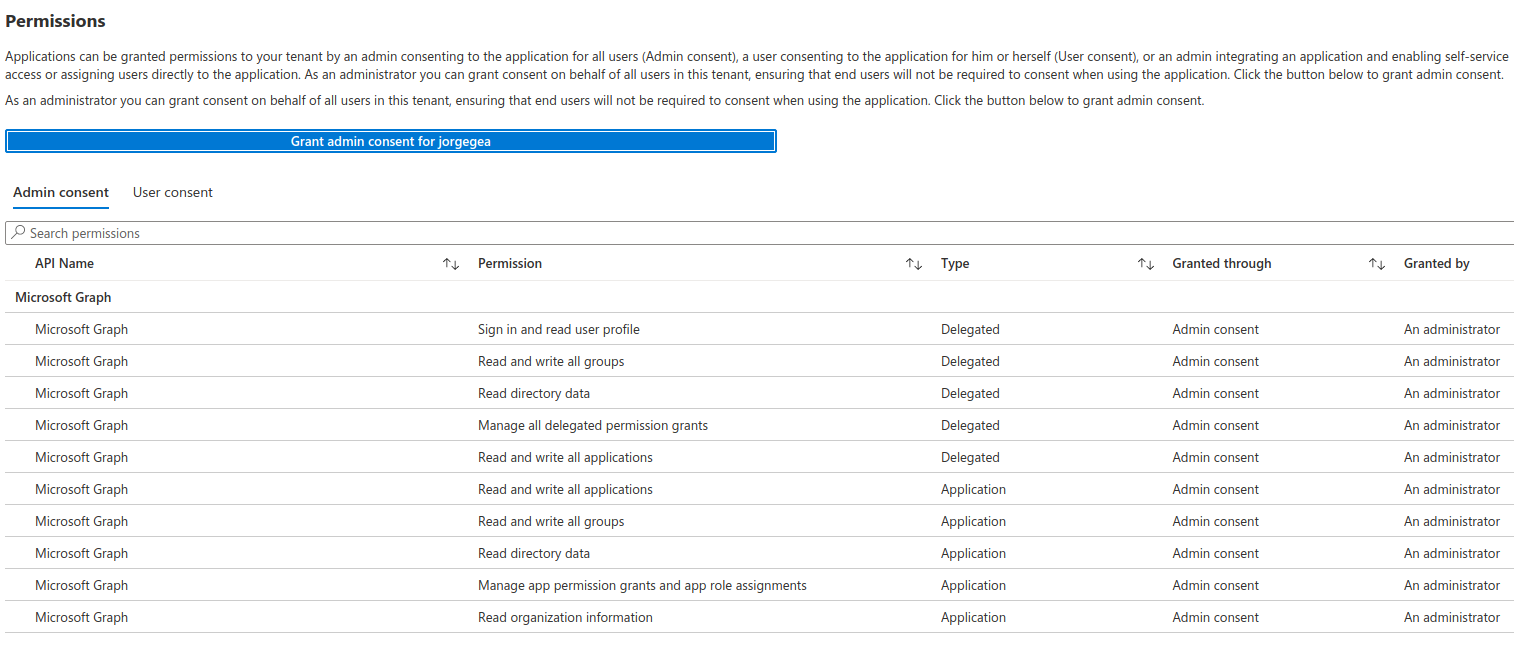
…and once they are correctly provided, the app will ask for all the required permissions to backup and restore all of the supported elements:

The application needs all of the listed permissions to be able to work. If any of them is missing, the final command to add the application will fail.
The image shown here is illustrative and some additional permission may be needed as the plugin evolves. To facilitate that information, we are listing the permissions in text alongside the reason for their need.
Graph - Sign in and read user profile: Connect to the tenant - Read and write all groups: Necessary to manage some permission grants (delegated form) - Read directory data: Find your tenant information, check service principals (delegated form) - Manage all delegated permission grants: Generate delegated permissions grants for the end app - Read and write all applications: Create/Update the new application (client credentials) - Read organization information: Find your tenant information and show user-friendly progress - Read and write all applications: Create/Update the new application (delegated form) - Read and write all groups: Necessary to manage some permission grants (client credentials) - Read directory data: Find your tenant information, check service principals (client credentials) - Manage app permission grants and app role assignments: Add necessary plugin permissions
Once it is confirmed, the browser will use the ‘redirect_uri’, which is a page on baculasystems.com that will confirm the result of the registration process.
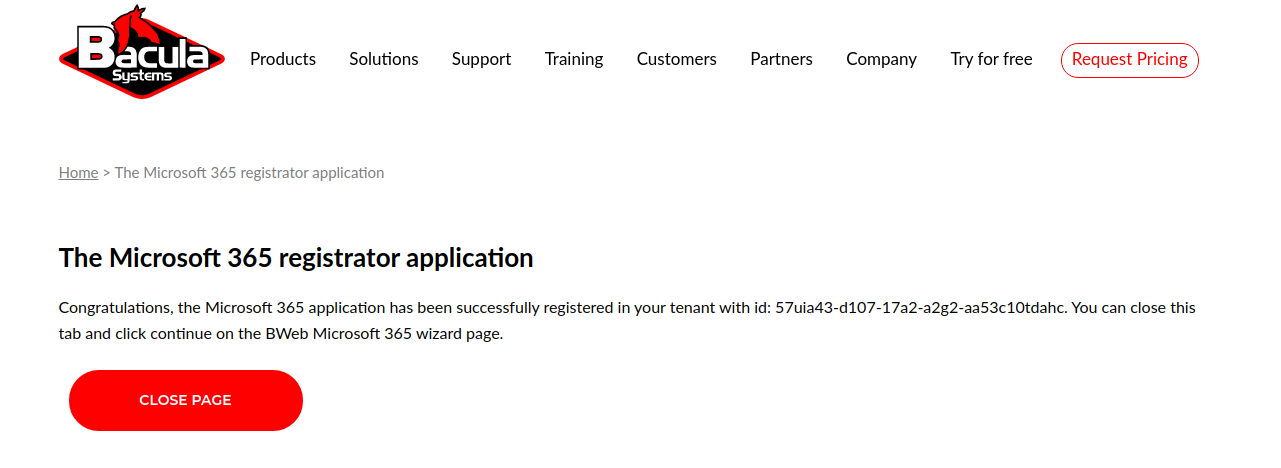
The generated URI contains the parameter admin_consent=True if the action was successful, so you will see a confirmation message in that case. Otherwise, the operation may have not been successful for some reason and you will see an error message.
Once that action is done, the tenant where our app now has permissions will show the plugin in the Enterprise Apps section:
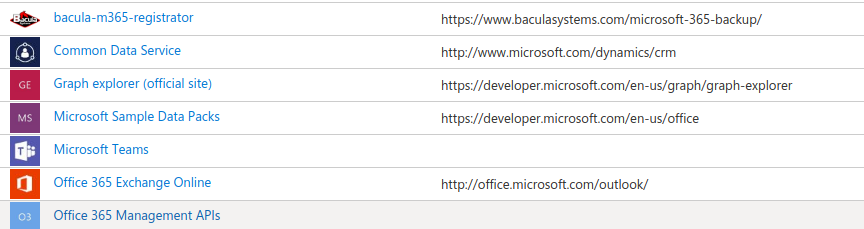
Clicking on the app, the tenant admin can always see the permissions assigned:
B-2. Add bacula-m365-plugin-standalone to your tenant
Once the registrator app is successfully registered into the target tenant, it is possible to add the bacula-m365-plugin-standalone application as a ‘registered app’ using the following bconsole command:
*.query plugin="m365: tenant={tenantId}" client={your_client_name} parameter=add-app
This command needs to run operations with ‘client credential’ permissions, but also with ‘delegated permissions’ where an admin user must be implied. Therefore, at some point during its execution it will ask for the user interaction in order to complete the authentication process using an special URL and a given code. Once introduced, we will be asked about confirming the sign-in of bacula-m365-registrator:
The process must be performed by a tenant administrator. On the other hand, Microsoft Azure service needs some time in order to present newly created objects. Therefore, the process will be paused a couple of times for about one minute.
You need to wait 2-3 minutes (minimum!) after the first registration command has been completed. If it is executed too soon it could fail, as the registrator may not be completely available yet. If this happens, please, just run the command again.
Please find an example for this procedure below:
*.query client=127.0.0.1-fd plugin="m365: tenant=57uia43-d107-17a2-a2g2-aa53c10tdahc" parameter=add-app
console=---- M365 ADD APP ----
info=Creating destination config file in: /opt/bacula/working/m365/baculaenterprise/bacula_m365_config.conf
info=Creating application: bacula-m365-plugin-standalone in tenant: baculaenterprise ...
info=Waiting a bit so MS Azure cache has enough time to show our new Application...
info=Adding certificate key credential ...
info=Adding password credential ...
info=Application successfully created
info=We don't have a valid token. Please:
info=To sign in: use a web browser to open the page https://microsoft.com/devicelogin and enter the code CG2QYSK8Y to authenticate. You need to do it with an administrator user
info=Adding owner: johndoe@johndoe.onmicrosoft.com to the application ...
info=Owner successfully added
info=Creating service principal for application ...
info=Service principal successfully created
info=Waiting a bit so MS Azure cache has enough time to show our new ServicePrincipal...
info=Granting admin consent for permissions ...
info=Admin consent granted
info=Storing access configuration to the new app in file: /tmp/regress/working/m365/johndoe/bacula_m365_config.conf
info=Access configuration successfully stored
console=---- ADD APP COMPLETED SUCCESSFULLY ----
console=-------------------------------------
info=Use the generated configuration file in your m365 filesets. Just add the property config_file=/your/path/bacula_m365_config.conf to the line Plugin="m365: ..."
info=Sample: Plugin = "m365: config_file=/opt/bacula/etc/m365/mytenant/bacula_m365_config.conf service=drive"
console=-------------------------------------
console=-------------------------------------
In case the add-app command fails for any reason, please, wait a bit and just run it again.
B-3. Utilize your generated config file
The result of the add-app command is the generation of a configuration file that is intended to be referenced in any future fileset, as the output of the command is indicating.
We recommend copying that file to a convenient common location (for instance /opt/bacula/etc/filesets) and setting the same directive in any M365 fileset:
Fileset {
     Name = FS_M365
     Include {
             Options {
                     signature = MD5
                     compression = LZO
             }
             Plugin = "m365: config_file=/opt/bacula/etc/m365/mytenant/bacula_m365_config.conf service=drive"
     }
}
The contents of the configuration file are described below:
#Thu Jul 01 12:30:34 CEST 2021                                                                     -> Generation Date
secret=xxxxxxxxxxxxxxxxxxxxxxxxxxxxx                                                               -> Password secret auto-generated
appid=1587ba33-8eer-4512-bgb1-6d65fd393f51                                                         -> Azure AD AppID of your bacula-m365-plugin-standalone
objectid=8jki8705-010p-4ee6-b2aa-c3klmn1b5b9                                                       -> Service principal ID of your Application
tenant=e4wsdf55-de8a-4a83-945a-bfaabb6fa166                                                        -> Your tenant id
sharepoint_certificate_path=/opt/bacula/etc/m365/example/bacula-m365-plugin-standalone-cert.pfx    -> Certificate generated to use PnP in Sharepoint module
sharepoint_certificate_password=fAG@2O5PoOSSU<j2u65zqEKIN<Dh~ya3AWKqK]vv                           -> Sharepoint certificate password
Please, note that once this application is generated in your tenant, you have full control of it. As a result, you can manually generate a new secret and set the value yourself at your convenience whenever this is needed, but we recommend to use the add-app command to do this, as we explain in the following section.
It is recommended to use the add-app command as a best practice, allowing you to specify the path of the configuration file (config_file=path) within your fileset configurations. By following this approach, you will not have to alter your backup configuration each time you perform an update.
B-4. Optional: Renew your secrets
The add-app command discussed in section B-3 is prepared to automatically regenerate a new password secret if it detects that the current ones are expired or close to expire (less than 3 months).
Bacula automatically generated keys feature an extended timestamp, however, they can be regenerated at any time or on a regular basis by simply executing the add-app command again, incorporating the q_addapp_renew=true parameter within the plugin string, as demonstrated below:
*.query client=example-client-fd plugin="m365: tenant=********-****-****-****-************ q_addapp_renew=true" parameter=add-app
console=---- M365 ADD APP ----
info=File /opt/bacula/etc/m365/example/bacula_m365_config.conf already exists. Contents will be just updated
info=Application named: bacula-m365-plugin-standalone already exists in tenant: example ...
info=Updating its permissions ...
info=Permissions updated successfully
info=Generating key credential ...
info=Key credential generated successfully
info=Generating new password credential ...
info=New password credential generated successfully
info=Service principal already exists
info=Granting admin consent for permissions ...
info=Admin consent granted
info=We don't have any valid token. It's needed to sign in
info=To sign in; use a web browser to open the page https://microsoft.com/devicelogin and enter the code GJL5LGXC8 to authenticate. Please do it with a tenant administrator user
info=Storing access configuration to the new app in file: /opt/bacula/etc/m365/example/bacula_m365_config.conf
info=Access configuration successfully stored
console=---- ADD APP COMPLETED SUCCESSFULLY ----
console=----
info=Use the generated configuration file in your m365 filesets. Just add the property config_file=/your/path/bacula_m365_config.conf to the line Plugin="m365: ..."
info=Sample: Plugin = "m365: config_file=/opt/bacula/etc/m365/example/bacula_m365_config.conf service=drive"
console=----
console=----
Note
q_addapp_renew is available since Bacula Enterprise 18.0.8.
Please, note that this command will also regenerate the certificate and associated password that Sharepoint module needs to function. In general, it is recommended to simply use this add-app command (or its equivalent through BWeb) to manage the authentication and access M365 and so, using the config_file that contains the details. However, if you are using different variables manually, note that you will need to update them once you run any new add-app action with the renewal behavior.
Any add-app execution requires the proper configuration of the bacula-m365-registrator app. If you have uninstalled it following the initial add-app procedure as outlined in section B-5 during the plugin installation, you must repeat the B-1 step.
It is important to recognize that this process (excluding the registration part) could be automated through the use of a suitably configured Admin Job.
B-5. Optional: Remove bacula-m365-registrator app
The registrator application has elevated permissions, as without them it would not be possible to manage applications and associated permissions. It is handy to have it if you plan to run automatically the add-app command at some point, as suggested in B-4.
However, if you want to remove it from your tenant after completing the add-app process you could do it manually or you could call the following bconsole command:
.query client={your-client} plugin="m365: tenant={yourTenantId}" parameter=delete-registrator
Please, be aware that once you do that, you won’t be able to run the add-app command. If you need to run it again after deletion, you will need to call again the register-registrator command.
Check permissions
It is possible to check if the service principal of the target tenant (this is shown under ‘enterprise applications’ in Azure AD) has all the needed permissions to perform plugin operations.
You just need to run the following command:
.query client={your-client} plugin="m365: tenant={yourTenantId} objectid={yourobjectid}" parameter=permissions
The output will report if everything is ok around permissions, or if there is any missing one:
.query client={your-client} plugin="m365: tenant={yourTenantId} objectid={yourobjectid}" parameter=permissions
info=All permissions are correctly set
.query client={your-client} plugin="m365: tenant={yourTenantId} objectid={yourobjectid}" parameter=permissions
error=Delegated permission Chat.ReadWrite was not found in your Azure service principal 8cee7605-0d5e-42b6-b269-c39f3411b5b9
error=Please review your app permissions
In case you are using the standalone application, you will need to run the command with appid and secret too:
.query client={your-client} plugin="m365: tenant={yourTenantId} objectid={yourobjectid} appid={yourappid} secret={yoursecret}" parameter=permissions
Please, run this command at any time you have doubts about the correct app permissions.
Please note though, that the command is unable to check if you have activated or not ‘Protected APIs’ for Teams and Chats. It will check the presence of those permissions, but it is up to Microsoft to enable those particular ones and they do not show (at the time of writing) any flag indicating if they are enabled or not.
See also
Previous articles:
Next articles:
Go back to: Authorization.