Note
You can download this article as a PDF
WinBMR
Introduction
Bare Metal Recovery as part of a Disaster Recovery strategy allows for much quicker (re-)installations of original software and sophisticated automatic deployment and configuration management systems. For Windows environments, where automatic deployment and configuration management can become quite opaque, Bare Metal Recovery can be an important part of a Disaster Recovery plan. Bare Metal Recovery can save a lot of time and effort in virtualized environments, where all hardware looks identical to the guest operating systems (though it should be noted that, in virtualized environments, virtual machine backups backed by LUN snapshots in the SAN can be much more effective).
For these reasons, Bacula Systems has developed procedures and tools to provide Bare Metal Recovery capabilities to its customers. In this user’s guide, we introduce the tools and related procedures for Windows systems by guiding you through a complete setup and test run of the Bacula Systems Windows Bare Metal Recovery procedure.
File-Based or Image-Based
In general, for any sort of Bare Metal Recovery, a complete backup of the original system is required. This can be done not only at the file level, where individual files are backed up, but also on the disk image level, where complete disk contents is backed up.
While both approaches have their pros and cons, we focus on the file based approach here. For image level backups, additional information can be found in the Bacula Systems white paper “VMware Virtual Machine Backup with Bacula Enterprise”.
Installation Environment
Bacula Enterprise Director and Storage daemon components, used in the backup and restore of your Windows system, can run on any supported platform. Note that you will need to modify the Bacula Director configuration, so it may be reasonable to set up a test installation in your network and use that until you are satisfied that your production backup system will not be negatively affected by your work.
We assume that you already have Bacula Enterprise installed including the required network connectivity i.e. all routers and firewalls involved should allow Bacula traffic as needed. In particular, this means that you may need to allow connections from all machines you consider valid targets for BMR to the Bacula Director.
Since Bare Metal Recovery is used as a means to get critical systems up and running quickly, it is important to ensure that the procedures planned actually work. A good deal of this testing and fine-tuning today can be done in virtualized environments; however, Bacula Systems recommends testing on your physical hardware as well – only then can you be sure of your procedures.
Prerequisites
For testing and probably fine-tuning, we recommend that you define a “real” server system to use as the source of backups, and one unused server system as the target for a test of Bare Metal Recovery. You should only run this in virtual machines if your production environment is also virtualized. It may be necessary to pre-install drivers in the source system that match the hardware devices that will be required at recovery time if the expected replacement hardware differs from the existing. This can save time installing drivers during BMR.
The source and the target servers don’t need to have Internet access, but this can make any troubleshooting procedure with our support easier.
Bacula Systems recommends that you go through the whole procedure to configure Recovery Media several times. We also suggest that you update your Disaster Recovery manual during those sessions to make sure your documented procedures really match what an operator will encounter. So, even though the final goal of doing Bare Metal Recovery is to save time, you should set aside at least one working day to get things set up, configured, created, tested and documented.
Installation
The installation of the Bacula Bare Metal Recovery for Windows Server is done in separate steps.
Downloading Files
winbmr-rescue-3.x.y.iso, this ISO image is used to boot your system for recovery. You can customize it with the ISO configurator.
winbmr-iso-configurator.exe This executable is used to pre-configure the ISO image with your Bacula Director settings and passwords. You can also configure network addresses and setup VNC for remote access.
The WindowsBMR Plugin has been included into the main Bacula Enterprise Client package since Bacula Enterprise versions 6.2.7 and 6.4.3, so no additional software installation is required on the client.
Configuring the WindowsBMR Rescue ISO
You can preset your Bacula configuration inside the Recovery Image
itself to simplify the restore procedure. To customize your rescue
CD-ROM, you must use winbmr-iso-configurator.exe. Start the program,
locate your ISO file, and edit the fields you want to customize. When
done, you can restart the program to check the values and change them
whenever needed.
None of these fields are mandatory and setting a value for one will only pre-fill the field in the rescue application. You will still be able to modify this value at recovery time.
Any of these fields can also be initialized using the command line with
the appropriate option. Run the program with the -h option to get a
list of all these options. The name of the options are also included
under parenthesis below for reference. You can see how the GUI looks
like at figure SetupConfig.
The first field is the keyboard.
Keyboard(
–keyboard, “US” by default). You can get a list of available keyboard layouts using the option–list-kb. Don’t forget to use quote for name that contains spaces.
Then come the fields related to your Bacula setup. These are identical to the fields shown in the configuration screen of the rescue program, figure BaculaConfig.
Your Director’s Catalog (
–catalog, set to “MyCatalog” in this document). If you have only one catalog, you can keep it blank because this catalog will be automatically selected by the rescue program even if you have given another name here.Rescue client name (
–cli-name, set to “rescue-fd” in this document), this is the name of the bacula-fd client running on the machine being restored.Rescue client password (
–cli-pass, set to “password” in this document)Rescue client port (
–cli-port, 9102 by default)Director’s name (
–dir-name, set to “zbackup-dir” in this document))Director’s address (
–dir-address, set to “zbackup” in this document))Director’s port (
–dir-port, 9101 by default)Rescue console password (
–cons-pass, set to “password” in this document)Client version (
–cli-version, auto by default). To support a wider range of infrastructures, multiple versions of the Bacula FileDaemon are embedded into the image. You can select one specific version or select “auto” and let WindowsBMR choose the appropriate version regarding your director version at recovery time. You can get a list of available client versions using the option–list-cli-version). “auto” selects the latest version of the client compatible with your Director.
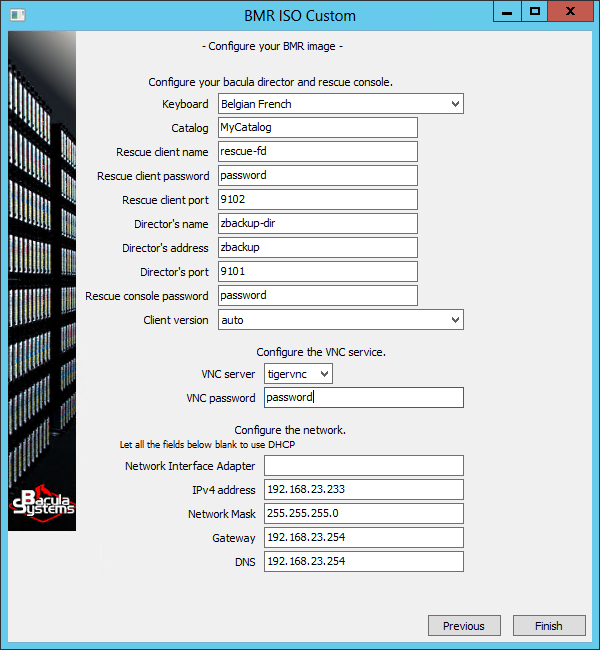
Customize the ISO Image
Next is the VNC configuration data:
VNC Server (
–vnc-server, set to “tigervnc” in this document). You can keep VNC disabled or choose between TightVNC and TigerVNC . If you have some refresh issues with one VNC server, try the other. However, only TigerVNC supports IPv6 and SSL.VNC password (
–vnc-password, set to “password” in this document).
You can assign a static IP address to your machine. If you want to use
DHCP instead let the IPv4 address field blank.
Network Interface Adapter (
–net-ifname, set to “<blank>” in this document). When left blank, the rescue program will assign the address to the first adapter that is connected.IPv4 address (
–net-ipaddr, set to “192.168.23.233” in this document).Network Mask (
–net-netmask, set to “255.255.255.0” in this document).Gateway (
–net-gateway, set to “192.168.23.254” in this document).DNS (
–net-dns, set to “192.168.23.254” in this document).
The command line interface has some special options
–iso FILENAMEuse the given ISO image filename.–no-guiwill not show theGUIinterface.–list-kbshows a list of known keyboard layouts.–list-cli-versionshows a list of known client versions.
For example to setup some parameters of your ISO image without starting the GUI, you can use :
C:\> winbmr-iso-configurator.exe --no-gui --iso winbmr-rescue-3.4.0.iso
   --cli-name=rescue-fd --cli-pass=xxx --cli-port=9102 --cons-pass=xxx
   --dir-address=10.10.1.2 --dir-name=bacula-dir.lan --dir-port=9101
Preparing your Bacula Installation
Now it is time to configure your Bacula installation to add the WindowsBMR services. We will not discuss the details of normal configuration of Bacula here because we assume that your Bacula Enterprise is already installed and configured.
The BMR procedures require you to add some resources to the Director’s configuration. The required additions can be grouped into several categories. You may freely choose Passwords and names for File Sets, and Clients etc.
WindowsBMR Plugin for Windows Clients
As noted, in versions later than 6.2.6 or 6.4.2, Bacula Enterprise
includes the WindowsBMR plugin with the main installer
bacula-enterprise-win32-x.x.x.exe or
bacula-enterprise-win64-x.x.x.exe.
A BMR Enabled Client Job
Below is typical Job resource for a BMR-enabled backup:
Job {
  Name = "WinBMR-job"
  JobDefs = "DefaultJob"
  Level = Incremental
  Client = your-windows-fd
  File Set = "WinBMR-set"
}
For those users who have used a WindowsBMR prior to version 3.0, please be aware that the new WindowsBMR version 3 is packaged as a plugin and does not need or use the Client Run Before Job setting in the Job resource as was the case with previous versions.
File Set Considerations
The second part of setting up your WindowsBMR job is to include the WindowsBMR plugin in your FileSet resource.
Since BEE version 16.0.9, it is recommended to use the new version=2 option, see below. You don’t need to upgrade your old FileSet, it will continue to work as before.
The File Sets used to back up Windows systems for BMR purposes must contain the Plugin = winbmr line to enable the WindowsBMR plugin. The plugin searches for and includes all drive letters automatically.
Although we do not recommend it, if you are careful, you may exclude some drives by using the Exclude subresource. However, take care to exclude only existing drives, because unused letters are assigned by WindowsBMR to “hidden” partitions during the time of the backup. If you exclude one of the letters used by WindowsBMR then the matching partition will not be backed up and the system will probably not boot at restore time.
FileSet {
  Name = "WinBMR-set"
  Enable VSS = yes # default, but make sure it's enabled!
  Include {
    Options { Signature = MD5 }
    Plugin = winbmr
    # Plugin = "winbmr:exclude=F,G"  # not recommended
  }
}
Above, we show an example of the “exclude” option. Be careful to use the exact same notation, the double quotes are important.
The new version=2 option has been designed to be used specifically in conjunction with the File=/ directive inside the FileSet.
When the option version=2 is used, the winbmr plugin will:
not modify the FileSet that will be used by the File Daemon. This is a major difference with the normal winbmr behavior. When the “version=2” option is not used, the normal winbmr behavior will add the system/recovery disk if there is any present in the system.
ignore any exclude=XXX option of the plugin as it cannot apply it to the FileSet because of the previous rule. You must use an exclude option block instead.
mount any system/recovery partitions (if not already mounted) before the beginning of the backup and dismount it after the end of the backup (if it was not mounted). This behavior doesn’t change.
If the directive File=/ is used, Bacula will include any system/recovery partition that is mounted at the time of the backup. Else, you must include it yourself usually using a File=T: directive in the Fileset. Be careful, the T: letter depends on the drive letters available when the plugin mounts the partition.
Copy the content of the EFI partition (if any) into “C:BaculawinbmrpartitionsEFI”. You must of course be sure that C: is backed up. File=/ always backs up C: (if it is not excluded). If that’s not the case, you have to add the File=”C:” directive to your FileSet yourself.
Remember that in a Windows FileSet, the “File=/” directive will back up all the drive letters. If OneFs=no is specified (in the last Option block because others are ignored), all the mount points below the selected drives will also be included and recursively. A drive or a mount point will be selected only if it is not listed in the Exclude block. VSS will only snapshot the volumes (drives or mount point) that have been selected.
A typical FileSet using this new option looks as follows:
FileSet {
  Name = "Winbmr2-FileSet"
  Enable VSS = yes
  Include {
         Options {
                signature = MD5
                compression = LZO
                # Implicitly Include directories that are mount point for other Filesystems
                OneFs = no
         }
         Options {
            # In this Option block, excludes files and directories
                # that are not mount points or drives
                Exclude = yes
                OneFs = no # only the last one matter

                WildDir = "*/$Recycle.Bin"
                WildDir = "*/$RECYCLE.BIN"
                WildDir = "*/System Volume Information"
         }
         # use the new "version=2 " winbmr option with the File=/ directive
         Plugin = "winbmr: version=2"
         File = "/"
  }
  Exclude {
         # exclude mount points and drives here
         File="F:"
         File="C:/mount"
  }
}
This FileSet will also work well without the winbmr plugin line, of course you will lose the “BMR” feature, but the backup will be valid.
If for some reason you don’t want to use File=/, you can replace it with something like:
File = "C:" # always if you are doing a winbmr backup
File = "D:"
File = "T:" # if you have a system partition, you must include it manually and verify that the drive name match the one used by the winbmr plugin
And to answer a question that you have: If you have 3 volumes with mount points that are stacked on each other:
H:/ (volume1)
H:/mnt (volume2)
H:/mnt/submnt (volume3)
and a FileSet like this one:
FileSet {
  Name ="XXX"
  Enable VSS = yes
  Include {
    Options {
      Exclude = yes
      OneFs = no
    }
    File="H:"
  }
  Exclude {
    File="H:/mnt"
  }
}
it will back up the content of H:/ and H:/mnt/submnt but not goes into H:/mnt. It will create a snapshot for H:/ and H:/mnt/submnt but not for H:/mnt
Note that there was a bug in the winbmr plugin in version prior to 16.0.12 when using the “estimate” command. The system/recovery filesystem that have been mounted by the plugin were not dismounted. This doesn’t not disturb the next winbmr backups. Since version 16.0.12, “estimate” doesn’t mount any filesystem and doesn’t update the partition layout.
Restore Job Considerations
A restore Job resource which does not have any RunScript
directives is needed by the WindowsBMR restore process. Which restore
job to use can be chosen by the user (see figure SelectJob) from a
list of such jobs. The single restore job of a default Bacula
configuration meets this requirement.
Handling of Windows Volume Mount Points
Note that all paths containing a mount point must be named using ASCII characters exclusively, as otherwise at restore time the mount point will not be re-created. This limitation will be removed in a future WindowsBMR version.
If you cannot assign a drive letter to your Volume, you must explicitly add the path to your mount point directory to your FileSet resource. At restore time choose “Manual Partitioning”, create the Volume and mount the file system to its correct location before starting the restore. Do the same if the path of your mount point contains non-ASCII characters.
How the WindowsBMR Works
During backup, the WindowsBMR plugin analyzes host disks and partitions.
It creates the directory C:/Bacula/winbmr and copies certain files
and directories needed at restore time to that location (only a few MB).
If a “Recovery” or a “System Reserved” partition is found, the plugin
assigns an unused drive letter (usually the first free letter starting
at T:) to it for the time of the backup. This drive letter is released
at the end of the backup. If the system is EFI-enabled, the EFI
partition is automatically mounted, its contents copied to
C:/Bacula/winbmr/partitions/EFI, and the partition then unmounted.
The plugin adds all static volumes that have a drive letter assigned to the backed-up FileSet. As mentioned above you may exclude some drive letters using the “exclude” option, but be careful to not exclude an important drive or an unused letter (like T:) which the plugin might use for the “hidden” partitions.
Here are the directories and files you will find in the C:/Bacula/winbmr directory:
C:/Bacula/winbmr
C:/Bacula/winbmr/data
C:/Bacula/winbmr/data/bcd.bak
C:/Bacula/winbmr/data/bcd_active.txt
C:/Bacula/winbmr/data/bcd_all.txt
C:/Bacula/winbmr/data/disklayout.txt
C:/Bacula/winbmr/data/the_bacula_rescue_for_windows
C:/Bacula/winbmr/partitions
C:/Bacula/winbmr/partitions/EFI
...
Attention: The rescue process is case sensitive and expects to find the above files in this exact directory name: with an uppercase ’B’ and lowercase ’w’.
The BMR Rescue Access
The Director configuration entries presented next are required to run actual BMR Restore Jobs.
The client defined below will run from the Recovery Media during the
WindowsBMR restore process and is a special client that is used for all
WindowsBMR restores and thus should have a different name from any of
the clients used for backup. The “0.0.0.0” address will be updated
during the recovery process with the correct address of the host
(client) on which you are restoring. We recommend that you use the name
rescue-fd and to not use this particular client for any non-BMR
operation. Under BWeb, go to the configuration part under Console and
click on the Set BMR Console wizard to create all necessary
resources called rescue-fd.
Client {
  Name = rescue-fd        # cliname, same as Console
  Password = "xxxpassxxx" # clipass
  FDPort = 9102           # cliport

  Address = 0.0.0.0      # dummy address
  Catalog = MyCatalog
  File Retention = 30 days
  Job Retention = 6 months
  Auto Prune = Yes
}
The named console defined below is used for BMR operations. It is important that it allows access to all needed Catalogs (Bacula Systems recommends using only one Catalog, unless there are some very specific requirements involved), Clients, Jobs and Locations. Limiting Access to Commands, Storage, Jobs, Pools and File Sets can be safer, but it depends on your configuration. We will show how to tune access control lists (ACLs) later in this manual. For a first try we recommend to set all ACLs to “*all*”.
Console {
  Name = rescue-fd          # cliname, same Client
  Password = "xxxpassxxx"   # conspass

  CommandACL = *all*
  ClientACL = *all*
  CatalogACL = *all*
  JobACL = *all*
  StorageACL = *all*
  ScheduleACL = *all*
  PoolACL = *all*
  FileSetACL = *all*
  WhereACL = *all*
  # The next two ACLs are required when using
  # Bacula Enterprise 8.8.0 and above
  UserIdACL = *all*
  DirectoryACL = *all*
  # This last ACL is available when using
  # Bacula Enterprise 8.8.0 and above but is not required
  RestoreClientACL = *all*
}
The client and console resources shown above must have the same name. Also as mentioned above it would be a bad idea to use the name of a production server as doing so makes it possible to accidentally do a BMR restore to a production server thereby destroying it.
Using the Recovery Media
You now have a CDROM and an ISO image. For testing purposes, on physical servers, the CD-ROM is the best choice, while in virtual machines, the ISO image should be used. It is also possible to create a bootable USB flash drive from the ISO. Creating a bootable USB device from the ISO is described in a later chapter. If you need a bootable USB device please create it now before proceeding.
Starting the Recovery
Proceed by attaching the Recovery Media to your test recovery system, which should be set up with an empty disk (or several empty disks, if that matches your production needs). Make sure the test system will boot from the Recovery Media by setting the BIOS options accordingly. It may be necessary, for example, to disable secure boot while performing the recovery and re-enable it afterwards.
The actual recovery procedure is initiated and configured manually; although this has the disadvantage that physical or remote console access to the system is required, we consider this to be the safer approach for a procedure that could otherwise lead to data loss.
When your client to recover boots, it will start the minimal Windows on the Recovery Media, set up its network, and display the Bacula splash screen: (Figure Splash)
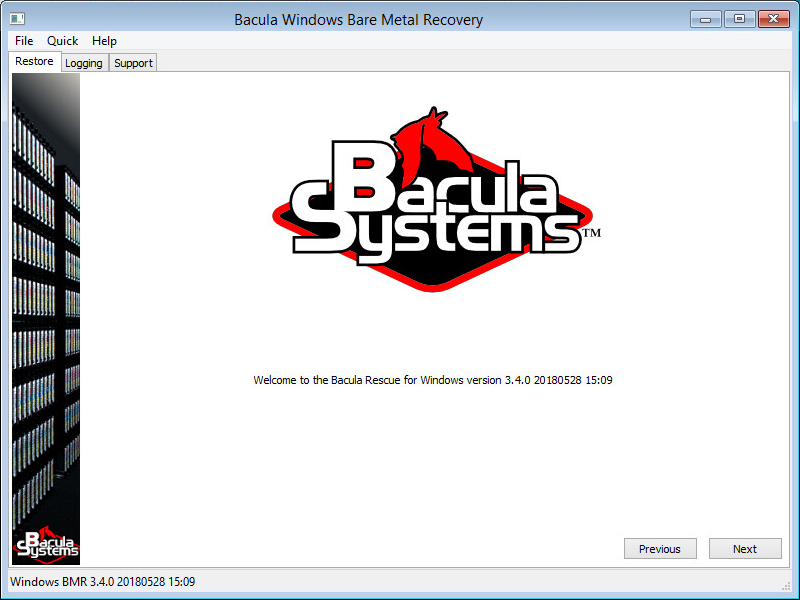
Recovery System Booted
Click “Next” and select your keyboard layout in the list. You can double click on the line to avoid to have to click the “Next” button. After that the program will restart to take the keyboard change into account and return to prompt you.
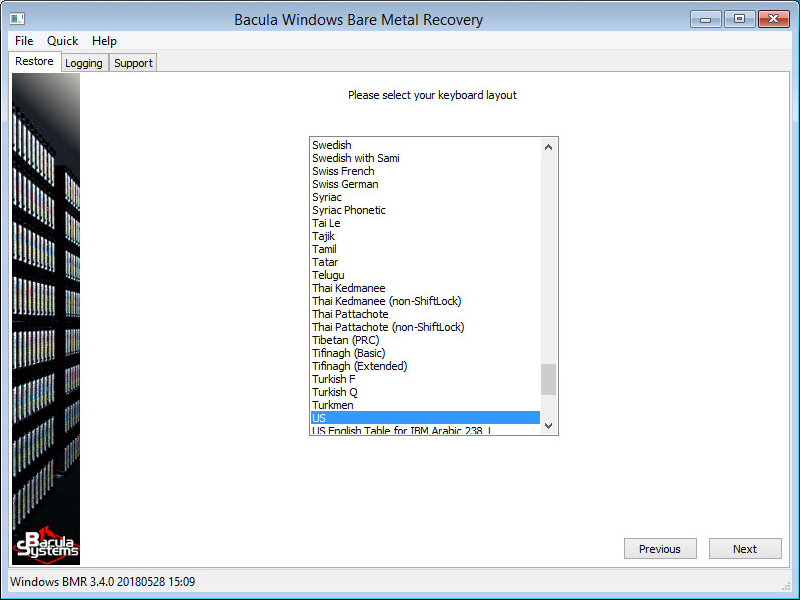
Select your Keyboard Layout
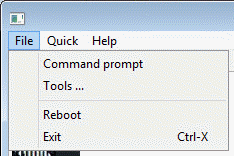
If your network is not configured with a DHCP server or if you did not pre-configure your ISO image with static addresses, you must configure a static IP address using the Network setup dialog box started from the Tools menu item in the File Menu.
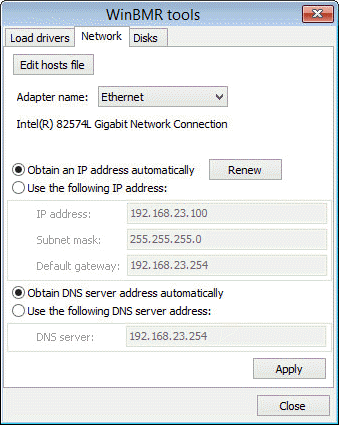
Configure the Network
WindowsBMR now lets you review and modify the Bacula configuration
(Figure BaculaConfig) that is stored on the Recovery Media. You can
pre-configure your Recovery Media using the configurator. See the
Configuring the WindowsBMR Rescue ISO to learn how and find some
information about the available configuration options.
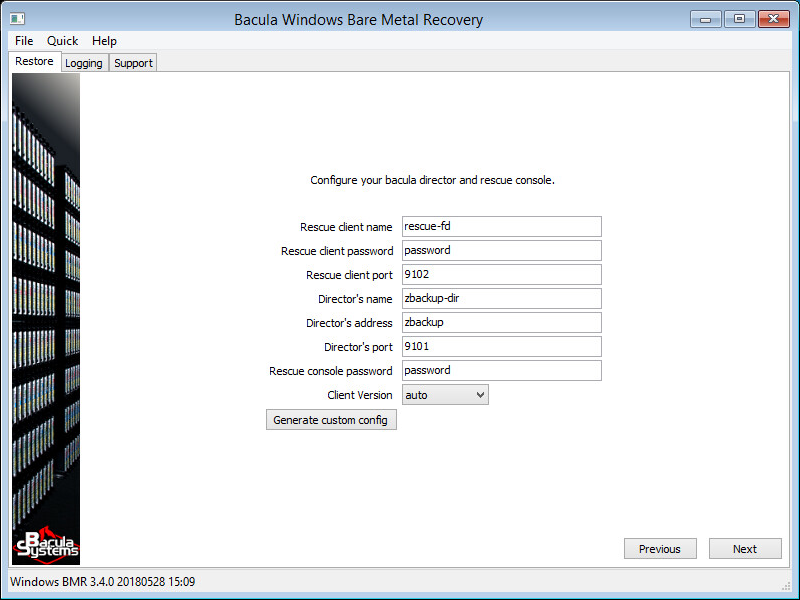
Configure Bacula
If the host cannot connect to your Director or if the Director cannot connect back to the recovery file daemon you will get an error message. Please read the message carefully to know which parameter is wrong and correct it. When your setup is OK, the program will go to the next screen.
When your director has more than one Catalog configured, WindowsBMR shows you this extra screen (Figure SelectCatalog) to select the catalog you want to use.
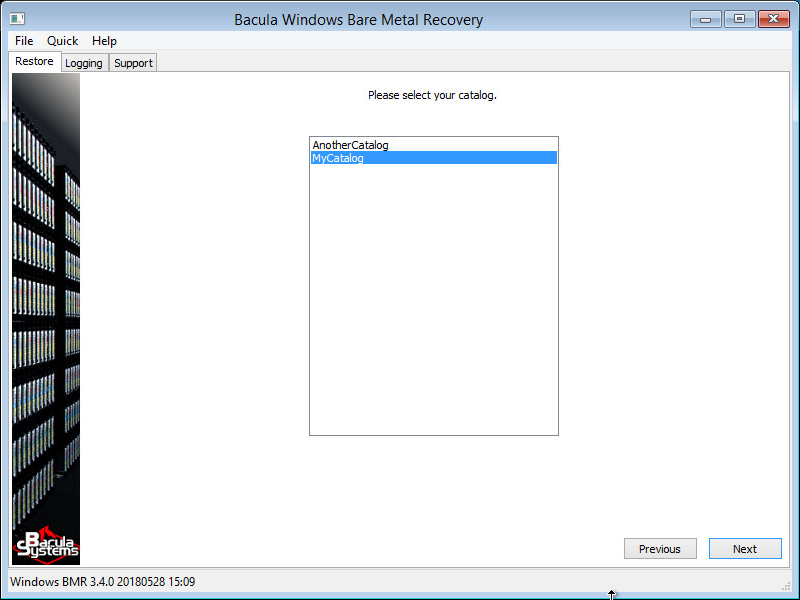
Catalog Selection
Then you will be presented with a screen to select the client you wish to recover (figure SelectClient). You can type some characters in the filter box to reduce the number of clients in the list. The match doesn’t need to start at the beginning of the client name, but any sub string can match the filter. No wildcard characters are supported.
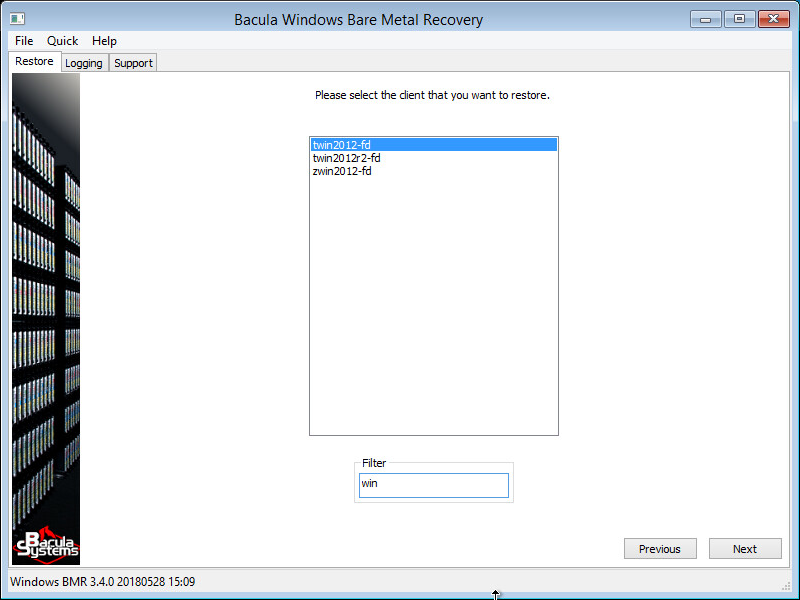
Client Selection
The next screen shows the date and time stamps of all successful backups
run from the selected client. The list displays the date, the job level,
Incremental or Full, the JobId and the name of the Job.
Unfortunately we cannot filter the jobs to display only valid
BMR-enabled backups in a reasonably short amount of time. If the
selected job is not a valid BMR-enabled backup, the program will ask you
to choose another one. At the bottom of the screen, the program will
automatically select a restore job template; you can choose a different
one if needed. (Figure SelectJob).
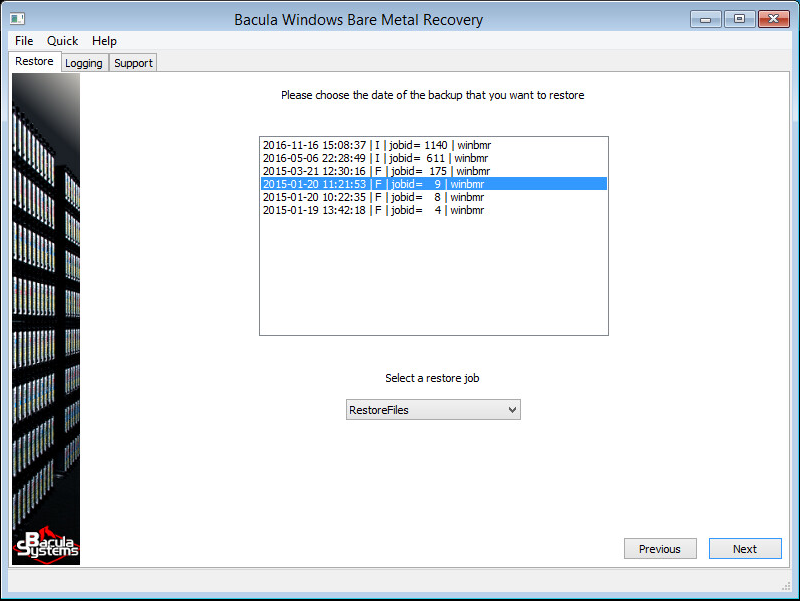
State to Restore
Information, both from the backed up and the local system, is then collected and the next three screens will help you create partitions, format them and select to which of them the data will be restored.
Managing Disk Drives
The BMR process will recommend that you remove any existing dynamic disk volumes on the destination disk and allow automatic partitioning. You can decide to use your existing partitions instead if you are confident they are correctly configured.
The next three screens may look difficult to understand, but most of the time the default settings are what you want and simply clicking “Next” will do the job. If the number of disks on the target host is different or if the disks are too small, then you will have to modify the configuration by making appropriate selections on these screens.
The screens have been designed to be very flexible and also allow partitioning operations to be done manually and finishing the restore within the tool. In most cases, however, the program will work correctly without extra operations.
To understand the details of these three screens it is important to be aware that a “Volume” is located on a partition or a dynamic disk and has been formatted and has a drive letter assigned. WindowsBMR can only handle “Volumes” that have a drive letter.
Some partitions that are not backed up by WindowsBMR (because they are not required), like the MSR, are not shown in the screens below, but they will be created because they are required. Other “system” partitions like the “EFI”, “System Reserved” and the “Recovery” partitions are usually hidden and not seen by the user. These partitions may be important in the boot process and are backed up by WindowsBMR. These can be excluded and merged with the C: drive at restore time. Most of the time, it is advisable to keep them in the restore process and the recovery will be successful. (Figure Partitioning).
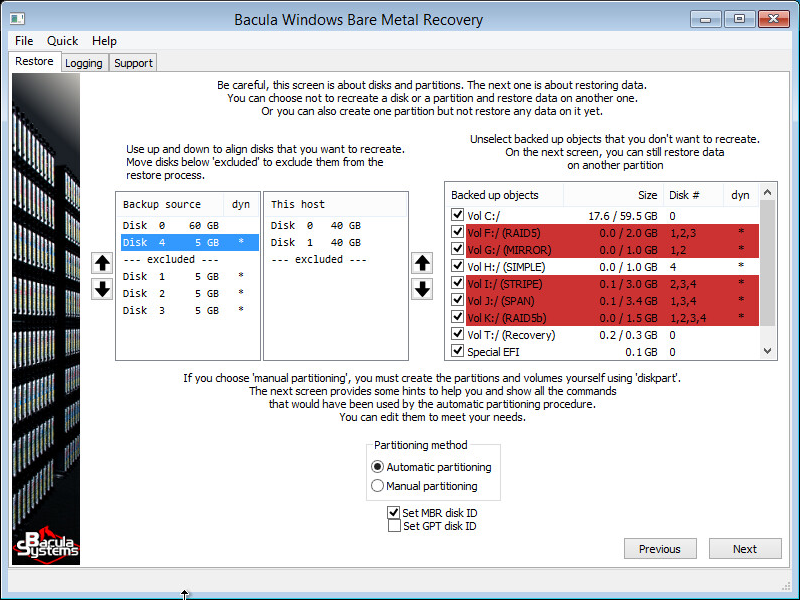
Disk Matching and Partitioning
The first of the three screens mentioned is about disk matching and partitioning. The goal is to match disks of the source host (original machine backed up) with disks on the target host (machine to which you are restoring which is usually the same as the source host but could be a replacement machine). It is possible that disks on the target host are of different capacity and appear differently numbered than those of the source host.
Use the two lists on the left to do the matching. Use the arrows on both sides to move disks up and down. Disks below “–excluded–” will be ignored. If the exclusions are on the left, “volumes” that are located on them (the source host) will not be created and are displayed in red in the list at the far right.
Disks below the “–excluded–” bar on the right will be left untouched (if you have data on these disks they will normally be unchanged by the restore process).
Be careful that the bootable disk on the source is aligned with one on the target. Usually both “disk 0” have to be aligned.
The list on the far right displays the “Volumes” that have been backed up. If you unselect a volume, it will not be created. The fact that the volume will not be created does not imply data can not be restored to another location! For example, if you have a C: and a D: drive on the same disk, you can skip the creation of the D: drive but still restore data from D: to the C: drive.
The “dyn” column on the left tells you if a disk is part of a dynamic “Volume”, and the last column on the right tells you which of these dynamic “Volumes” are on which disks. The column “size” on the right shows two values, the first one is the space used on the volume and the second one the size of the source volume. The space used is only an estimate and should always be less or equal to the size needed for the restore.
If the disk to which you are restoring your data is of a different size, the size of the last partition will be automatically adapted to fit the new disk size.
The “Set disk ID” checkboxes at the bottom allow you to decide if the re-partitioned disks should be assigned their original disk IDs. Windows may encounter problems if two disks with the same disk ID exist on the same machine. Our default setting provides the best user experience. You should change this setting only if you are aware of the resulting consequences. Please contact support with any questions.
If this interface is not flexible enough for your needs, you can select the “Manual partitioning” radio button. (Figure ManualPartitioning). If you want to create additional partitions, you must select the manual mode, as it is not possible to create new partitions with the current interface.
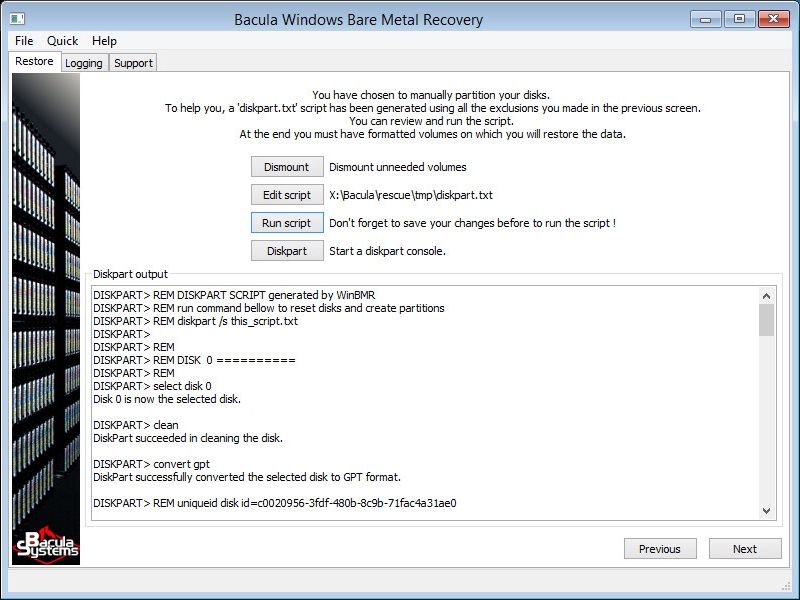
Manual Partitioning
At the end of the manual partitioning process, you must have created and formatted the “Volumes” to restore your data as well as all the system partitions. You must have assigned drive letters to be able to select them during the following steps.
To help you, this screen provides all the information that the auto-partitioning procedure would use. You are free to use your own tools, or even to have pre-partitioned the disk before booting the WindowsBMR media. Once the disk layout fits your needs, click “Next”.
The steps you can do are the following: First you should understand that simply clicking “Dismount”, then “Run Script” and then “Next”, will do exactly what “auto-partitioning” mode does.
The “Dismount” button un-mounts all drives. Only the X: drive will stay after this, even the CDROM drive letter will have been dismounted. This will avoid drive letter collision later on, but please be aware that you must not use drive X:.
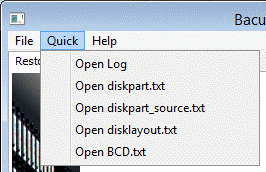
A script “diskpart.txt” has been generated for you. You can push the button “Edit script” to edit it. The script has been generated using the information from the previous screen. If you have excluded disks or partitions you will see the changes in the script. The script contains some comments to help you. The original size of the partition and the disk ID are sometimes commented out. You can uncomment the line or copy the size into the “create partition” command.
The original script cleans up existing partitions on each disk it will re-partition. Thus you can run the script repeatedly, without the need to manually clean up partitions in between.
When done you must save the file and click the “Run script” button to run it. You will see the script output in the text area below. Since the program does not detect errors at this point, please read this output carefully and search for any errors then modify your script until you corrected any and all errors.
Keep in mind that WindowsBMR uses drive letters. You must format and assign a drive letter to all the volumes that you want to use during the restore process.
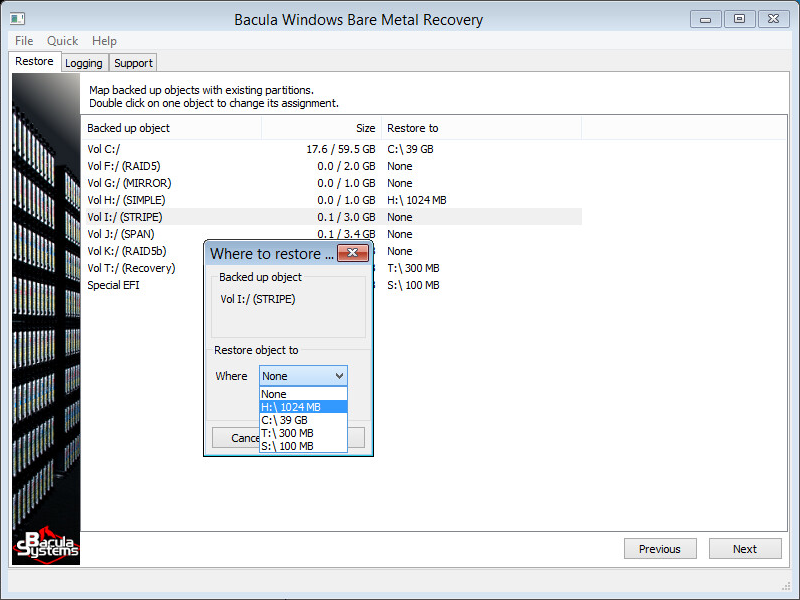
After the automatic or the manual partitioning of your disks, the “Volume matching” screen is shown. (Figure VolumeMatching).
Volume Matching
On this screen, you have to tell the program where you want to restore your data to. The objective is to match the drive letters of your source host to the drive letters of the target host. The program has automatically matched the “Volumes” using the same drive letters. Normally, C:/ (here we use the Bacula notation) will go to C:\ (with the Windows notation) and the same for other drive letters. If you have fewer disks or excluded some partitions, you will get orphaned “Volumes” that are going to nowhere (None). You can double-click on the right column to change the “Volume” assignment.
On the other hand, if you don’t want to restore a “Volume”, you can set it to None and possibly restore it later, after having rebooted the system.
Restore Progress
When ready, click “Next” to start the restore.
Restore Status
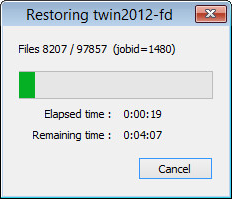
The (figure RestoreStatus) window shows you the progress of the restore.
You can “Cancel” the process and go back to make further changes, and start a new restore process.
When done, the (figure Final) screen shows the status of the restore and the status of the process making the host bootable. Error messages and success status are only indicative – you can know the final status only after having rebooted. Check any error or warning messages (if any) to see if they are critical for you and ask our support team if you are worried.

Final
Click “Next” to reboot the system. If you have questions for our support team, download the log of the restore in advance, since our support may ask for it. See the “Troubleshooting” section to know how to get the bssupport.zip file.
When rebooting the machine don’t forget to remove the rescue BMR disk / USB key to prevent booting into the rescue system again.
If don’t want to reboot immediately, the command wpeutil reboot can
be used to reboot later and the command bsrescue will start the
bare-metal recovery program again.
Finalizing a Windows BMR Session
In some cases, after the actual BMR process is finished, some additional tasks may be needed.
For example, if the recovered system does not boot, repairing the system using the repair options of the original Windows installation media may be needed. Also, for Active Directory servers, it may be necessary to follow Microsoft’s guidelines to get a consistent state of the AD databases and synchronize with other AD servers.
If your setup includes dynamic disks, you must import them in the freshly restored system after the reboot. You can do that from the disk manager or using “diskpart” by selecting one of the dynamic disk and using the “import” command:
select disk <XX>
import
Remote or Head Less recovery using VNC
It is possible to do the BMR of a remote or a head less machine using the VNC protocol. You can choose between TightVNC and TigerVNC server. Only TigerVNC supports SSL connections. You must enable VNC and setup the password on the ISO image using our winbmr-iso-configurator.exe tools. See the Configuring the WindowsBMR Rescue ISO section to learn how.
The VNC server is started at startup. You must know the IP address of your machine to connect to it. The port used by VNC is the default one, 5900. Notice that the IP address is displayed by the console just before the WindowsBMR program starts, but if you don’t have access to the console you’ll need to know the IP address or be able to find it in another way.
More About the GUI
The GUI includes some “helpers” that can be useful in some circumstances.
The Tools Dialog Box
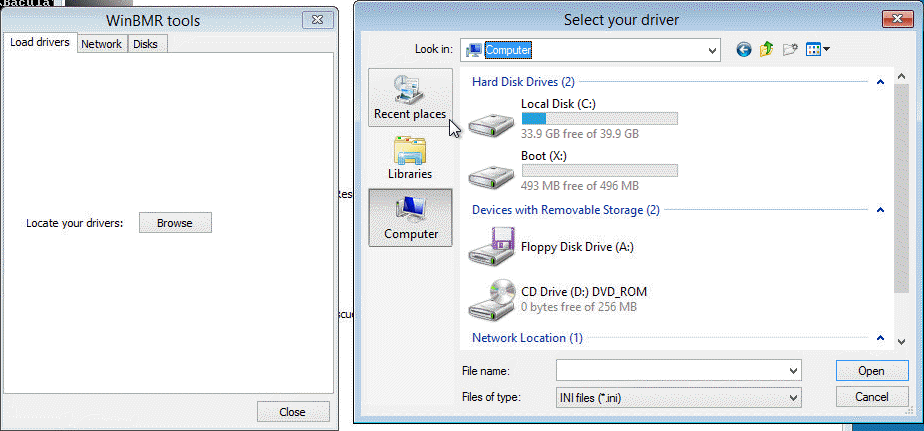
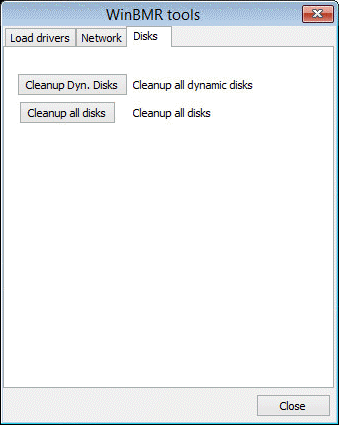
The tools dialog box allows you to load drivers, setup your network adapter or remove any existing partitions from your disks.
Load Drivers

Network Configuration
Cleanup Disks
The Logging Tab
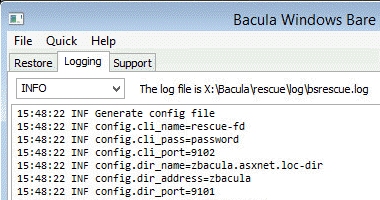
Next to the “Restore” tab is the Logging tab that displays all log messages of the program. You can filter messages by level.
Logging Tab
The Support Tab
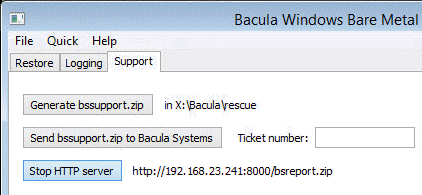
The “Support” tab allows generation of a report file called “bssupport.zip”. The file can be uploaded directly to Bacula support through HTTPS protocol or downloaded through HTTP protocol via a built-in server. If you already have a ticket open, then supply the ticket number while sending the file to the support. If not, use any identifier that can help the support to easily identify your report.
Support Tab
Troubleshooting
Backup
Before starting any BMR test, you must be able to back up files on your source host with Bacula Enterprise. Then you must be sure that the WindowsBMR plugin is correctly installed and working. Use the command “status” in bconsole to check the status of your source client :
*status client=zwin2012b-fd
Connecting to Client zwin2012b-fd at zwin2012b:9102

win2012b-fd Version: 6.2.4 (04 May 2013) VSS Linux Cross-compile Win64

Daemon started 18-May-13 12:15. Jobs: run=2 running=0.
Microsoft (build 9200), 64-bit
Heap: heap=0 smbytes=132,812 max_bytes=394,019 bufs=110 max_bufs=228
Sizes: boffset_t=8 size_t=8 debug=0 trace=1 mode=0,2010 bwlimit=0kB/s
Plugin: alldrives-fd.dll winbmr-fd.dll
The “Plugin” line shows that the winbmr-fd.dll is installed.
You can get more debugging information from the “trace” file in “C:Program FilesBaculaworking”, if you enable debug tracing from the console with:
*setdebug level=20 trace=1 client=zwin2012b-fd
Connecting to Client zwin2012b-fd at zwin2012b:9102
2000 OK setdebug=20 trace=1 hangup=0
Restore
All the critical information for restoration is compiled in the bssupport.zip file. This file can be generated, downloaded or directly sent to Bacula Systems support from the “support tab”. Read the section about the “Support tab” for more information.
File transfer to and from the WindowsBMR environment
If you need to transfer files to or from the WindowsBMR environment, you can use:
A USB stick
FTP
SCP (ssh copy)
mount a network share using command “net use”
USB Stick
You can use the command below to display all connected drives and identify your USB key:
echo list volume | diskpart
Use the command “xcopy” to copy a directory recursively :
X:\Bacula\rescue\restore>xcopy temp h:\ /e
FTP
Here is a sample of using FTP to upload and download a file.
X:\Bacula\rescue\restore>ftp ftp.yourserver.net
Connected to ftp.yourserver.net.
220-Bienvenue,
User (ftp.yourserver.net:(none)): bacula
331 User bacula OK. Password required
Password: *********
230-User bacula has group access to:  users
230 OK. Current restricted directory is /
ftp> put temp\logs\stderr.log
200 PORT command successful
150 Connecting to port 49204
226-File successfully transferred
226 0.420 seconds (measured here), 186.14 Kbytes per second
ftp: 81855 bytes sent in 0.31Seconds 262.36Kbytes/sec.
ftp> get stderr.log
200 PORT command successful
150-Connecting to port 49205
150 78.1 kbytes to download
226-File successfully transferred
226 0.047 seconds (measured here), 1.67 Mbytes per second
ftp: 81852 bytes received in 0.08Seconds 1049.38Kbytes/sec.
ftp> quit
221-Goodbye. You uploaded 79 and downloaded 80 kbytes.
221 Logout.
SCP
More secure (and probably more common than ftp, today) is scp, a
command that uses the SSH protocol. Since most Linux systems run the SSH
daemon, it is easy to transfer a file using SCP.
X:\Bacula\rescue\restore>pscp temp\logs\stderr.log root@max:/tmp
The server's host key is not cached in the registry. You
have no guarantee that the server is the computer you
think it is.
The server's rsa2 key fingerprint is:
ssh-rsa 2048 46:75:4c:4b:41:b9:57:c2:d9:58:8b:1d:62:1a:54:18
If you trust this host, enter "y" to add the key to
PuTTY's cache and carry on connecting.
If you want to carry on connecting just once, without
adding the key to the cache, enter "n".
If you do not trust this host, press Return to abandon the
connection.
Store key in cache? (y/n) y
root@max's password:******
To download a file just swap the arguments:
X:\Bacula\rescue\restore> pscp root@max:/tmp/stderr.log .
Network Share
To mount a network share use the command “net use”. This command is very capricious, if you have a problem, try to qualify / unqualify / tune the various options it supports.
X:\Bacula\rescue\restore> net use U: \\192.168.1.10\C$ /user:Administrator password
C$ is the administration share of drive C:, all drives have an administration share.
You can also use a share Name, if the windows host exports any.
“Administrator” is the local Administrator, use “DOMAINNAMEAdministrator” for the domain admin. You can also use any other local or domain user with the correct password: “HOSTNAMEusername”. The administrator account name is localized, so it may be different for different localizations of Windows.
Please take care to use the correct combination of username and password to get write access to the network share.
Instead of the IP address you can also try to use the DNS or netbios name.
net use V: \\myserver.domain.com\myshare /user:LOCALCPU\LOCALUSER password
net use W: \\myserver\myshare /user:DOMAINNAME\DOMAINUSER password
Use the command xcopy to copy a directory recursively, for example:
X:\Bacula\rescue\restore>xcopy temp h:\ /e
Creating a bootable USB flash disk
To create a bootable USB device from the ISO, you must first prepare your USB key using diskpart. You must create a single partition and activate it to make it bootable, then format the partition as FAT32 and assign it a drive letter, to copy the content of the CDROM on it. Here is the output of the diskpart utility. Be careful, be sure to select the right disk; when you run the “clean” command, all data on the partition will be erased!
PS C:\Users\Administrator> diskpart

Microsoft DiskPart version 6.2.9200

Copyright (C) 1999-2012 Microsoft Corporation.
On computer: ZWIN2012

DISKPART> list disk

  Disk ###  Status         Size     Free     Dyn  Gpt
  --------  -------------  -------  -------  ---  ---
  Disk 0    Online           60 GB      0 B        *
  Disk 1    Online          100 GB    99 GB        *
  Disk 2    Online         2048 MB  2015 MB        *
  Disk 3    Online         7554 MB      0 B

DISKPART> select disk 3

Disk 3 is now the selected disk.

DISKPART> clean

DiskPart succeeded in cleaning the disk.

DISKPART> create partition primary

DiskPart succeeded in creating the specified partition.

DISKPART> active

DiskPart marked the current partition as active.

DISKPART> format quick fs=fat32

  100 percent completed

DiskPart successfully formatted the volume.

DISKPART> assign

DiskPart successfully assigned the drive letter or mount point.

DISKPART> exit

Leaving DiskPart...
You need to copy all files from the ISO image / CD-ROM to the freshly formatted USB key, which can then be used to boot a system.
Securing the Rescue Console
Overview
The recommended ACLs setup for the rescue console is to use *All*
for all ACLs. This allows you to restore any backup of any host using
the same console. The drawback is that anybody getting the password of
this console can restore any data to their own computer.
If you must delegate BMR privilege to people with limited permissions,
you must create restricted consoles using Bacula ACL directives. For any
of these consoles, you must create clients with the same name because
WindowsBMR uses the setip command that requires that the client and
the console use the same name.
Minimal ACLs
The minimal setup requires accesses to all resources needed to restore the backup. For example:
Console {
  Name = <rescue-fd>
  Password = <password>
  CatalogAcl = <catalog>
  ClientAcl = <rescue-fd>, <host-fd>
  JobAcl = <restore-job>, <winbmr-job>
  FilesetAcl = <restore-fileset>, <winbmr-fileset>
  PoolAcl = <pool>
  StorageAcl = <storage>
  WhereAcl = *all*
  # the following three ACLs are required when using Bacula Enterprise
  # version 8.1 or newer
  RestoreClientACL = <rescue-fd>
  UserIdACL = *all*
  DirectoryACL = *all*

  CommandAcl = .bvfs_cleanup, .bvfs_get_jobids, .bvfs_lsdirs, .bvfs_lsfiles, .bvfs_restore
  CommandAcl = .bvfs_update, cancel, .catalog, .clients, gui, .jobs, list, llist, q, quit
  CommandAcl = restore, setip, show, status, wait
  # .sql is not required anymore since WinBMR >= 3.4.0 and Bacula Enterprise > 8.4.2
  CommandAcl = .sql
}
Replace <tag> as follow :
- rescue-fd
the name of the console and the file daemon.
- host-fd
the host you want to restore.
- restore-job
you must use a restore job that doesn’t run any script to do the recovery.
- winbmr-job
this is the WindowsBMR-enabled job used to backup your host. If you have multiple jobs, add them to the list.
- restore-fileset
is the FileSet used by the <restore-job>.
- winbmr-fileset
This is the FileSet used by the <winbmr-job>.
- pool
the list of pools which hold data you want to restore.
- storage
the storage devices which store data you want to restore.
In practice, there may be multiple jobs, stored on different pools located on different storages. You must add ACLs for all these jobs depending on your configuration.
If you want to restore multiple hosts from the same WindowsBMR console, you must merge all the ACLs together.
Troubleshooting ACLs
Before modifying your ACLs you should ensure that the WindowsBMR procedure works for your setup using *All* for all your ACLs. When you are sure, then you can try to fine tune your ACLs.
Each step in the BMR process requires different ACLs. When you get your
clients and the <rescue-fd> listed in the GUI, you know that your
CatalogACL and ClientACL are correct. When the list of dates is
the expected one, you know that FilesetACL and JobACL are
correct, too. If WindowsBMR doesn’t show you the appropriate drive list,
this is probably because the PoolACL or the StorageACL are
misconfigured.
For finer troubleshooting, it is easier to test some commands in
bconsole and look at the result. Before starting bconsole,
ensure that you are connected to the director, which is the case if you
can get the list of clients in the GUI. Use a command prompt, and type
the command below to start bconsole.
X:\Bacula\rescue\executable\bconsole -c X:\Bacula\rescue\executable\bconsole.conf
You must use the full path for the configuration file, a relative path will not work.
Every time you change an ACL in the configuration file, you must reload
the configuration from another console using the reload command and
restart the bconsole on the rescue client. Don’t forget to re-run
the command setip before trying a restore because every reload
resets the IP address of the client.
First, test if you have access to the clients using the command
".clients". You must see your <rescue-fd> and all hosts that you
want to be able to restore from this console.
Use ".jobs type=R" to list all restore jobs and verify that your
<restore-job> is in the list.
Use "list job=<winbmr-job>" to see if you have access to the
WindowsBMR job.
Use command "setip" without any argument to tell the director the
current IP address of your console. The director will use this address
as the one of the corresponding file daemon running on the same machine.
If the command fails, check the CommandACL and make sure to use the
same name for your console and the file daemon.
To test the PoolACL and the StorageACL, you have to try to
restore at least one file. Before that you must be sure that your file
daemon is running. Use "status client=<rescue-fd>" to get its
status. The file that we will try to restore is
the_bacula_rescue_for_windows, which is generated for every
WindowsBMR-enabled backup. To list all BMR-enabled backups run
"restore client=<host-fd>", in the menu select 2 to get a list
of all jobs where a given file is saved, enter the name of the file and
then select 13 to cancel the operation.
For example if my host is zwin2003-fd:
*restore client=zwin2003-fd

First you select one or more JobIds that contain files
to be restored. You will be presented several methods
of specifying the JobIds. Then you will be allowed to
select which files from those JobIds are to be restored.

To select the JobIds, you have the following choices:
     1: List last 20 Jobs run
     2: List Jobs where a given File is saved
     3: Enter list of comma separated JobIds to select
     4: Enter SQL list command
     5: Select the most recent backup for a client
     6: Select backup for a client before a specified time
     7: Enter a list of files to restore
     8: Enter a list of files to restore before a specified time
     9: Find the JobIds of the most recent backup for a client
    10: Find the JobIds for a backup for a client before a specified time
    11: Enter a list of directories to restore for found JobIds
    12: Select full restore to a specified Job date
    13: Cancel
Select item:  (1-13): 2
Enter Filename (no path):the_bacula_rescue_for_windows
+-------+-------------------+----------+------+------+-------+------------+
| JobId | Name              | Start    | Type | Stat | Files | Bytes      |
+-------+-------------------+----------+------+------+-------+------------+
| 7     | C:/...for_windows | 11:39:17 | B    | T    | 25250 | 5382372536 |
| 5     | C:/...for_windows | 23:05:07 | B    | T    | 21    | 372705     |
| 3     | C:/...for_windows | 21:14:30 | B    | T    | 25238 | 4853751303 |
+-------+-------------------+----------+------+------+-------+------------+
Here, the name has been truncated for display purposes. The full name is:
C:/Bacula/winbmr/data/the_bacula_rescue_for_windows
Take note of the JobId and the full path of the filename, taking
care of the case of each characters. Then use the following command to
start a restore :
restore client=<host-fd> restoreclient=<rescue-fd> jobid=<jobid> where=/Bacula/temp file=<full_path>
In a test environment, the full command is:
restore client=zwin2003-fd restoreclient=rescue-fd jobid=7 where=/Bacula/temp file=C:/Bacula/winbmr/data/the_bacula_rescue_for_windows
This last command should confirm that your Storage and Pool ACLs are correct.
Using Additional Hardware Drivers
Overview
If your hardware is not supported out of the box by our WindowsBMR system, you have the choice to load the required drivers manually or even embed them into the Rescue Image.
Download the missing drivers from the manufacturer or vendor web site. Choose a 64-bit version, and always prefer the Windows 8 or Windows 2012 version of the drivers. Older versions of the drivers could work too, if you cannot find more recent version.
Load Drivers from a USB Stick or a Floppy
Extract the drivers and associated files to a USB stick. Usually there
are 3 files: *.inf, *.sys and *.cat like these:
26/08/2009  15:10            68,668 b57win32.cat
26/08/2009  15:10           181,388 b57win32.inf
26/08/2009  15:10           213,544 b57xp32.sys
At any time in the GUI you can open the menu item “Tools” in the “File”
menu. A dialog box appears, where, in the tab “Load drivers”, you can
click on the “Browse” button to locate the .ini file and then choose
it and click “Open” to load the driver.
It is also possible to load the driver from the command line using the “drvload” command:
drvload filename.inf
To test if your network adapter or disk controller is working, use the
commands ipconfig or diskpart as explained below.
Embedding Drivers into the Recovery Image
It is not possible to modify an ISO 9660 filesystem, but some free tools
on the Internet can extract all data and rebuild a new ISO image
including your changes. Ask Google for "modify" or "edit"
"iso" "images" to find these tools. We have tried the free
WinISO-5.3 with success.
You must copy your drivers into the WinBMRDrv directory at the root
of the ISO image. This directory already exists and contains additional
drivers. When looking for drivers, WindowsBMR does a recursive search in
this directory, thus you can keep your drivers in separate directories.
Remove the existing drivers if you think they conflict with your own
drivers.
Test your Drivers
You can use the ipconfig and diskpart commands to see if your
network adapter or your disk controller has been detected by your
drivers.
Run "ipconfig" from any command prompt to display the list of all
network adapters found on the host and their IP addresses.
diskpart can display the list of installed disk. Run the program
from a command prompt and at the diskpart prompt type "list disk".
Compatibility
Bacula Enterprise
WindowsBMR 3.4 is compatible with Bacula Enterprise 6.2.6 and later.
Hardware
The ISO image is 64-bit and must be run on a 64-bit Intel x86 compatible processor. You can use it to restore any 32-bit Windows OS, but the CPU must be 64-bits. If you are restoring on a virtual machine, you may be required to temporarily switch the CPU or the Virtual Machine OS to 64-bits. After the restore you may switch back into 32-bit mode. Your restore machine must have 1GB of RAM, but 2GB are recommended.
Windows
WindowsBMR 3.4 can do bare metal recovery of all 32 and 64-bit XP versions of Windows and later.
It has been successfully tested on:
Windows XP 32-bit (English, French)
Windows 7 64-bit (French)
Windows Server 2003 32-bit (English)
Windows Server 2008 32-bit (English, French)
Windows Server 2008R2 (English, French)
Windows Server 2008R2 (English) on (U)EFI-enabled system
Windows Server 2012 (English) on legacy BIOS
Windows Server 2012 (English) on (U)EFI-enabled system
Windows Server 2016 (English) on legacy BIOS
Windows 10 & 11, Home and Workstation, on (U)EFI-enabled system
Restrictions
The Bacula Enterprise VSS Plugin (vss-fd.dll)
The Bacula Enterprise VSS plugin (vss-fd.dll) cannot be used with BMR. In fact, when doing backups to be used for BMR, you must not use the vss plugin otherwise the BMR restore will fail. This is because our BMR uses Windows PE, which does not include VSS capability, so when Bacula attempts to restore data backed up by the vss-fd.dll plugin, it will fail.
Don’t confuse the plugin with the VSS option in the FileSet! VSS in the FileSet is enabled by default and must be enabled for a WindowsBMR backup.
If you need to restore a backup made with the vss-fd.dll plugin, please do so after you have restored your system with the BMR.
Restrictions in Using the BMR
As mentioned above, you cannot do a WindowsBMR restore with a Bacula backup that used the vss-fd.dll plugin. It will fail in Microsoft WinPE environment.
The drive letter X: is used internally by the rescue system and cannot be used during the restore procedure. If you have an X: drive, you must choose “Manual Partitioning” and use another free drive letter to restore it, then change the letter assignment after the first reboot.
If you restore your server on different hardware such as IDE, SATA, SAS, SCSI, you will have to manage driver problems. Microsoft Windows will probably ask you to re-enter the license key for Windows. This is also true when moving between different virtual infrastructure.
The rescue system needs to connect to your Director using the Bacula bconsole protocol (9101/tcp by default). After connecting, the Director Daemon uses the address from which bconsole was executed to contact the Client being restored. If the Client is behind a firewall or uses network address translation (NAT) it is possible that the Director will not be able to connect to the rescue Client. To avoid this kind of problem, we recommend that you ensure that the machine to be rescued resides in the same network as the Director and the Storage Daemon.
The
restartcommand has limitations with plugins, as it initiates the Job from scratch rather than continuing it. Bacula determines whether a Job is restarted or continued, but using therestartcommand will result in a new Job.
Known Issues
Disk Labels
Disk labels can contain non-ASCII characters. These characters are sometime replaced by “0” (zero) at restore time. This should have no consequences on the restored host.
Volume Mount Points
All Volume mount points to be restored must have paths that are ASCII characters. This restriction will be removed in a future WindowsBMR version.
The machine fails to boot following the :term:`BMR` restore
Users have reported that running the command below fixes the issue.
bcdboot c:\windows
You can reboot from the ISO image and run the command using the command prompt that appears after you have selected the keyboard layout.
Troubleshooting
- QUESTION: I don’t seem to have any connectivity with the WindowsBMR, what can I do?ANSWER: This is most probably because the drivers of your Ethernet NICare not present on the WindowsBMR iso.The section “Use extra hardware drivers” explains how to solve this problem.
- QUESTION: It looks like the Bacula Director cannot connect to my client, I have checked that passwords and port match, but I still cannot connect, why?ANSWER: This happens most often if the machine that you are trying to restore is on a different subnet than your director; place the machine into the subnet where your Director is connected.
- QUESTION: I restored onto different hardware, and it doesn’t reboot, why?ANSWER: This is most probably because your original Windows didn’t include the drivers for your new hardware or Windows has not been set up to use these drivers as boot device. Restore onto the same hardware or install the required drivers in the original machine, add these drivers to the list of drivers on which the system can boot on and back up again.
- QUESTION: I restored onto the same hardware, but a different disk, and it doesn’t reboot, why?ANSWER: This is because you still have the original partition in your BCD file; you can solve this by removing your original drive from the machine. It may also help to disable the original drive in the BIOS configuration.Please note that if you already rebooted and tried to repair the bootloader things can be broken – it is much better to have the original disk removed before the first attempt to boot the recovered system.
- QUESTION: The diskpart never ends the disk inventory. What can I do?ANSWER: Please check if some of the disks are made available through an HBA interface and disconnect it. The HBA disk may be restored after the basic server is restored.
