<blockquote> <div><div class=”admonition note”> <p class=”admonition-title”>Note</p> <p>You can download this article as a <a href=”https://docs.baculasystems.com/pdf/bsys-hypervwmiplugin.pdf”>PDF</a></p> </div> </div> </blockquote>
Hyper-V WMI plugin
Important
Remember to read the Best Practices chapter common for all of our hypervisor plugins.
Hyper-V Plugins to Cover All Backup Needs
Microsoft has created various technologies for backing up Hyper-V virtual machines. Thus, multiple Bacula Plugins have been designed to maximize the benefits of each solution.
Hyper-V is equipped with a VSS writer on all compatible versions of Windows Server. This VSS writer enables developers to utilize the existing VSS infrastructure for backing up virtual machines to Bacula using the Bacula Enterprise VSS Plugins. This technology is supported by the original Bacula Hyper-V plugin. Although it doesn’t allow incremental and differential backups and other more granular VM-based options, it can still cover any Hyper-V version. Therefore, it is highly recommended for small standalone Hyper-V servers (single node, no Failover Cluster) and older Hyper-V versions that do not offer Virtual Disk Service or Hyper-V WMI API.
The Virtual Disk Service (VDS) is a service provided by Microsoft Windows that handles query and configuration tasks upon request from end users, scripts, and applications. This service is compatible with Windows Server 2003, Windows Vista, and newer versions. The Hyper-V Winapi Plugin utilizes this technology to backup and restore virtual machines. It supports incremental and differential backups, making it the recommended solution for more intricate Hyper-V servers, such as Failover Clusters with multiple nodes, where local disk space is a critical resource. Depending on the relocation of virtual machines within the Cluster, it may be necessary to migrate the backed-up VMs across specific nodes.
Starting in Windows 8 and Windows Server 2012, Hyper-V supports backup via the Hyper-V WMI API. This feature enables individual Guest VMs to be backed up separately and incrementally, offering a more scalable solution compared to using VSS in the host. The Bacula Enterprise Hyper-V WMI Plugin uses this technology for backup and restore to/from Bacula. It backups/restores VM in the recommended Microsoft format. By utilizing the Microsoft snapshot format from/to disk, it is essential to have sufficient disk space available for the process to proceed smoothly. In scenarios where disk space may be limited due to busy configurations, the Hyper-V Winapi Plugin can be utilized as an alternative solution.
Backups created using the Hyper-V WMI Plugin, Hyper-V Winapi Plugin and Hyper-V Plugin are not compatible with each other.
Features summary
Quiescing VSS-based applications can be achieved through VSS-based guest snapshots.
Microsoft’s RCT technology enables Full, Differential, and Incremental image-level backups for virtual machines.
Complete virtual machine images can be restored effortlessly.
Important notes
Backups made with the Hyper-V WMI plugin cannot be used with Virtual Full jobs. It is not recommended to mix these backup methods as it may result in difficulties when restoring jobs from Virtual Full backups.
Single Item Restore is not supported.
Linux virtual machines cannot be backed up live at Application Consistency level.
The Hyper-V WMI Plugin requires Hyper-V Virtual Machines version 6.2 or above to manage Differential and Incremental backups.
The
restartcommand has limitations with plugins, as it initiates the Job from scratch rather than continuing it. Bacula determines whether a Job is restarted or continued, but using therestartcommand will result in a new Job.
Supported platforms
This documentation presents solutions for Bacula Enterprise 16.0.0 and higher, and is not applicable to prior versions of Bacula.
This plugin supports Windows 8, Windows Server 2012 and later.
Installation
The Bacula File Daemon and the Hyper-V WMI Plugin need to be installed on the Hyper-V host server. The Hyper-V WMI Plugin Windows installer is the same as the Hyper-V Winapi Plugin installer.
You can choose to install one or the other from the Plugin tree.
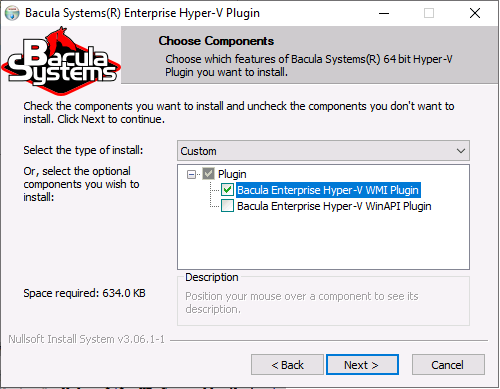
It will deploy required components within the Bacula File Daemon plugins directory.

To configure the Bacula File Daemon, refer to the general Bacula installation documentation.
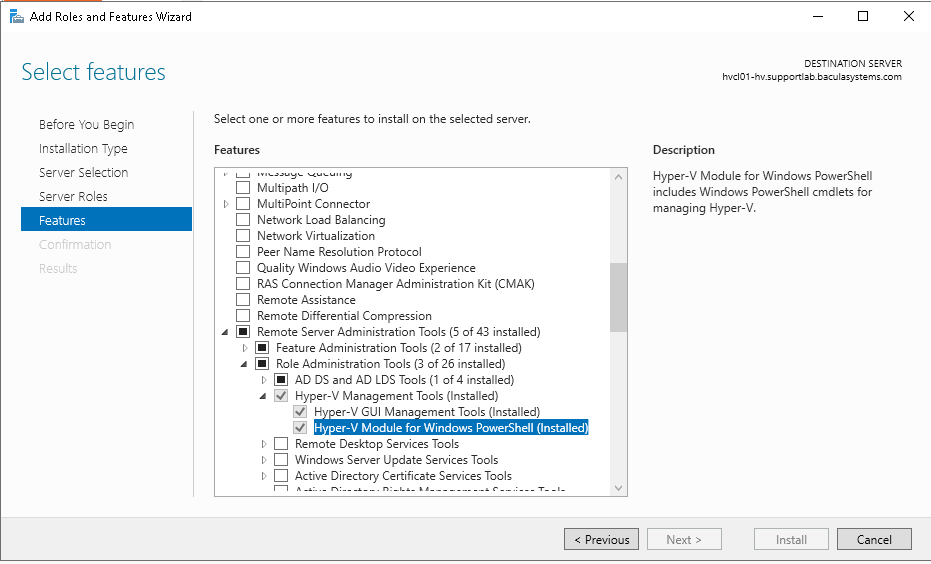
On the server side, the Hyper-V PowerShell Module needs to be enabled. On Windows Server or Hyper-V server 2012, 2016 and 2019, use Server Manager to install it. It should be located under Remote Server Administration Tools -> Role Administration Tools -> Hyper-V Management Tools and check Hyper-V Module for Windows PowerShell.
Verify the correct installation of the FD and the Hyper-V WMI Plugin by running status client from bconsole or from BWeb.
*status client=w2019-hv01-fd
Connecting to Client w2019-hv01-fd at 172.22.22.50:9102
w2019-hv01-fd Version: 12.8.0 (06 April 2021) VSS Linux Cross-compile Win64
Daemon started 19-Jun-21 16:31. Jobs: run=23 running=2.
Microsoft Windows 2012 Standard Edition (build 9200), 64-bit
Priv 0x73f
Memory: WorkingSetSize: 34,168,832 QuotaPagedPoolUsage: 183,768 QuotaNonPagedPoolUsage: 17,368 PagefileUsage:
43,687,936
APIs=OPT,ATP,LPV,CFA,CFW,
WUL,WMKD,GFAA,GFAW,GFAEA,GFAEW,SFAA,SFAW,BR,BW,SPSP,
WC2MB,MB2WC,FFFA,FFFW,FNFA,FNFW,SCDA,SCDW,
GCDA,GCDW,GVPNW,GVNFVMPW,LZO,EFS
Heap: heap=34,168,832 smbytes=39,489,074 max_bytes=69,259,353 bufs=395 max_bufs=396
Sizes: boffset_t=8 size_t=8 debug=10 trace=1 mode=0,2010 bwlimit=0kB/s
Crypto: fips=no crypto=OpenSSL
APIs: !GPFS
Plugin: alldrives-fd.dll(1.2) hyperv-wmi-fd.dll(0.1) winbmr-fd.dll(3.1.0)
Verify that hyperv-wmi-fd.dll is in the “Plugin” line (last line in the above example output).
In the case of a Failover Cluster configuration, the Bacula file deamon and the Hyper-V WMI plugin need to be installed on only one node.
Important considerations regarding credentials settings
Important
In order to access and backup the Hyper-V server, the delegation of the User credentials must be enabled and the Bacula file daemon must be logged as an authorized user within the Hyper-V server.
Enable delegation of user credentials on the Hyper-V server
Run gpedit.msc (normally in C:\Windows\System32) on the Hyper-V server and look at the
following policy: Computer Configuration -> Administrative Templates -> System -> Credentials Delegation -> Allow Delegating Fresh Credentials.
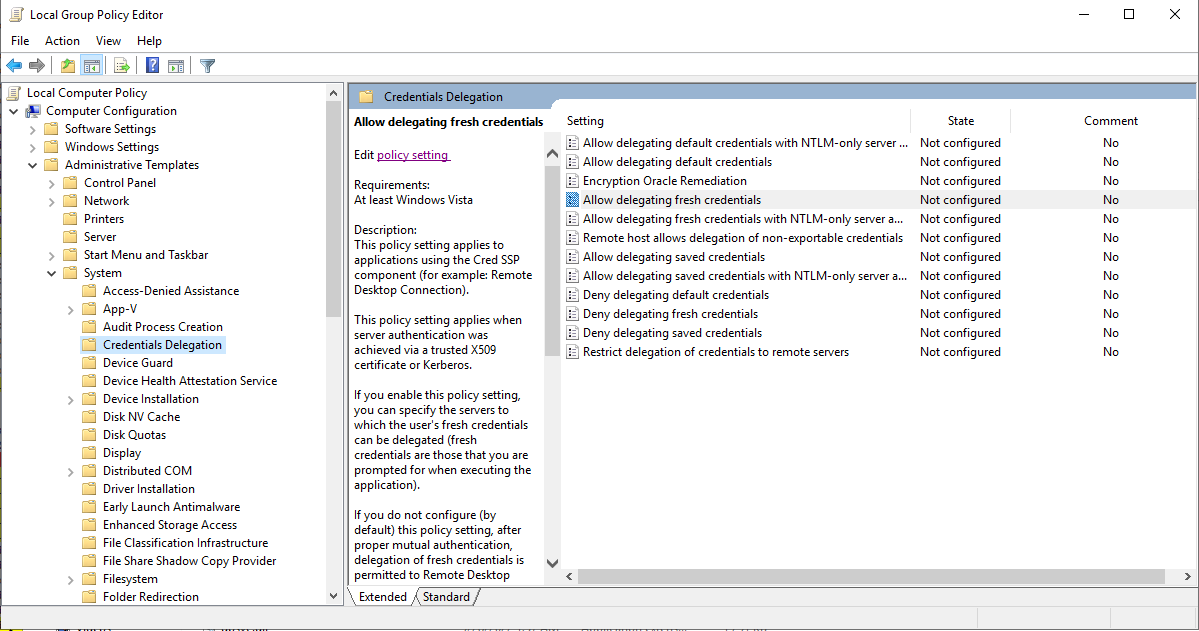
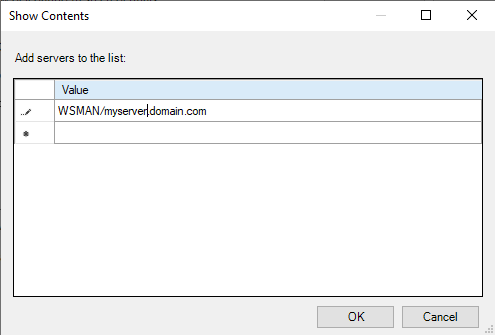
Verify that it is enabled and configured with the WSMAN SPN appropriate for the target computer.
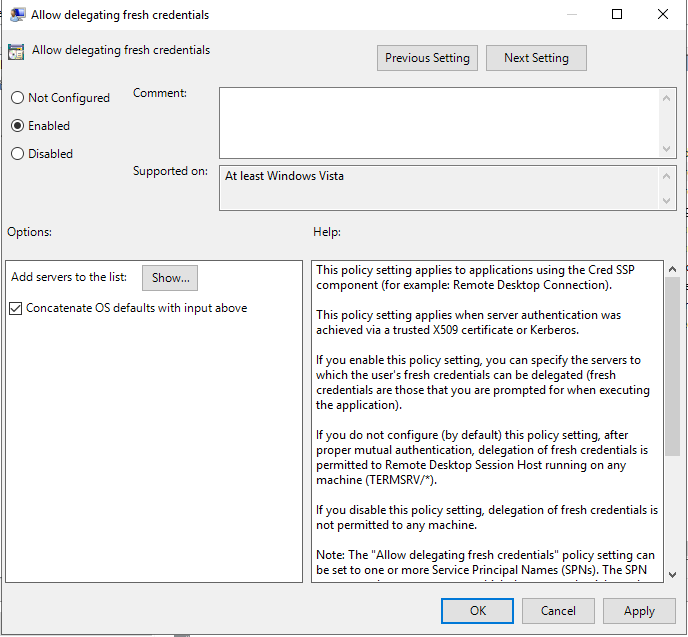
For example, for a target computer name “myserver.domain.com”, the SPN can be one of the following: WSMAN//myserver.domain.com or WSMAN//*.domain.com. Introduce it in the “Add servers to the list” “Show” dialog box.
Alternatively run a powershell console on the Hyper-V server (normally in C:\Windows\Systeme32\WindowsPowerShellv1.0powershell.exe) and enter the following commands:
Enable-WSManCredSSP -Role Server -Force
Enable-WSManCredSSP -Role "Client" -DelegateComputer myserver.domain.com -Force
Impersonation of Hyper-V WMI Plugin
The impersonation of the Hyper-V WMI Plugin can be achieved in different ways.
Specify the user name and password locally on the hyper-v node. This is the recommended method. In a
bacula-hyperv.pwdfile, located by thebacula-fd.confconfig file (typically C:\Program Files\Bacula).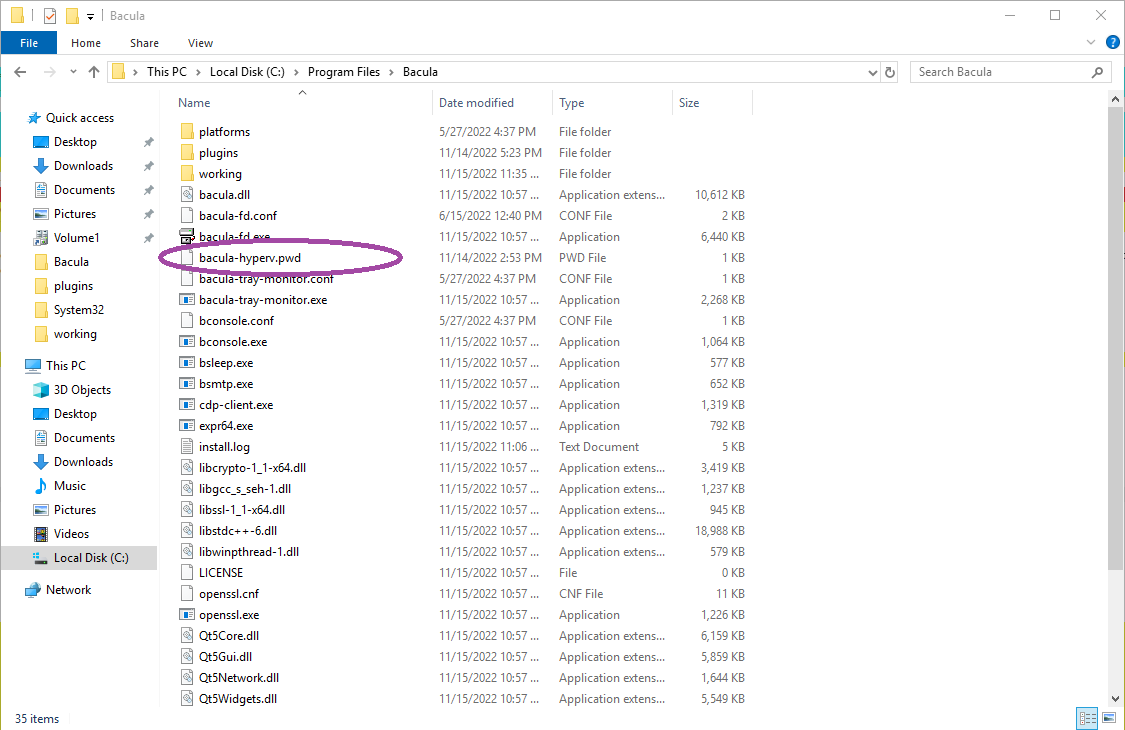
bacula-hyperv.pwdcontains the user name followed by the user password, separated by a colon.name@domain.com:mypassword
or
DOMAIN\name:mypassword
Impersonate the Hyper-V WMI Plugin by passing user and password, as plugin options See Job configuration
user_nameanduser_passwordoptions.Manually change the Bacula file daemon default login account:
Access the Hyper-V server using administrative credentials. Go to the Windows Start menu, enter “Services”, and press Enter to display a list of all installed services. Locate the Bacula File Backup Service, right-click on it, and then select Properties. Navigate to the Log On tab, where the settings should appear as follows:
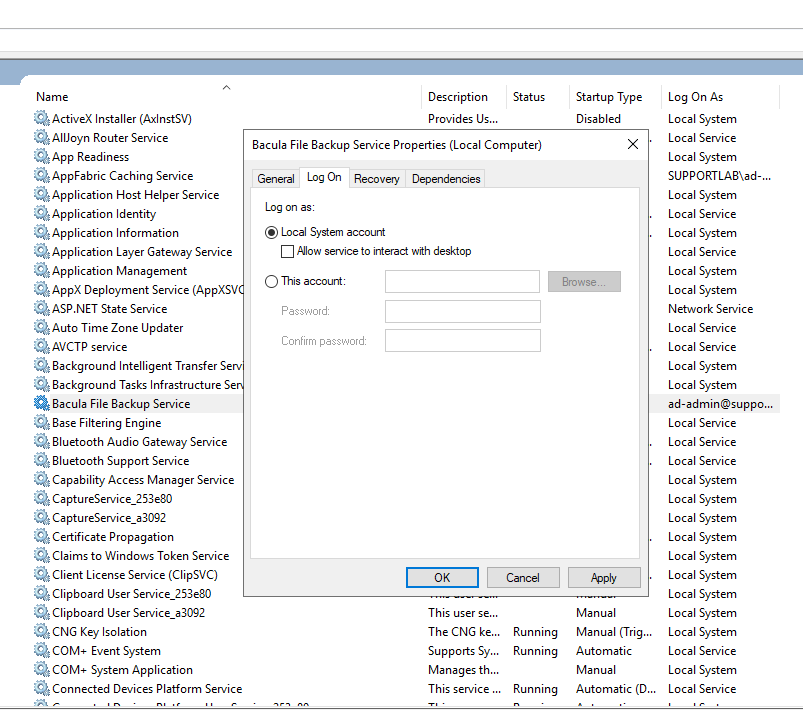
Toggle the selection from “Local System account” to “This account”. Enter the credentials of a Hyper-V administrator (either read only or read-write). Click OK.
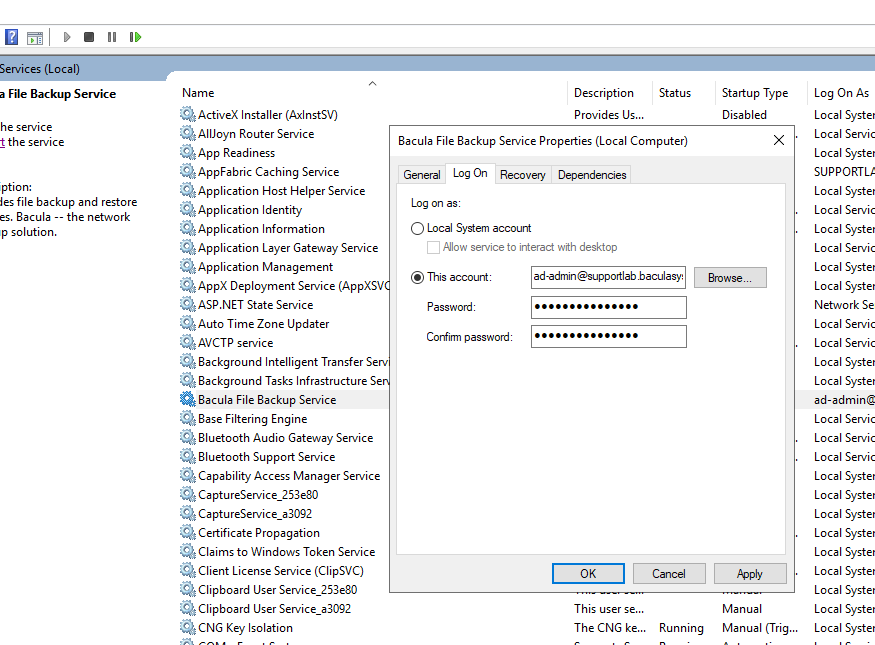
Click on the Bacula File Backup Service entry once more with the right mouse button, then select “Restart” to ensure that the changes take effect.
Job Configuration
Once the Bacula File Daemon and the Hyper-V WMI plugin are correctly installed and configured, setting a backup job up is as simple as adding the job and the fileset within the Bacula Director configuration file.
Important
The Enable VSS parameter must be set to no in the FileSet (see
examples below).
The following plugin options are supported:
Name |
Status |
Default |
Description |
|---|---|---|---|
include |
Optional |
Include all (*) |
a Unix shell-style wildcards pattern for including VMs by name |
exclude |
Optional |
Exclude none |
a Unix shell-style wildcards pattern for excluding VMs by name |
tmp_dir |
Optional |
|
locates the Bacula working repository folder.
Make sure there’s enought space on this location
to create VM’s shapshots and exports. Default is a |
pre_backup_action |
Optional |
None |
action on the VMs before backup takes place. Can be None, Stop, Save. - None is noop. - Stop stops the VM before backup (useful when VM doesn’t support VSS or kernel freeze to maintain consistent backups). - Save saves the VM before stoping it. |
post_backup_action |
Optional |
None |
action on the VMs after backup is completed. Can be None, Restart, ForceRestart. - None is noop. - Restart restarts the VM if it was stopped or saved pre-backup. - ForceRestart restarts the VM unconditionnaly. |
consistency_level |
Optional |
Application |
overwrites the consistency level. Can be Application Consistent of Crash Consistent. Application is the recommanded value but some VMs might not support it. |
allow_pre_save |
Optional |
Disabled |
when enabled, allows retry with |
localhost_only |
Optional |
Disabled |
when anabled, restricts all operations to the local node (for Failover Cluster configuration). |
abort_on_error |
Optional |
Disabled |
abort immediately the job if a serious error is found
(b.e when no VM matches the |
disable_vm_migration |
Optional |
Disabled |
when enabled, VMs migration is disabled during backup to avoid collision between backup an migration (for Failover Cluster configuration). Doesn’t take any value. To disable, remove keyword. |
user_name |
Optional |
None |
the user name that will run the backup/restore operation. This is not the recommanded method. The user name can be specified locally on the hyper-v node in a |
user_password |
Optional |
None |
the user password that will run the backup/restore operation. This is not the recommanded method. The user password can be specified locally on the hyper-v node in a |
Examples
Example 1: backup all vms using Bacula’s default working directory
Job {
  Name = "Hyper-V-BackupAll"
  Type = Backup
  Client= w2019-hv01-fd
  FileSet="Simplest-Hyper-V-FileSet"
  Storage = File
  Messages = Standard
  Pool = Default
}

FileSet {
  Name = "Simplest-Hyper-V-FileSet"
  Enable VSS = no
  Include {
    Options {
      signature=MD5
    }
    Plugin = "hyperv-wmi:"
  }
}
Example 2: backup only «Linux- » prefixed vms using Bacula’s default working directory
Job {
  Name = "Hyper-V-BackupOnlyLinux"
  Type = Backup
  Client= w2019-hv01-fd
  FileSet="Linux-Hyper-V-FileSet"
  Storage = File
  Messages = Standard
  Pool = Default
}
FileSet {
  Name = "Linux-Hyper-V-FileSet"
  Enable VSS = no
  Include {
    Options {
      signature=MD5
    }
    Plugin = "hyperv-wmi: include=\"Linux-*\""
  }
}
Example 3: backup any VM having «Windows» in its name, using a custom working directory
Job {
  Name = "Hyper-V-BackupOnlyWindowsOnF"
  Type = Backup
  Client= w2019-hv01-fd
  FileSet="WindowsOnF-Hyper-V-FileSet"
  Storage = File
  Messages = Standard
  Pool = Default
}
FileSet {
  Name = "WindowsOnF-Hyper-VFileSet"
  Enable VSS = no
  Include {
    Options {
      signature=MD5
    }
    Plugin = "hyperv-wmi: include=\"*Windows*\" tmp_dir=\"F:/backup\""
  }
}
Backup
The files backed up by the Hyper-V server will be visible in a bconsole or with the
prefix /@HYPERV-WMI/.
Typically, a VM backup data is organized as follows:
/@HYPERV-WMI/1ecd8f42-ccca-462a-ab0f-b7644ea77b9b/1ECD8F42-CCCA-462A-AB0F-B7644EA77B9B.vmcx
/@HYPERV-WMI/1ecd8f42-ccca-462a-ab0f-b7644ea77b9b/1ECD8F42-CCCA-462A-AB0F-B7644EA77B9B.vmgs
/@HYPERV-WMI/1ecd8f42-ccca-462a-ab0f-b7644ea77b9b/1ECD8F42-CCCA-462A-AB0F-B7644EA77B9B.VMRS
/@HYPERV-WMI/1ecd8f42-ccca-462a-ab0f-b7644ea77b9b/backup-config.xml
/@HYPERV-WMI/1ecd8f42-ccca-462a-ab0f-b7644ea77b9b/test1_1C6A2D1E-9CEF-4F08-A14E-E463F909C94D.avhdx
/@HYPERV-WMI/1ecd8f42-ccca-462a-ab0f-b7644ea77b9b/test1.vhdx
/@HYPERV-WMI/1ecd8f42-ccca-462a-ab0f-b7644ea77b9b-test1
Where:
1ecd8f42-ccca-462a-ab0f-b7644ea77b9b is the VM UID of the “test1”
the .vmcx file stores the Vm’s machine settings
the .vmgs file stores the Vm’s guest state
the .vmrs file stores the Vm’s running state
the backup-config.xml contains information on the vm at the backup time
the vhdx file stores the Vm’s Virtual Hard Drive data
the avhdx file stores the differential data of the Vm’s Virtual Hard Drive
1ecd8f42-ccca-462a-ab0f-b7644ea77b9b-test1 is a convenience file reminding us that the VM name is test1 and its ID 1ecd8f42-ccca-462a-ab0f-b7644ea77b9b
Incremental-Differential backups: the Hyper-V WMI Plugin will automatically follow the backup level strategy as scheduled in Bacula.
Consistency Level: A backup can fail when the option “Application Consistent” is required for a VM that doesn’t support it.
If an Application Consistent backup fails, the Hyper-V WMI Plugin will change automatically the Consistency Level to “Crash Consistent” and retry.
If
allow_pre_saveif enabled and a “Crash Consistent” backup fails, the Hyper-V WMI Plugin will change thepre_backup_actionto “Save” andpost_backup_actionto “Restart” and retry.If none of the above works, the backup fails with Error.
Restore
It is advisable to choose the entire fileset instead of cherry-picking backed up files, especially for one VM.
Restore parameters:
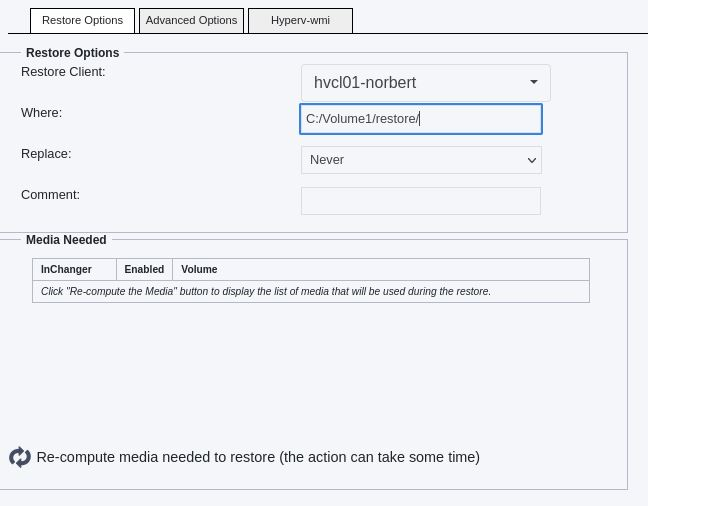
Where: Can specify a path for VM restoration. If the content is not a path (does not contain slashes or backslashes), it’s considered to be the new VM restore name.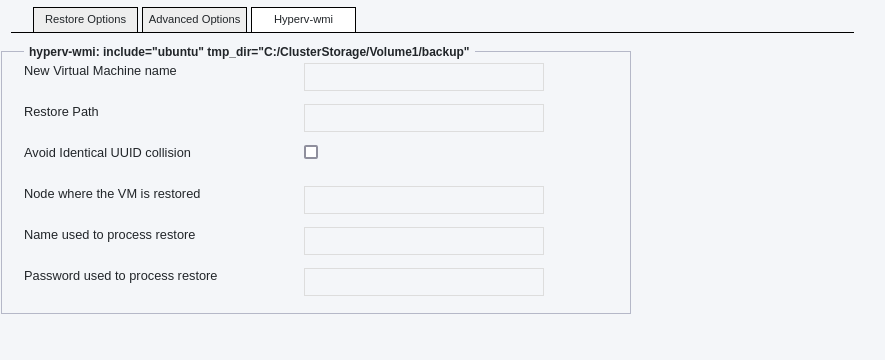
New Virtual Machine Name: Specify the restored VM new nameRestore Path: Specify the location where Snapshot files are restoredAvoid Identical UUID collision: Over restoration, the VM UID is regenerated. It avoids issue when the original VM is still existing on the Hyper-V host.Node where the VM is restored: Specify the name of the node where the VM is to be restored (clustered configuration). Note: the Restore Path need to be shared between the local host and the remote node, for this option to work (on a clustered storage b.e.)Name used to process restore: impersonation user name (see Impersonation of the Hyper-V WMI plugin)Password used to process restore: impersonation user password (see Impersonation of the Hyper-V WMI plugin)
VM Renaming:
If the ‘New Virtual Machine Name’ is specified, the restored VM(s) will be renamed using this value. However, if the ‘Where’ value is not a path, then the ‘Where’ value itself will be used for renaming the restored VMs. In case neither of these options are set, the restored VM(s) will retain their original name(s).
Restore Path:
If the ‘Restore Path’ is provided, it will be used as the restore path for all the drive-related backup files (vhdx, avhdx) and the VM-related backup files (vmcx, vmgs, vmrs). However, if the ‘Restore Path’ is empty and the ‘Where’ value is set with a path, then the ‘Where’ path will be used instead. To facilitate multiple restorations, the files will be restored in a specific folder named after the Bacula job name. If none of the above options are set, the default locations of the Hyper-V host will be used, and no specific folder named after the Bacula job name will be created. It is important to note that the restore files are not moved during the restoration process, so the Restore Path will be the location of the restored VM.
VMs duplication:
If the original VM still exists on the node, attempting to restore the same VM with the same unique identifier will be rejected. In such cases, the “Avoid Identical UUID collision” option can be used to assign a new unique identifier to the restored machine. If a restoration without the “Avoid Identical UUID collision” option fails, it will automatically be retried with this option enabled, and a warning will be issued.
Retries:
In the event of a VM restoration failure, the import process will be retried. If the “Avoid Identical UUID collision” option is turned off, it will be automatically enabled to prevent the most common cause of restoration errors: duplication of unique identifiers. Alternatively, an attempt will be made to rename the VM. By default, the rename will follow the pattern “<JobName>_<originalVMName>”.
Examples:
Defaults:
Where: EmptyNew Virtual Machine Name: EmptyRestore Path: EmptyAvoid Identical UUID collision: OffNode where the VM is restored: Empty
The restored VM(s) are (re)created in the local Hyper-V host default VMs and VirtualHardDrives locations with original names are Unique Identifiers.
Quick Rename:
Where: newVMNameNew Virtual Machine Name: EmptyRestore Path: EmptyAvoid Identical UUID collision: OffNode where the VM is restored: Empty
The restored VM(s) are (re)created in the local Hyper-V host default VMs and VirtualHardDrives locations and renamed newVMName.
Large Restore:
Where: EmptyNew Virtual Machine Name: NewVMNameRestore Path: C:\LargeStorage\restoreAvoid Identical UUID collision: OffNode where the VM is restored: Empty
The restored VM(s) are (re)created and renamed NewVMName. Virtual drive(s) and VM files are located into a folder named after the JovName in C:\LargeStorage\restore. Something like : C:\LargeStorage\restore\RestoreFiles.<date>_<time>.
Note
You can download this article as a PDF
Best Practices
While it is technically possible to backup multiple VMs in one Bacula hypervisor plugin backup job (VMware, Hyper-V, RHV, Proxmox, etc), this is not necessarily the best way to perform VM backups. It is strongly recommended that one backup Job is created for each VM being backed up for the following reasons:
By default, if one of your VMs fails to backup in a “multi-VM” backup job, the main Bacula job will terminate “Backup OK – with warnings.” The JobStatus for jobs that terminate “Backup OK” and “Backup OK – with warnings” are not differentiated in the catalog. They are both ‘T’, so this means that you will have to carefully monitor your backup job logs in case some VM backups fail and pay attention to the JobErrors field in the job summaries.
To address this issue, there is a plugin option called “abort_on_error” in each of the Bacula hypervisor plugins, which causes Bacula to immediately fail the job as soon as an error is detected while backing up a VM. However, if you use this option, and the backup of VM number 11 in a list of 50 VMs fails, then the whole job will be failed, and VMs 12-50 will not be backed up during that job’s run.
A 1:1 configuration (one VM backed up per job) means that the “abort_on_error” option will make more sense to enable in each job so you will immediately know when a VM fails to backup since the Bacula job will terminate with a “Backup failed” message and ‘f’ in the catalog for the job.
With a 1:1 VM/Job configuration, re-running a specific VM backup job is simple to do after the cause of the failure is investigated and fixed.
In the example about the 50 VMs, without a 1:1 configuration, there is no way to re-run a backup of just the one VM that failed to backup.
Additionally, with a 1:1 VM/Job configuration, job metrics will have more meaning because each VM will be one job, and you will know to expect a specific number of jobs each night with each job representing one VM.
With a multi-VM per job configuration, each VM will be backed up “serially”, one at a time, disk by disk, VM by VM. A 1:1 configuration will allow several VM backups to be run concurrently which will reduce the overall time to perform the VM backups. Of course, you will need to pay close attention to SD and ESXi storage and networking resources, and adjust the number of concurrent jobs accordingly.
For some hypervisors (VMware, Proxmox, etc) Bacula provides automation scripts (eg: scan_datacenter.pl for VMware). These scripts are designed so that they will create 1:1 VM/Job configurations. If you plan to make use of these automation scripts, it is a good idea to already be thinking this way, and having your hypervisor plugin backup configurations in a 1:1 configuration from the beginning.
Failover Cluster
Backup operations are seamlessly executed in a Failover Cluster setup, regardless of the node responsible for hosting the VM(s) at the time of backup. As long as the user possesses the correct credentials on all nodes, the VMs within the cluster will undergo filtering via include/exclude criteria. The tmp_dir directory must be situated on the Cluster Shared Volume and be accessible to the user through an identical path on each node. By default, the tmp_dir is designated as a “Bacula-repo” folder within the VHD default directory, ensuring optimal performance as long as sufficient disk space is allocated for snapshots on the Shared Volume. It is important to note that transferring a VM from one node to another during a backup process is prohibited by Hyper-V.