Note
You can download this article as a PDF
RHV plugin
Important
Remember to read the Best Practices chapter common for all of our hypervisor plugins.
See also
Scope
IT organizations are constantly being challenged to deliver high quality solutions with reduced total cost of ownership. Virtualization technologies are an important and widely used element of the resulting strategies and accordingly found in most data centers.
Naturally, reliable solutions to protect the underlying data are a critical topic. This white paper presents the Bacula Enterprise plugin and strategy to protect Red Hat Virtualization environments.
The plugin provides several ways to backup virtual machines, image level with a full backup or proxy backup, incremental or differential backup, with a set of options to select different backup sets. To later, recovery them with a set of options to customize the restore process.
Red Hat Virtualization Technology
Red Hat Virtualization (RHV) is a full virtualization platform capable of managing the full set of features that make up a virtualized data center: Hosts, networks, local, remote, or distributed storage. Management, accounting and monitoring are done through an API-based Web interface, which implements users and roles to implement access restrictions.
Ovirt
RHV is based on the open source OVirt virtualization platform. OVirt is available for Linux distributions related to RHEL. OVirt is under active development, and RHEL integrates releases they consider mature. Therefore, Ovirt itself can typically exist in newer versions than what is part of RHV.
Architecture
RHV is composed of the following elements:
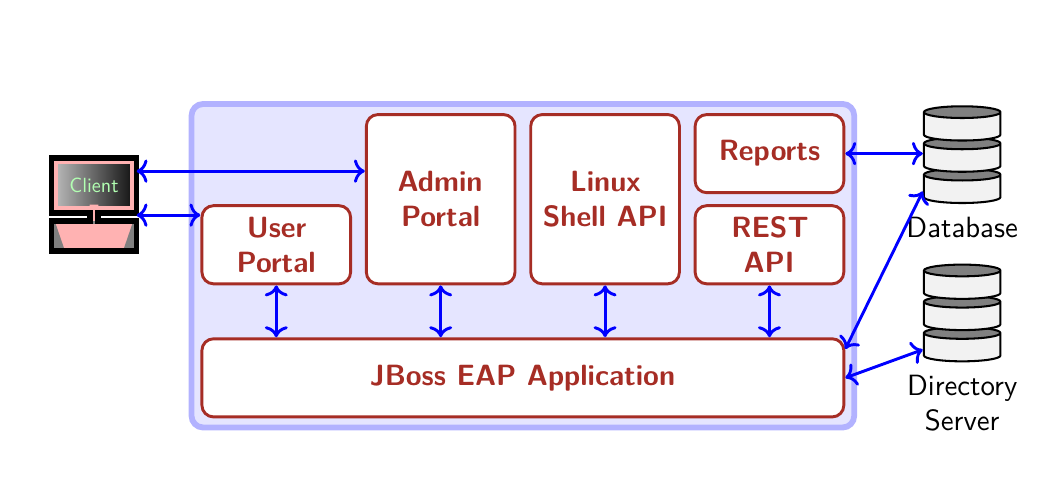
- RHV Manager
is the service offering management through a web interface and APIs.
- Virtualization Hosts
- are the hypervisors providing their resources to the virtual machines. They are managed through the RHV Manager, and are based on the KVM system.Two kinds of hosts are available:
- RHEL hypervisors
being standard RHEL server systems
- oVirt nodes
are minimal servers which are distributed as ISO images to install a lean virtualization platform solely for RHV usage.
There are 2 ways to deploy the RHV Manager: Standalone, with the RHV Manager running on a host outside of the virtualized environment, which does not provide native high availability, but is easily deployed and managed, and self-hosted, where RHV Manager runs inside the virtualized environment, in a dedicated VM.
The latter approach can be a highly available service by making use of
the ovirt-ha-agent and virt-ha-broker services.
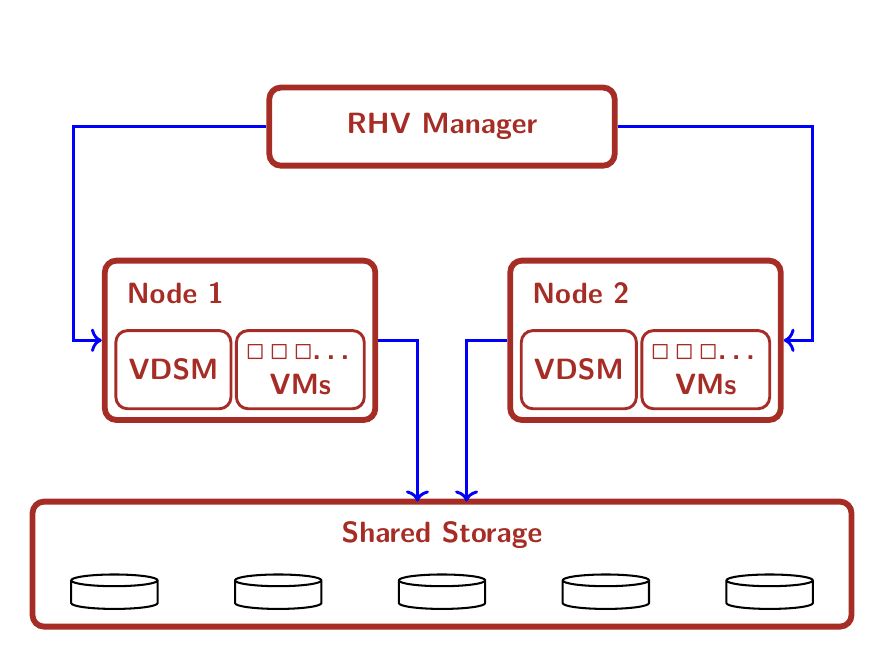
General Architecture (Standalone mode)
RHV Manager Architecture
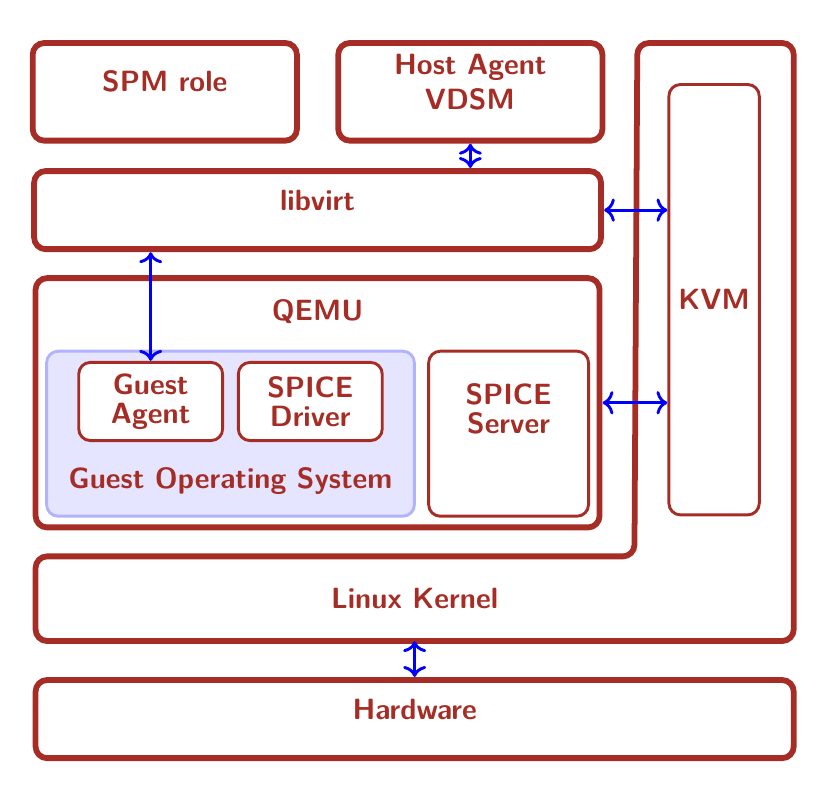
RHV Host Architecture
In figure RHV Host Architecture, the architecture of a virtualization host is shown. The stack of technologies employed by a host to provide a VM consists of the following elements:
- VDSM
is the host agent service running on every virtualization host to provide the hypervisor service to the RHV system. This services listens on the TCP port 54321 on the network.
- libvirt
is the toolkit that manages virtual machines.
- QEMU
is the multi-platform emulator which provides emulation of full systems, including CPU capabilities not available on the underlying system.
- KVM
is the kernel module which provides the system integration component to QEMU. It allows to execute guest VMs in user space, ensuring full segregation of VMs from each other and the host system.
- SPICE
is the interface between virtualized user-facing components and remote interfaces, providing input, display, and sound services to remote interfaces (the “viewer” program).
Other important concepts to understand a RHV system are
- Datacenter
is the most high-level group of virtualization systems, the VMs managed in it, and all the resources available.
- Cluster
refers to a group of virtualization hosts (sharing networks, storage, and some other infrastructure properties). A Cluster is always part of a distinct Datacenter, and a Datacenter can consist of more than one Cluster.
- Storage Domain
indicates a logical entity providing storage capacity to Virtual Machines of a Datacenter.
- Storage Pool Manager
is the role of a certain host in the datacenter which creates, manages, and removes virtual disk images.
- Template
is the base configuration of vms. This configuration can be from the architecture of the processor that will use the vm to the disks attached to it.
- Host
is a physical server on which the virtual machines run. Alternatively, host is also called hypervisor. Both RHEL Virtualization Hypervisors and RHEL hosts interact with the rest of the virtualized environment in the same way.
Template
The templates have the ability to create virtual machines quickly and conveniently. To create a template we need a vm to copy its configuration, its networks and content of its disks.
The templates have a specific configuration and unique content on the disks. Once the template is created the content of the disks is immutable and RHV does not allow to add or remove disks. However, it is possible to modify, add or modify the networks attached to the template.
Storage Domain
Storage Domains are distinct storage subsystems used to host different kinds of information.
Two Storage Domains are used by RHV:
- The Data Domain
stores virtual hard disks of VMs and templates in a Data Center. Data Domains are exclusive to one Data Center.
Data Domains can be backed by different storage attachment technologies, such as NFS, Fibre Channel, FCoE, GlusterFS, Ceph, iSCSI, and any (local) POSIX-compliant file system.
- The ISO Domain
hosts images of media such as CDs and DVDs to deploy software on VMs. There can only be one ISO Domain in a Data Center, an ISO Domain can be shared among Data Centers, and NFS is the only available backing store for this type of storage domain.
Data Warehouse
RHV employs a database of historical data where all the management and
auditing data is stored. This function is provided by the
ovirt_engine_history service. It makes use of the PostgreSQL
database for storing its data.
Networking
RHV allows the definition of different logical networks to isolate traffic types and paths. These networks are created, maintained, and destroyed by the RHV Manager, which also handles VLANs, routing, and firewalling.
Usually, there will be several networks in use in a RHV Datacenter. Some pre-defined network types are available to segregate different types of traffic: A management network which should be used exclusively by RHV management communications, VM networks for use by the virtual machines, storage networks for example for iSCSI or NFS traffic, and storage migration networks.
Networks for dedicated purposes can be created as needed, and they can be bound to specific network hardware (and VLANs) available on the virtualization hosts.
Red Hat Virtualization APIs
RHV provides different APIs to access its functionality:
SDKs (based on the REST API)
The Bacula Enterprise Red Hat Virtualization Plugin is based on the Java SDK 4.3
Connection Modes
RHV allows 2 different authentication schemes:
OAuth Authentication
- HTTP Basic Authentication
The plugin supports both connection and authentication modes.
More Information
The information of this chapter is based upon the official RHEL Documentation available in the following links:
- General Documentation
- Version Information
- oVirt
Architecture and Design
The Red Hat Virtualization Plugin is a File Daemon plugin. It may be installed on a machine inside or outside of your RHV environment. Is based on a Java SDK, therefore is non-machine dependent and is compatible with any Operating System where the Bacula File Daemon can run and the Java Virtual Machine is available.
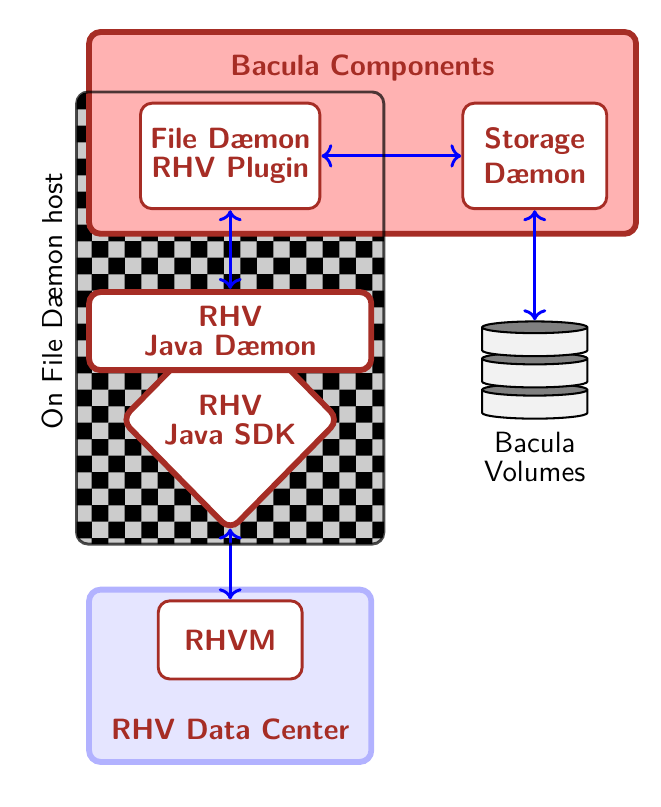
Plugin Architecture
Backup Process
The backup process allows you to perform in two different environments: external or internal. The external process allows full clone backups or snapshots, and incremental or differential backups. The internal process allows full backups to be performed faster than the external processes.
Backup from RHV environment external machine
The next backups methods (clone, snapshot, template) perform a download of the VM’s disks through the API. These methods are slower than the ’Proxy VM’ method, but they do not depend on a virtual machine in the RHV environment.
The general backup process of a virtual machine is as follows (check also Figure External backup diagram):
Check for the existence of the virtual machine to protect and the compatibility of the RHV environment with the chosen backup method (check Section Limitations).
If it is not a template backup:
Check the snapshots:
If the last backup was incomplete and the generated snapshot was not removed successfully.
If apply a full backup in a virtual machine with incremental snapshots.
Lauch a snapshot.
If it is a clone backup:
Clone the virtual machine using the created snapshot.
Download configuration of the original virtual machine and cloned machine (XML).
Download all disks of cloned machine.
If it is a template backup:
Download configuration of template (XML).
Download all disks of template.
If it is a snapshot backup:
Download configuration of virtual machine (XML).
Download all virtual machine snapshot disks.
If it is a backup clone:
If necessary, remove clone machine.
If it is not a template backup and cbt is off:
Remove snapshot.
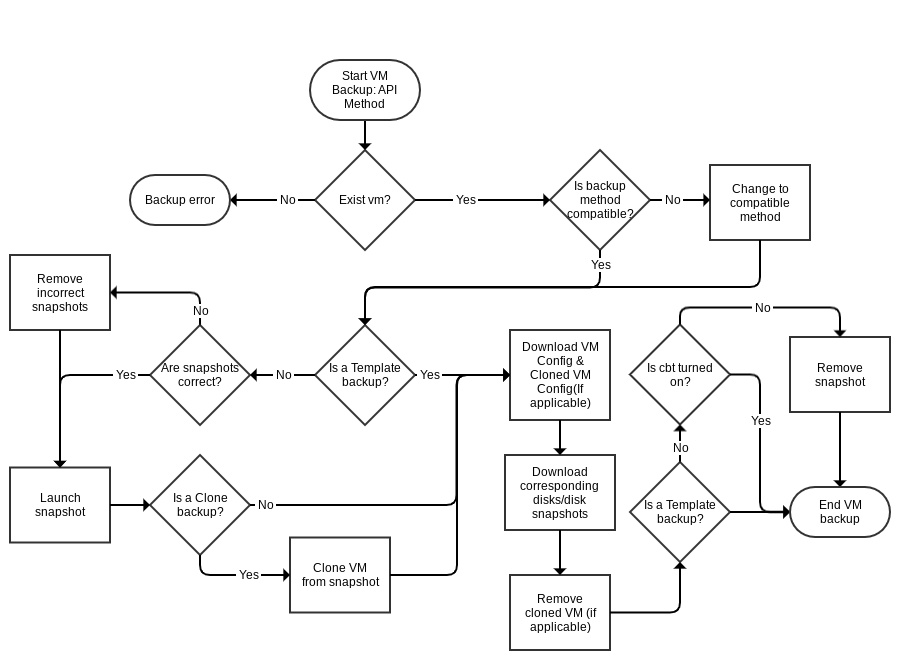
External backup diagram
Incremental and Differential Backups
Incremental Backup Process
An incremental backup is one in which successive copies of the data will contain only the portion of the disk(s) that has changed since the previous backup was performed. When a full recovery is needed, the restoration process will need the last full backup plus all the incremental backups up to the point of restoration. Incremental backups are often desirable as they reduce storage space usage, and are quicker to perform than full or differential backups.
The method to perform incremental backups used by this plugin is as follows:
CBT function is activated in the fileset.
The first FULL will leave the snapshot, which it created during backup, in the machine.
Each Incremental will perform a new snapshot, take the data from that new snapshot (which will contain the difference between the current state and the snapshot immediately before) and eliminate the snapshot created by the previous Incremental backup.
The disadvantages of this process are the following:
A longer time is required during a restore since the Full and all Incrementals will need to be read.
It is recommended to perform closed cycles that are not very long with the following sequence: 1 FULL + X INCREMENTAL, with ’X’ being the number of backups in the chain. This recommendation is due to the fact that in each iteration that performs an incremental backup the snapshot that is maintained in the virtual machine is larger, and therefore the operations carried out with it will take longer and longer, and more data will be stored. (See Table A normal incremental backup).
Differential Backup Process
CBT function is activated in the fileset.
The first FULL will leave the snapshot, which it created during backup on the machine. This full snapshot will be present in all differential backup processes until a new full is performed.
Each differential will make a new snapshot. It will take the data of that new snapshot (which will contain the difference between the Full and the current state) and eliminate the snapshot at the end.
The advantages of this level of backup over INCREMENTAL are:
Faster restorations.
Unlimited iteration of differential backups without influencing backup performance.
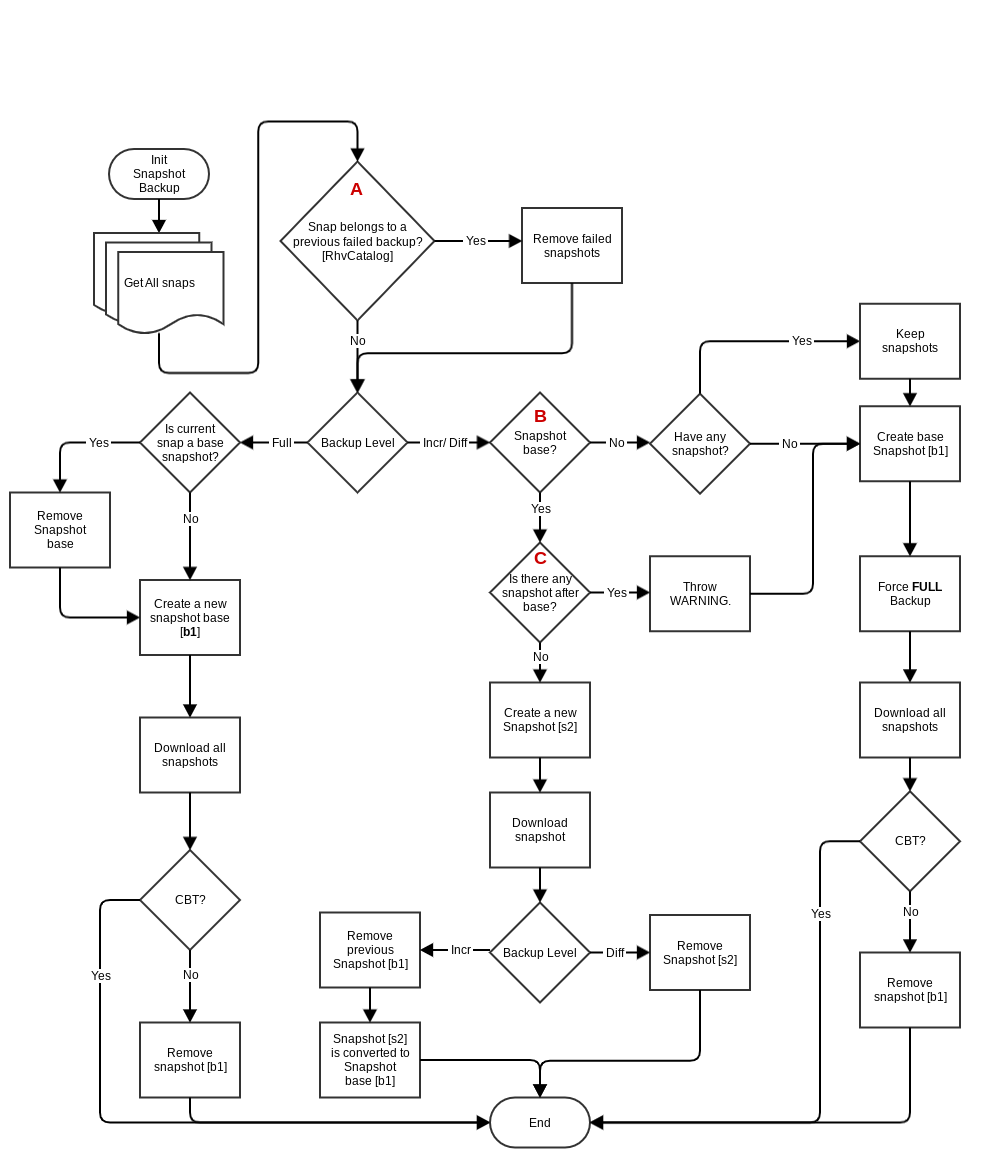
Incremental/Differential backup diagram
In Figure fig:incr-diff-backup-diagram you can see 3 marks with the letters A, B and C. These marks correspond with:
Check previous backups with internal RhvCatalog stored in /opt/bacula/ working/rhv/catalog/{server_parameter}/{vm_id}.json. The function of this catalog is to control the backups of each VM to check if they finish correctly. If this catalog entry doesn’t exist for the VM, the plugin creates it with a FULL backup.
Incremental/Differential backups need a chain of snapshots. The base snapshot is the snapshot of the last Full backup done by the RHV plugin for a virtual machine. The description of the snapshots created by the RHV plugin is backup_{jobId}_{jobName}.
If the snapshot chain is interrupted by any snapshot created outside of the RHV plugin, the RHV plugin must make a COMPLETE backup. The RHV plugin will always keep foreign snapshots.
Use cases in snapshot maintenance
T1 |
T2 |
T3 |
T4 |
T5 |
|
|---|---|---|---|---|---|
Type Backup |
F |
I |
I |
I |
I |
Create snapshot |
S1 |
S2 |
S3 |
S4 |
S5 |
Snapshots in VM |
S1 |
S2 |
S3 |
S4 |
S5 |
T1 |
T2 |
T3 |
T4 |
T5 |
|
|---|---|---|---|---|---|
Type Backup |
F |
D |
D |
D |
D |
Create snapshot |
S1 |
S2 |
S3 |
S4 |
S5 |
Snapshots in VM |
S1 |
S1 |
S1 |
S1 |
S1 |
T1 |
T2 |
T3 |
T4 |
T5 |
|
|---|---|---|---|---|---|
Type Backup |
F |
D |
D |
F |
I |
Create snapshot |
S1 |
S2 |
S3 |
S4 |
S5 |
Snapshots in VM |
S1 |
S1 |
S1 |
S4 |
S5 |
T1 |
T2 |
T3 |
T4 |
T5 |
|
|---|---|---|---|---|---|
Type Backup |
F |
I |
I |
I |
|
Create snapshot |
E1 |
S2 |
S3 |
S4 |
S5 |
Snapshots in VM |
E1 |
E1 + S2 |
E1 + S3 |
E1 + S4 |
E1 + S5 |
T1 |
T2 |
T3 |
T4 |
T5 |
|
|---|---|---|---|---|---|
Type Backup |
F |
I |
I |
I |
|
Create snapshot |
S1 |
S2 |
E3 |
S4 |
S5 |
Snapshots in VM |
S1 |
S2 |
S2 + E3 |
S2 + E3 + S4 |
S2 + E3 + S5 |
I *: Internally, the RHV plugin will do a FULL backup and log a warning.
Backup from RHV environment internal machine
A proxyVM backup is a method where backup is done through a special VM inside the RHV environment. Disks belonging to VMs that need to be backed up will be attached to this special VM and backed up via this proxyVM. This method only allows FULL backups, but is much faster than the other REST API based methods.
The backup process consists of binding to each of the virtual machine disks to perform the backup, backing up of the contents of the disks, then unbinding from them. The binding process is made through a snapshot and an attach operation of the snapshot to the proxy VM.
Backup Cache
This feature keeps VM backups in different storage domains to be used for future restores. This functionality allows faster restores of virtual machines, but requires more space available in the storage domains.
Quiescing VMs
If the guest agent for RHV is installed in a VM, the system will be quiesced automatically and transparently when a snapshot is created. Red Hat’s documentation at redhat.com/…/Live_Snapshots_in_Red_Hat….html provides full information.
Restore Process
The general restore process of a virtual machine consists of
Create a new VM using an XML configuration.
Create all of the VM’s disks.
Create every snapshot, if necessary.
Upload disks.
Create the VM’s network interfaces.
Create the template from the virtual machine, if necesary.
Switch on the virtual machine if necessary.
The disk upload operations are performed using the ImageTransfer service of oVirt.
Features
The following lists present the general features of this plugin.
Backup Features
Full image-level backup.
Incremental backup.
Differential backup.
Proxy backup.
Agentless backup.
RHV snapshot integration to create a snapshot to back up, and always delete this snapshot when the backup finishes, when the plugin finishes its work, or when the next backup is initiated if a prior backup error occurred.
Snapshot consistency through quiescing VMs for backup.
Backup storage cache in Red Hat Virtualization Manager (Where we keep cloned VMs).
Individual VM Backups.
VM derivated of template Backups.
Individual Template Backups.
Optional VM configuration only backups.
Disk exclusion.
Selection of VMs to back up by tags, regular expression matching on name, or per any structure RHV Querying RHV.
Backup of virtual machines in a “running”, “paused” or “shut off” state.
VM exclusion.
Password obfuscation.
Failed backup control:
Find and remove previous failed backups / snapshots with every execution.
Backup cancellation and connection loss controls to try to remove snapshots or clones of current backup.
Control of snapshots by an internal catalog.
Restore Features
Restore to original or different location in RHV environment (Cluster or Storage Domain).
Replace original VM or create a new VM with a new name.
Restore templates.
Change destination VM name.
Local restore of disk images and VM XML configuration to allow manual processing.
Exclude disks from restore.
Turn VM on after restore, or leave turned off.
Restore disk configuration:
Virtual disk interface (ide, virtio, virtio_scsi, spart).
“Active” state of disk.
“Boot disk” flag.
Template to name restored disks.
Name list of restored disks.
Restore NIC configurations (providing MAC address list).
Limitations
The plugin currently does not support the following features:
The backup snapshot method is not compatible with RHVM4.1.
Virtual Machines in Suspended status cannot be backed up. This is oVirt/RHV limitation as do a snapshot is not allowed with that state.
The Incremental/Differential backup is only compatible with snapshot backups.
The Incremental/Differential backup is compatible with RHV Plugin version >= 4.0.0.
The proxy backup is compatible only with Bacula Enterprise version >= 12.4.0.
Virtual Full backups.
Using an external OAuth / SSO service different from the one provided directly by RHV.
Stop or Resume incomplete Jobs. For this to be possible with the guarantee of consistent backups, snapshots of virtual disks and cloned VMs would need to be kept.
Optimized backup with thin disks. The Ovirt API doesn’t provide any information about thin disk usage, except with thin disks located in iSCSI storage.
Restores from a backup sequences based on a Full and Differential and/or Incremental snapshots of VMs that contain at least one disk in a Block Based Storage Domain are possible only with RHV versions 4.4.5 or newer.
The
restartcommand has limitations with plugins, as it initiates the Job from scratch rather than continuing it. Bacula determines whether a Job is restarted or continued, but using therestartcommand will result in a new Job.
Compatibility and Requirements
Compatibility
The plugin is currently developed exclusively for RHEL Virtualization 4.1 and above environments (RHEL 7-based). It has been tested only on those platforms. Other virtualization platforms based on oVirt, and sufficiently similar to the RHV platform, may also be suitable.
Bacula Systems will add compatible platforms to this list when interoperability has been demonstrated through its development and QA processes. Please contact Bacula Systems Support if you have questions about the currently supported RHV versions.
Requirements
Bacula
The plugin works with version 10.1 or newer of Bacula Enterprise with non Accurate mode (The Accurate Job directive must be disabled).
Java
The server hosting the Bacula File Daemon must have the Java Virtual Machine version 8 or newer installed.
Red Hat Virtualization Considerations
Disk Download
In order to allow correct disk image downloads during the backup processes, and due to an existing bug of RHV, the following configuration changes must be made in RHV:
For RHV 4.1 (Compatible with RHV 4.2)
Connect to the RHV Manager host using ssh, then
$ su - postgres
$ psql -U postgres -d engine
# Get the existing value for future reference
psql (12.3)
Type "help" for help.

postgres=# SELECT * FROM vdc_options WHERE
option_name='ImageTransferClientTicketValidityInSeconds';
UPDATE vdc_options SET option_value=999999
WHERE option_name='ImageTransferClientTicketValidityInSeconds';
The value of option_value represents the validity time in seconds of
the token to access disk images for download or upload. We recommend to
set the life time to be virtually unlimited with the value 999999 in the
above query.
RHV 4.2
Connect to the RHV Manager host using ssh, then
# Get the existing value for future reference
engine-config --get=ImageTransferClientTicketValidityInSeconds
# Set value (we recommend 999999 seconds, virtually unlimited)
engine-config --set=ImageTransferClientTicketValidityInSeconds=999999
Storage Space
If RHV version 4.2 is used, additional backup storage space is not required, but if RHV version 4.1 is used, or the parameter ’apply clone’ is set, as discussed in section Backup Process, backups need to perform a complete clone of a snapshot of each virtual machine being backed up. This clone is removed after a backup or at the start of a subsequent backup in case the previous one failed without the plugin having a chance to clean up. Therefore it is necessary to have sufficient storage space in the Storage Domain the backup runs in. It is also important to consider how many backups are going to be run in parallel and reserve enough space for those temporary clones.
Use of computer resources
Proxy Backup
The process will run in a virtual machine that it is placed inside the same RHV environment we are protecting. It will be necessary to deploy this VM which contains the Bacula agent and proxy VM. This virtual machine has some minimal requirements:
OS: There is no specific OS requirement and this mode should work with any updated OS. However, it is recommended to use Debian 10 (Buster), as it is the only one where proxy mode has been tested extensively.
RAM: 2 GB.
Network: Access to logical network RHV.
Storage: 4GB.
Bacula Enterprise version: 12.4.0.
Java Virtual Machine: 8.
Calculations have been made that determine that the machine with the minimum requirements can process up to 20 backups in parallel. It will be necessary to add 1 GB of RAM for every 10 backups in parallel.
API Backup
This process will execute in a external machine, and it has been calculated that 1 GB of available RAM is needed for every 10 paralel backups for this process.
Configuration
Plugin Installation
The Bacula Enterprise RHV plugin is distributed as a standard package for every supported operating system.
After installing the package, a few aspects must be considered: The
Plugin Directory directive of the File Daemon resource in
/opt/bacula/etc/bacula-fd.conf has to point to where the
rhv-fd.so plugin is installed. The usual Bacula plugin directory is
/opt/bacula/plugins. Thus, the configuration file bacula-fd.conf
should look like in the following example:
FileDaemon {
  Name = bacula-fd
  Plugin Directory = /opt/bacula/plugins
  ...
}
Certificate and Truststore
There are two ways to create the truststore that allows the Bacula plugin to connect to RHV in secure mode.
Automatic
Call plugin
The plugin has an option to create the truststore automatically. To create the truststore run the following command:
java -jar /opt/bacula/lib/bacula-rhv-plugin.jar --server=myrhv.com --operation=system
  --create_truststore=true --truststore_file=/opt/bacula/working/rhv_truststore
  --truststore_password=changeit
Example command to create the truststore
user@host:~/\$ java -jar /opt/bacula/lib/bacula-rhv-plugin.jar --server={server}
  --operation=system --create_truststore=true --truststore_file={truststore_path}
  --truststore_password={truststore_password}
Interactive script
There is an interactive script in /opt/bacula/scripts/rhv_config.sh.
When the script is executed it requests parameters such as: server,
truststore path, truststore password, alias in truststore and keytool
Java path. Only the parameter ’server’ is required. The others
parameters by default are:
Truststore path:
/opt/bacula/etc/rhv.cacertsTruststore password: changeit
Truststore internal alias: rhvPluginX<randomNumber(1-100000)>
Path to Java’s keytool:
/usr/bin/keytool
Example of a script execution:
[root@rhv-client tmp]# /opt/bacula/scripts/rhv_config.sh
Welcome wizard to create TrustStore File
Enter FQDM Red Hat Virtualization Manager:rhv-mgmnt.local.lan
Path truststore (/opt/bacula/etc/rhv.cacerts):
Password truststore (changeit):
Alias (rhvPluginX89803):
Path keytool ('/usr/bin/keytool'):


Resume:
Server:  rhv-mgmnt.local.lan
Path Truststore:  /opt/bacula/etc/rhv.cacerts
Pass Truststore: default
Alias:  rhvPluginX89803
Keytool:  /usr/bin/keytool


Are you sure? [no] yes
Truststore generate successfully
[root@rhv-client tmp]#
Manual
To generate the truststore that allows the Bacula plugin to connect to RHV, the RHV server certificate needs to be downloaded and added to the existing Java truststore or a new one used by the plugin.
In the following examples, the address will be used; it needs to be replaced with the proper one.
To install the RHV server certificate on the File Daemon host, the certificate can be prepared in different ways:
Download using http, as in
# beware - line broken below!
curl -o rhvm.cer 'http://rhv.example.com/ovirt-engine/services/
pki-resource?resource=ca-certificate&format=X509-PEM-CA'
Edit a new certificate file and paste the needed content:
Log in to the Bacula File Daemon host.
Use
sshto connect to the RHV Manager.cat /etc/pki/ovirt-engine/ca.pemCopy the contents from the “BEGIN CERTIFICATE” line, up to and including the “END CERTIFICATE” one.
Log out from the RHV host.
Edit a new text file: For example
vim rhvm.cerPaste the copied text. (With
vimin a typical Linux terminal session, the key strokes would be “i shift-ctrl-v escape : x”.)
Once the certificate file, called rhvm.cer in the example above, is
available, it be added to a Java truststore file. The truststore path
and password are general required parameters of this plugin.
It is possible to use an existing Java truststore (including the local default file), or to create a new one. For this example, a new one is created:
keytool -import -alias "mirhvm.crt_truststore" \
 -file rhvm.cer -keystore rhvm.truststore
# A prompt will ask for a password
To use the existing, default Java truststore, the command would be as follows:
keytool -import -alias "mirhvm.crt_truststore" \
 -file rhvm.cer -keystore $JAVA_HOME/jre/lib/security/cacerts
# This will ask for a password, default value is: changeit
Note
By default, the Java truststore path is: $JAVA_HOME/jre/lib/security/cacerts
Please refer to the relevant Java documentation for an explanation of
the keytool command, or Java truststore in general.
Note
The full path to the truststore file used, as well as the password, are needed for further plugin configuration steps, as well as for its operation.
Without Certificate
The plugin also allows a connection without certificate. It is discouraged to use this mode in production environments. To run the plugin in this mode, the plugin must be execute with the option “insecure”, explained in Plugin Parameters.
User Permissions
It is possible to use the RHV “admin” user for the plugin. But, in general, IT organizations should prefer using a specific backup user account with more restricted permissions. In order to have full functionality of this plugin, the user account that will be used must have the following RHV permissions:
Category |
Required setting |
|---|---|
RHV Special Roles |
ExternalEventsCreator |
UserVmManager |
|
System, Configure System |
Login Permissions |
Template, Provisioning Operations |
Import/Export |
VM |
Run VM |
VM, Provisioning Operations |
Edit properties |
Create |
|
Create Instance |
|
Delete |
|
Edit Storage |
|
Edit properties |
|
Disk, Provisioning Operations |
Create |
Delete |
|
Disk, Provisioning Operations, Edit Storage |
Attach |
Manipulate SCSI I/O Privileges |
Plugin Parameters
Below all options and parameters that can be used in a FileSet plugin line with the RHV plugin are described.
Options which have default values don’t need to be defined as long as their default behavior is desirable.
Note
To create obfuscated passwords, the Bacula administrator
should execute the command @encode password in bconsole and copy
the result, or execute it directly via the plugin. This application is
explained in section Plugin System.
Warning
When orthogonal VM selection schemes are combined, the plugin only will back them up once. For example: target_datacenter=dc1 and target_virtualmachine=vm1,vm2 where vm1 is in dc1, and vm2 is in dc2, the plugin will backup dc1 and vm2, and vm1 only backup once.
General plugin parameters
server
Required: Yes
Default:
Info: DNS name of RHV~Manager (the server parameter requires a domain name, not an URI, nor are IP addresses allowed).
Example:
server=rhv.example.com
truststore_file
Required: Yes
Default:
Info: File name of truststore
Example:
truststore\_file=/opt/bacula/etc/rhv-trust
truststore_password
Required: No
Default: changeit
Info: Truststore password
Example:
truststore\_password=changeit
truststore_hpassword
Required: No
Default: changeit
Info: Obfuscated truststore password, use either the obfuscated or plain password
Example:
truststore_hpassword=NTUyOjU0NDpRR1xaR0VJWwA
insecure
Required: No
Default: false
Info: Mode insecure, without truststore. Not recommended in production environment
Example:
insecure=yes
user
Required: No
Default: admin
Info: RHV user account to authenticate as
Example:
user=bacula
password
Required: Yes
Default:
Info: User password
Example:
password=rhvpass123
hpassword
Required: Yes
Default:
Info: Obfuscated user password
Example:
hpassword=NTUyOjU0NDpRR1xaR0VJWwA
auth
Required: No
Default: http
Info: Authentication type,
httporoauthExample:
auth=oauth
config_file
Required: No
Default:
Info: Path to configuration file
Example:
config_file=/opt/bacula/etc/rhv.conf
profile
Required: No
Default: internal
Info: Connection user profile
Example:
profile=internal
abort_on_error
Required: No
Default: 1
Info: Abort the backup in case of any problem with disks implied or previous backup files (0 or 1)
Example:
abort_on_error=0
output
Required: No
Default: json
Info: Helper program output format, one of
json,bacula,consoleExample:
output=console
log
Required: No
Default: ./rhv-plugin.log
Info: Log to specified file
Example:
log=/tmp/rhvbkup.log
debug
Required: No
Default: 0
Info: Enable debug output: 0 (informational), 1 (debug), 2 (deep debug)
Example:
debug=1
Tuning parameters
system_num_tries_connection
Required: No
Default: 5
Info: Number of failed attemps in http requests to RHV/oVirt server before failing
Example:
system_num_tries_connection=10
system_interval_request
Required: No
Default: 120
Info: Interval between http request to RHV/oVirt server (seconds)
Example:
system_interval_request=360
system_timeout_request
Required: No
Default: 120
Info: Timeout for http requests done to RHV/oVirt server (seconds)
Example:
system_timeout_request=360
Backup specific parameters
target_datacenter
Required: No
Default:
Info: Back up VMs from Data Center
Example:
target_datacenter=production
target_cluster
Required: No
Default:
Info: Back up VMs from specified Cluster
Example:
target_cluster=webfarm
target_tag
Required: No
Default:
Info: Back up VMs with specified tag
Example:
target_tag=bkup
target_virtualmachine
Required: No
Default:
Info: Comma-separated list of VM names to back up
Example:
target_virtualmachine=web1,web2,db1
target_path
Required: No
Default:
Info: Backup all vms of children path. Support comma-separated list.
Example:
target_path=/datacenters/Default/clusters/Default/,/tags/tag1/
target_template
Required: No
Default:
Info: Comma-separated list of Template names to back up
Example:
target_template=template1,temp2,temp3
target_exclude_disks
Required: No
Default:
Info: In testing, comma-separated list of disk ids to exclude
Example:
target_exclude_disks=65ccb526-30c0-4bebb348-4395e70d6e32, 3b874e8c-ddbb-4e1e-a4fc-3cdf0b76ec1c
target_exclude_vms
Required: No
Default:
Info: Comma-separated list of VM names to exclude
Example:
target_exclude_vms=web,db2
target_configuration_only
Required: No
Default: false
Info: Back up only VM configuration, not disk images,
trueorfalseExample:
target_configuration_only=true
clone_storage
Required: No
Default: false
Info: Enable clone mode backups
Example:
clone_storage=on
restorecache_retention
Required: No
Default: 0
Info: Number of clones to keep in RHVM
Example:
restorecache_retention=3
restorecache_storage_domain
Required: No
Default:
Info: Target storage to keep backup clone
Example:
restorecache_storage_domain=dataMaster2
cbt
Required: No
Default: false
Info: Active incremental or differential backup, available since Bacula Enterprise version 12.0.2 or newer
Example:
cbt=true
proxy_vm
Required: No
Default:
Info: Virtual machine to proxy backup
Example:
proxy_vm=ProxyVmBackup
proxy_block
Required: No
Default: true
Info: Safely attach/detach disks in proxy backup
Example:
proxy_block=true
persist_memory_state
Required: No
Default: false
Info: Save the memory state (or not) when taking a live snapshot for the backup. During a live snapshot with memory creation, the VM will be locked to prevent it from being changed. When the memory dump is being saved, the VM will be switched to the ‘paused’ state. Available since Bacula Enterprise 14.0.5. previously, version memory was persisted by default.
Example:
persist_memory_state=true
Restore-Specific Parameters
Note
These are usually set interactively during restore, not in a plugin line in a file set.
The correct compatibility [vm, cluster, storageDomain] is the responsibility of the administrator.
vm_name
Required: No
Default: suffix
Info: Name of restored VM,
suffixandoriginalhave special meaning (see chapter Restore for details)Example:
vm_name=restoredVM
template_name
Required: No
Default: suffix
Info: Name of restored Template,
suffixandoriginalhave special meaning (see chapter Restore for details)Example:
template_name=restoredTemplate
vm_disks
Required: No
Default:
Info: Comma-separated list of disks to restore (skip all others)
Example:
vm_disks=3b874e8c-ddbb-4e1e-a4fc-3cdf0b76ec1c
vm_exclude_disks
Required: No
Default:
Info: In testing, comma-separated list of disks to exclude
Example:
vm_exclude_disks=3b874e8c-ddbb-4e1e-a4fc-3cdf0b76ec1c
cluster
Required: No
Default: original
Info: Cluster to restore to, uses value from backup
Example:
cluster=secondary
storage_domain
Required: No
Default: original
Info: Storage Domain name to restore to: For specific cases that affect only one disk, you should use the id of the disk (you can use the restore prompt) delimited by ‘:’ and the value. For the general case, no id or ‘:’ should be used.Separate each case by ‘,’.
Example:
storage_domain=3b874e8c-ddbb-4e1e-a4fc-3cdf0b76ec1c:secondary,primary
vm_force_overwrite
Required: No
Default: false
Info: Overwrite existing target VM,
trueorfalseExample:
vm_force_overwrite=true
vm_switchon
Required: No
Default: false
Info: Turn on restored VM,
trueorfalseExample:
vm_switchon=true
remove_base_vm
Required: No
Default: true
Info: In template restore or vm restore with create template, remove vm restored after create template (see chapter Restore for details)
Example:
remove_base_vm=false
disk_interface
Required: No
Default: original
Info: Interface types for restored disks; comma-separated list of
original,ide,virtio,virtio_scsi,spartExample:
disk_interface=3b874e8c-ddbb-4e1e-a4fc-3cdf0b76ec1c:original,ide
disk_active
Required: No
Default: original
Info: Comma-separated list of
original,true,falseflags to make disks activeExample:
disk_active=true,3b874e8c-ddbb-4e1e-a4fc-3cdf0b76ec1c:false
disk_boot
Required: No
Default: originalfootref{fn:source}
Info: Comma-separated list of
original,true,falseflags to make disks bootableExample:
disk_boot=true,3b874e8c-ddbb-4e1e-a4fc-3cdf0b76ec1c:false
disk_names
Required: No
Default: original
Info: Comma-separated list of names for restored disks
Example:
disk_names=3b874e8c-ddbb-4e1e-a4fc-3cdf0b76ec1c:DiskInactive1,restOfDisks
nics
Required: No
Default: new
Info: Comma-separated list (one entry per virtual NIC) of MAC addresses or
original,newExample:
nics=C0:BA:C0:7A:CA:FE,original
System-Specific Parameters
create_truststore
Required: No
Default: false
Info: Create truststore of server RHVM (only use with Java Daemon), see Plugin System for details
Example:
create_truststore=true
system_num_tries_connection
Required: No
Default: 5
Info: Number failed connection tries before throw an Error more important, see section System operations for details}
Example:
system_num_tries_connection=10
system_interval_request~footref{fn:systemopts}
Required: No
Default: 120
Info: Time(seconds) between failed try and other try
Example:
system_interval_request=60
system_timeout_request
Required: No
Default: 120
Info: Timeout(seconds) to request server
Example:
system_timeout_request=60
Configuration File
The plugin parameter config_file allows for the creation of a file
which can be used to provide all necessary options instead of putting
them into the FileSet’s RHV plugin line. These configuration files are
plain text files containing one setting per line where the name of the
setting and its value are separated by an equals sign “=”. An example
configuration file could look like this:
server=rhv.example.com
user=admin
truststore_file=/opt/bacula/etc/rhvm.truststore
target_datacenters=myDatacenter
operation=backup
If a parameter is mentioned more than once, the last instance is used.
FileSet Configuration
A FileSet to back up RHV VMs will usually contain one plugin=rhv:… line, and may contain File=… directives.
It is recommended to have only a single RHV plugin line per FileSet, which will ensure that no unpredictable behaviour in case of errors such as failure to proceed with one plugin call, but success with all others.
Bacula Systems strongly advises against the use of other plugins in FileSets which use the RHV plugin.
Backup Configuration Examples
The minimal FileSet. This FileSet will backup all vms in RHV environment:
FileSet {
  Name = minimalFileSet
  Include {
    Plugin = "rhv: server=rhv.example.com insecure=true password=rhvpass123"
  }
}
The minimal FileSet using proxy backup method, using the PROXY_BACKUP_VM. This FileSet will backup all VMs in the RHV environment (includes proxy backup VM):
FileSet {
  Name = minimalFileSetProxy
  Include {
    Plugin = "rhv: server=rhv.example.com insecure=true password=rhvpass123 proxy_vm=PROXY_BACKUP_VM"
  }
}
The minimal backup Job. This Job uses the minimal FileSet above, so it will backup all VMs in the RHV environment:
Job {
  Name = minimalJob
  Type = Backup
  Level = Full
  Write Bootstrap = "/var/bacula/working/minimalJob.bsr"
  Accurate = no
  Client = Client1
  Maximum Concurrent Jobs = 1
  Allow Duplicate Jobs = no
  FileSet = minimalFileSetProxy
  Storage = Storage1
  Pool = Pool1
  Messages = Standard
  Enabled = yes
}
Backing up only “vmExample” can be achieved like this:
FileSet {
  Name = ExampleFileSet0
  Include {
    Options {
      Signature = MD5
    }
    Plugin = "rhv: server=rhv.example.com insecure=true password=rhvpass123 target_virtualmachine=vmExample"
  }
}
A backup of the VM named “vm1” and all vms that the datacenter “dc1” contains, excluding the disks with ids 65ccb526-30c0-4beb-b348-4395e70d6e32 and 3b874e8c-ddbb-4e1e-a4fc-3cdf0b76ec1c, would be configured like this:
FileSet {
  Name = ExampleFileSet1
  Include {
    Options {
      Signature = MD5
    }
    Plugin = "rhv:server=rhv.example.com
      truststore_file=/usr/lib/jvm/java-1.8.0-openjdk-amd64/jre/lib/security/cacerts/rhvm.truststore
      auth=http user=admin password=rhvpass123 target_virtualmachine=vm1 target_datacenter=dc1
      target_exclude_disks=65ccb526-30c0-4beb-b348-4395e70d6e32,3b874e8c-ddbb-4e1e-a4fc-3cdf0b76ec1c"
  }
}
The backup of all VMs with names starting with “vm”, excluding “vm1”:
FileSet {
  Name = ExampleFileSet2
  Include {
    Options {
      Signature = MD5
    }
    Plugin = "rhv:server=rhv.example.com truststore_password=changeit auth=http profile=internal
    truststore_file=/usr/lib/jvm/java-1.8.0-openjdk-amd64/jre/lib/security/cacerts/rhvm.truststore
    user=admin password=rhvpass123 target_virtualmachine=vm* target_exclude_vms=vm1"
  }
}
The backup of all templates with names starting with “template”:
FileSet {
  Name = ExampleFileSet3
  Include {
    Options {
      Signature = MD5
    }
    Plugin = "rhv:server=rhv.example.com truststore_password=changeit auth=http profile=internal
    truststore_file=/usr/lib/jvm/java-1.8.0-openjdk-amd64/jre/lib/security/cacerts/rhvm.truststore
    user=admin password=rhvpass123 target_template=template*"
  }
}
Backing up only “vm1” with backup proxy method, using the vm PROXY_BACKUP_VM:
FileSet {
  Name = ExampleProxyFileSet
  Include {
    Options {
      Signature = MD5
    }
    Plugin = "rhv: server=rhv.example.com insecure=true password=rhvpass123 target_virtualmachine=vm1 proxy_vm=PROXY_BACKUP_VM"
  }
}
Restore
Restores of backups done using the RHV plugin are initiated like restores of any file-based backups. The File Daemon used for the restore, indicated by the Client selected as restore target, must have the RHV plugin installed in order to allow restores to RHV directly.
From version 3.0.0, the plugin allows restores of templates. This integration is compatible with restore of vms. And also it allows create a template from a restored vm, directly. Only the appropriate parameters should be used.
From version 4.0.0 (Bacula Enterprise version 12.4.0), the plugin allows restores of incremental and differential backups, and proxy backups.
If the where parameter of a restore of a RHV plugin backup is set to
indicate the original location, the restore will be passed directly to
RHV Manager. An example would be a bconsole command line such as:
restore job=one-RHV-VM where=/
If the restore target location is set to anything else, the selected data will be restored to the path indicated. VM or TEMPLATE configuration will be in an XML file, and virtual disk images will be stored in the format applicable, depending on format at backup time and restore options set. This operation is not necessary use the truststore file.
When selecting VMs or TEMPLATEs to restore, these will be represented as
sub-directories in a common root directory @rhv/. Only one VM or one
TEMPLATE (one subdirectory) should be restored at a time, and for
restores to RHV directly (as opposed to a plain file), the whole
subdirectory needs to be marked.
The treatment between templates and vms is done transparently to the user. Therefore, the user should know if it is a job with a template backup or vm backup. The only way to know if a backup was from a vm or a template is by looking at the name of a file inside the directory. This file will be named as: “nameVm|nameTemplate_vm|template_BaculaRhvBackup.xml”. Such as:
exampleVm_vm_BaculaRhvBackup.xml
exampleTemplate_template_BaculaRhvBackup.xml
The options that were used during a backup job are stored in Bacula’s catalog database and they will applied during a restore session. To provide full flexibility, these options can be modified, and some options specific to restores are also available. These options are documented, along with all other plugin options, in table Restore-Specific Parameters.
Note that some options will be used to pass lists of values to the plugin. Such lists consist of comma-separated values. If a list does not contain enough values to be applied to all related objects, the default value as shown in table Restore-Specific Parameters is used for the missing ones.
Often, special values are available to cause certain behaviour; such options are explained below, in detail.
When using bconsole, the options can be modified using the option 13
(“Plugin Opts”) of the “modify” menu.
An example bconsole restore session of a RHV backup job that saved a
single VM, with one disk won’t be active but all of them yes, is shown
below:
Connecting to Director 127.0.0.1:8101
1000 OK: 103 127.0.0.1-dir Version: 9.0.6 (20 November 2017)
Enter a period to cancel a command.
restore jobid=926 Client=RHV-fd where=
Using Catalog "MyCatalog"
You have selected the following JobId: 926
Building directory tree for JobId(s) 926 ...
6 files inserted into the tree.
You are now entering file selection mode where you add (mark) and
remove (unmark) files to be restored. No files are initially added, unless
you used the "all" keyword on the command line.
Enter "done" to leave this mode.
cwd is: /
$ cd @rhv/
cwd is: /@rhv/
$ ls
vmTest/
$ cd vmTest/
cwd is: /@rhv/vmTest/
$ ls
DiskSnap_513901a8-095e-4bbc-a6d3-b082e91fe64c_151736db-dba5-491b-af39-537914f4a176_0.img
DiskSnap_513901a8-095e-4bbc-a6d3-b082e91fe64c_e3d2062a-d463-4271-9c8a-ff85a8d73d3c_1.img
DiskSnap_58efd04d-48e8-4ab6-9d9c-42247798fd31_151736db-dba5-491b-af39-537914f4a176_4.img
DiskSnap_58efd04d-48e8-4ab6-9d9c-42247798fd31_e3d2062a-d463-4271-9c8a-ff85a8d73d3c_5.img
DiskSnap_d382cd50-f052-4621-950a-4692200012e7_151736db-dba5-491b-af39-537914f4a176_2.img
DiskSnap_d382cd50-f052-4621-950a-4692200012e7_e3d2062a-d463-4271-9c8a-ff85a8d73d3c_3.img
vmTest_attachs_BaculaRhvBackup.xml
vmTest_config_BaculaRhvBackup.json
vmTest_disks_BaculaRhvBackup.xml
vmTest_dsnaps_BaculaRhvBackup.xml
vmTest_nics_BaculaRhvBackup.xml
vmTest_snapshots_BaculaRhvBackup.xml
vmTest_vm_BaculaRhvBackup.xml
$ cd ..
cwd is: /@rhv/
$ mark vmTest
13 files marked.
$ done
$
Bootstrap records written to
/opt/bacula/working/bacula-dir.restore.6.bsr
The Job will require the following (*=>InChanger):
Volume(s)                    Storage(s)             SD Device(s)
===========================================================================
poolrhv-0415                RestoreStorage
Volumes marked with "*" are in the Autochanger.
6 files selected to be restored.
Using Catalog "MyCatalog"
Run Restore job
JobName:          RestoreFiles
Bootstrap:        /opt/bacula/working/bacula-dir.restore.6.bsr
Where:
Replace:          Always
FileSet:          Full Set
Backup Client:    RHV-fd
Restore Client:   RHV-fd
Storage:          File
When:             2018-05-22 10:32:51
Catalog:          MyCatalog
Priority:         10
Plugin Options:   *None*
OK to run? (yes/mod/no): mod
Parameters to modify:
1: Level
2: Storage
3: Job
4: FileSet
5: Restore Client
6: When
7: Priority
8: Bootstrap
9: Where
10: File Relocation
11: Replace
12: JobId
13: Plugin Options
Select parameter to modify (1-13): 13
Automatically selected : rhv:"abort_on_error=0"
"server=cubietruck1.dtic.ua.es"
"truststore_file=/opt/bacula/etc/rhvm.truststore"
"truststore_password=sosecret!" "auth=http" "profile=internal"
"user=admin" "password=alsogood" "target_virtualmachine=vmB3"
Plugin Restore Options
server:              *None*               (*None*)
truststore_file:     *None*               (*None*)
truststore_password: *None*               (*None*)
system_num_tries_connection: *None*               (*None*)
system_interval_request: *None*               (*None*)
system_timeout_request: *None*               (*None*)
auth:                *None*               (*None*)
profile:             *None*               (*None*)
user:                *None*               (*None*)
password:            *None*               (*None*)
vm_disks:            *None*               (*None*)
vm_exclude_disks:    *None*               (*None*)
cluster:             *None*               (*None*)
storage_domain:      *None*               (*None*)
vm_name:             *None*               (*None*)
vm_force_overwrite:  *None*               (*None*)
vm_switchon:         *None*               (*None*)
disk_interface:      *None*               (*None*)
disk_active:         *None*               (*None*)
disk_boot:           *None*               (*None*)
nics:                *None*               (*None*)
disk_names:          *None*               (*None*)
template_name:       *None*               (*None*)
remove_base_vm:      *None*               (*None*)
log:                 *None*               (*None*)
debug:               *None*               (*None*)
debug:Use above plugin configuration? (yes/mod/no): mod
You have the following choices:
1: server (Restore server)
2: truststore_file (Restore truststore file)
3: truststore_password (Restore truststore password)
4: system_num_tries_connection (Number failed tries before abort)
5: system_interval_request (Time (s) between failed tries)
6: system_timeout_request (Timeout(s) to request server)
7: auth (Mode authentication(http|auth2))
8: profile (Profile connection user)
9: user (Restore user name)
10: password (Password user)
11: vm_disks (List id disks to restore)
12: vm_exclude_disks (Exclude id disks in restore)
13: cluster (Target restore cluster)
14: storage_domain (Target restore domain)
15: vm_name (New name Vm restore)
16: vm_force_overwrite (Force overwrite if exist vm)
17: vm_switchon (Turn on vm when retore finished)
18: disk_interface (List interface disk)
19: disk_active (List if want active disks)
20: disk_boot (List if want bootable disks)
21: nics (List restore MACS)
22: disk_names (LIst disks' names)
23: template_name (New name Template restore)
24: remove_base_vm (Remove base vm of template)
25: log (Log path in restore phase)
26: debug (Level debug in restore phase)
Select parameter to modify (1-24): 15
Please enter a value for vm_name: TestBaculaActive
Plugin Restore Options
server:              *None*                (*None*)
...
storage_domain:      *None*                (*None*)
vm_name:             TestBaculaActive      (*None*)
vm_force_overwrite:  *None*                (*None*)
vm_switchon:         *None*               (*None*)
disk_interface:      *None*               (*None*)
disk_names:          *None*                (*None*)
Use above plugin configuration? (yes/mod/no): mod
You have the following choices:
1: server (Restore server)
...
16: vm_force_overwrite (Force overwrite if exist vm)
17: vm_switchon (Turn on vm when retore finished)
18: disk_interface (List interface disk)
19: disk_active (List if want active disks)
20: disk_boot (List if want bootable disks)
21: nics (List restore MACS)
22: disk_names (LIst disks' names)
23: template_name (New name Template restore)
24: remove_base_vm (Remove base vm of template)
25: log (Log path in restore phase)
26: debug (Level debug in restore phase)
Select parameter to modify (1-24): 16
Please enter a value for vm_force_overwrite: true
Plugin Restore Options
server:              *None*               (*None*)
...
storage_domain:      *None*               (*None*)
vm_name:             TestBaculaActive     (*None*)
vm_force_overwrite:  true                 (*None*)
vm_switchon:         *None*               (*None*)
disk_interface:      *None*               (*None*)
disk_active:         *None*               (*None*)
disk_boot:           *None*               (*None*)
nics:                *None*               (*None*)
disk_names:          *None*               (*None*)
template_name:       *None*               (*None*)
remove_base_vm:      *None*               (*None*)
log:                 *None*               (*None*)
debug:               *None*               (*None*)
Use above plugin configuration? (yes/mod/no): yes
Run Restore job
...
OK to run? (yes/mod/no): yes
Job queued. JobId=935
File-Level Restore
It is possible to perform file listing and extraction functions over the virtual disk images that are restored on the Bacula client’s file system (as opposite to restore directly to the RHV manager) by utilizing the set of tools developed and maintained as a part of a libguestfs project (http://libguestfs.org).
Prerequisites are to have libguestfs tools installed on the host that the virtual disk image file is going to be restored on and to have the appropriate daemon started.
Example of commands that should be run in order to meet these prerequisites are, in the case of RHEL7 host:
yum install libguestfs-tools
systemctl start libvirtd
In order to be able to list the contents of the virtual disk image, the
disk image itself needs to be restored on the filesystem of the local
host and command virt-ls executed.
Example of the command usage (where the virtual disk has been restored
to the file
/tmp/bacula-restore/vm1-cos7/Disk1-249226e-c38c-44f0-a121.img in
order to list the contents of the / directory):
# virt-ls -R -a /tmp/bacula-restore/vm1-cos7/Disk1-249226e-c38c-44f0-a121.img /
In order to be able to extract the contents of the virtual disk image,
the disk image itself needs to be restored on the filesystem of the
local host and command virt-copy-out executed.
Example of the command usage (where the virtual disk has been restored
to the file
/tmp/bacula-restore/vm1-cos7/Disk1-249226e-c38c-44f0-a121.img in
order to extract the contents of the /home/ directory to the
/tmp directory):
# virt-copy-out -a /tmp/bacula-restore/vm1-cos7/Disk1-249226e-c38c-44f0-a121.img \
 /home/ /tmp
Extra notes
In RHV, inactive disks are ignored when a clone is made from a snapshot.
In a snapshot backup, if there is a inactive disks without any snapshots, the content of this won’t be backed. But the disk will be created, without content, in the restore.
The templates always use the disk format “thick-provisioned”, although the format disks of base vm was “thin-provisioned”. Can not modify templates’ disks.
The disks out of the template behave like disks of independent vms.
The backup of virtual machines derived from independent templates behaves like independent virtual machines.
The backup of vms derivated of dependent templates, only the snapshots of the machine will be backed up, without those of the template.
The networks of the templates can be modified(name, connected, etc..) after the template was created. So if the network name is changed in restores from previous backups to this change as result will be more networks, as many networks as have been modified.
Diagnostic Operations
For diagnostic purposes, it is possible to interact with the RHV plugin java program on the shell to list information it retrieves from the RHV system as well as to actually transfer data.
Querying RHV
Assuming the Java environment is properly configured, the general approach is as follows:
java -jar /opt/bacula/lib/bacula-rhv-plugin.jar --server=<RHVM-DNS> \
--truststore_file=<path-to-truststore> --truststore_password=<password> \
--auth=<auth> --profile=<profile> \
--user=<user-name> --password=<password> \
--operation=list --path=<RHVM structure>
Results will be returned in JSON format.
The required options indicated above are directly representing the plugin options as described in table Plugin Parameters.
The following list shows all the available RHVM structure, by default “/vms”:
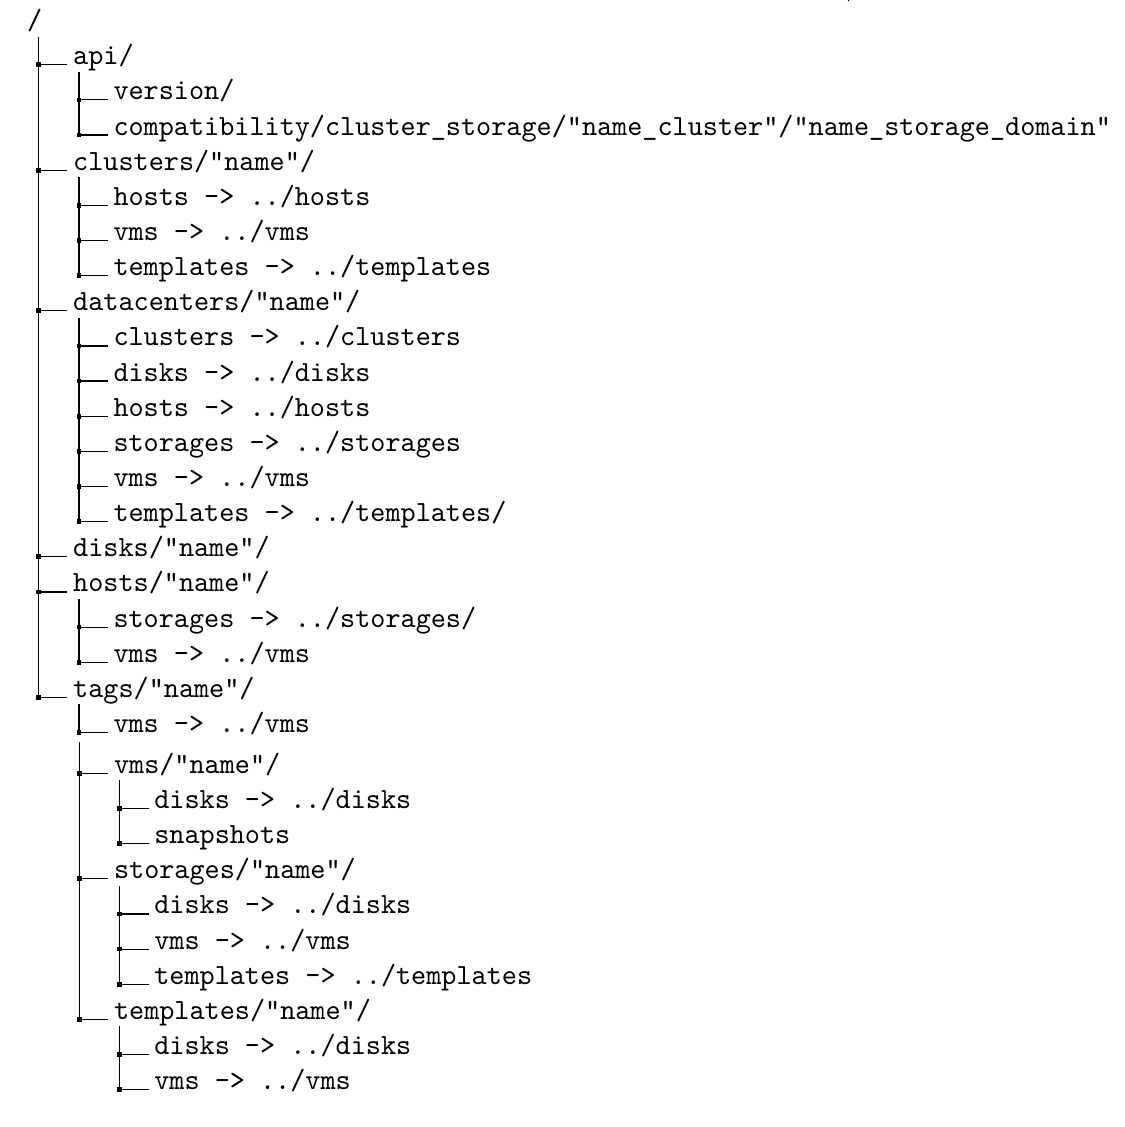
It is also possible to list RHV information using using the
.ls-command of bconsole. Below, some examples are provided.
The meaning of the required and optional parameters are the same as shown in table Plugin Parameters and above for the query functionality.
Note also that bconsole commands need to be entered without any line
breaks.
Verifying compatible backups of VMs than they starts with vm1*:
*.ls client=RHV-fd plugin="rhv:server=myrhv.com \
insecure=true password=rhvPass123" path=/vms/vm1*

#Answer:
# -rw-r----- 0 root root 0 1970-01-01 01:00:00 4f5f9abd-f407-4da6-ba39-272aed709c80->vm1\
                        [vm] [BACKUP_CLONE,BACKUP_SNAP]
# -rw-r----- 0 root root 0 1970-01-01 01:00:00 a8bf6b18-a116-4067-b884-172777fec446->vm11\
                        [vm] [BACKUP_SNAP]
Listing all disks attached to “vm1”:
.ls client=RHV-fd plugin="rhv:server=myrhv.com \
insecure=true user=bacula password=alsogood" path=/vms/vm1/disks/

# Answer:
#-rw-r----- 0 root root 0 1970-01-01 01:00:00 c43a1865-13ba-483e-b38b-6b929d6b4653->\
                        Preassigned_Disk1 [disk]
#-rw-r----- 0 root root 1 1970-01-01 01:00:00 b0b349ea-72d3-405f-9429-c1cb009f30ce->\
                        Preassigned_Disk2 [disk]
#-rw-r----- 0 root root 2 1970-01-01 01:00:00 3f993fb1-3157-4916-aad1-2f323a3cdd4f->\
                        Preassigned_Disk3 [disk]
#-rw-r----- 0 root root 3 1970-01-01 01:00:00 e9ac9bd8-920f-4eb8-b4d0-b405d675b16f->\
                        Preassigned_Disk4 [disk]
To list all datacenters:
.ls client=RHV-fd plugin="rhv:server=RHV.example.com \
insecure=true user=bacula password=alsogood" path=/datacenters/

# Answers:
# -rw-r----- 0 root root 0 1970-01-01 01:00:00 3e54cf31-7a9a-46ad-8a8d-7843b6d7a145->\
                        dcTest [datacenter]
# -rw-r----- 0 root root 1 1970-01-01 01:00:00 4cdcc978-73af-11e8-835d-b827eb7e5e47->\
                        Default [datacenter]
To list all options in datacenter named “dcTest”:
.ls client=RHV-fd plugin="rhv:server=RHV.example.com \
insecure=true user=bacula password=alsogood" path=/datacenters/dcTest/

# Answer:
# -rw-r----- 0 root root 0 1970-01-01 01:00:00 clusters
# -rw-r----- 0 root root 1 1970-01-01 01:00:00 disks
# -rw-r----- 0 root root 2 1970-01-01 01:00:00 hosts
# -rw-r----- 0 root root 3 1970-01-01 01:00:00 storages
# -rw-r----- 0 root root 4 1970-01-01 01:00:00 templates
# -rw-r----- 0 root root 5 1970-01-01 01:00:00 vms
Check if the Cluster “clusterTest” is compatible with the Storage Domain “iSCSIStorage”
.ls client=RHV-fd plugin="rhv:server=RHV.example.com \
user=bacula password=alsogood" insecure=true \
path=/api/compatibility/clone_storage/clusterTest[Name_cluster]/iSCSIStorage[Name_storage]
# Answer:
# -rw-r----- 0 root root 0 1970-01-01 01:00:00 true
Get version of RHVM:
.ls client=RHV-fd plugin="rhv:server=RHV.example.com \
user=bacula password=alsogood insecure=true" path=/api/version
# Answer:
# -rw-r----- 0 root root 0 1970-01-01 01:00:00 4.2.0
System operations
Plugin System
These operations are designed to offer some functionalities without affecting the RHVM’s state. Among these are check connection with RHVM, create truststore automatically and encode password using same pattern as Bacula. The possible parameters are defined in table Plugin Parameters
Warning
Call plugin directly!
The plugin generates a new truststore:
java -jar rhv-backup.jar --truststore_file=/opt/bacula/etc/rhvOwn.truststore \
--truststore_password=sosecret --log=./log_debugff.log --server=myrhvm.com \
--hpassword=Mjk1M2QwRnPCncKT --operation=system --create_truststore=true
# Result: Truststore file in /opt/bacula/etc/rhvOwn.truststore with password sosecret
Warning
Advanced use only
These allow control the disk request timeout, the number tries before reporting an error and more.
java -jar rhv-backup.jar --log=./log_debugff.log --server=myrhv.com \
--hpassword=Mjk1M2QwRnPCncKT --operation=list --path=/datacenters/ \
--num_tries_connection=10 --system_timeout_request=120
FileSet {
  Name = ExampleFileSet3
  Include {
    Options {
      Signature = MD5
    }
    Plugin = "rhv:server=rhv.example.com insecure=true
    system_num_tries_connection=100 system_interval_request=1200 system_timeout_request=2000
    user=admin password=rhvpass123 target_template=template*"
  }
}
Transferring Data
The Java program interacting with RHV can also be used to transfer data
between the RHV infrastructure, in which case additional parameters are
available and the operation=list parameter-value-pair is not used.
In this mode, the following general considerations apply:
Either backup, restore, or list mode must be chosen by using appropriate options. Modes can not be mixed.
Options have to start with double dashes, as in
--server.The
--outputdefines the output format and should be explicitly set to eitherconsoleorjson.These modes are not fully supported, but exist mostly to assist in trouble shooting with Bacula Systems support team. As such, they are not fully documented and should not be used for regular operations or maintenance of a RHV environment.
Some examples are provided below.
Backup of datacenter “OneDatacenter” configuration:
java -jar /opt/bacula/lib/bacula-rhv-plugin.jar --output=console --debug=1 \
--server=rhv.example.com \
--truststore_file=/opt/bacula/etc/rhvm.truststore \
--truststore_password=sosecure --auth=http --profile=internal \
--user=bacula --password=alsogood \
--operation=backup \
--target_datacenter=OneDatacenter \
--target_configuration_only=true \
--path=/tmp/rhvPlugins/
Backup of all Virtual Machines whose names match the regular expression “vm.*”, but excluding “vm1”. Note the quoting of the asterisk character to avoid the shell expaning it:
java -jar /opt/bacula/lib/bacula-rhv-plugin.jar --output=console --debug=1 \
--server=rhv.example.com \
--truststore_file=/opt/bacula/etc/rhvm.truststore \
--truststore_password=sosecure --auth=http --profile=internal \
--user=bacula --password=alsogood \
--operation=backup \
--target_path=/vms/vm.* \
--target_exclude_vms=vm1 \
--path=/tmp/rhvPlugins/
Restoring the Virtual Machine “vm1”:
java -jar /opt/bacula/lib/bacula-rhv-plugin.jar --output=console --debug=1 \
--server=rhv.example.com \
--truststore_file=/opt/bacula/etc/rhvm.truststore \
--truststore_password=sosecure --auth=http --profile=internal \
--user=bacula --password=alsogood \
--operation=restore \
--vm=vm1 \
--path=/tmp/rhvPlugins/
Restoring a VM, renaming disks:
java -jar /opt/bacula/lib/bacula-rhv-plugin.jar --output=console --debug=1 \
--server=rhv.example.com \
--truststore_file=/opt/bacula/etc/rhvm.truststore \
--truststore_password=sosecure --auth=http --profile=internal \
--user=bacula --password=alsogood \
--operation=restore --restore_vm=vm3 \
--vm_disk_names=65ccb526-30c0-4beb-b348-4395e70d6e32:vm3_restore_disks1,vm3_restore_disks_general
--path=/tmp/rhvPlugins/
Troubleshooting
Bacula environment
This plugin stores the logs depending of the number of paralel executions it has. In other words, if the operations are only performed synchronously, it will always be sotred in the same file, under the suffix of ’-0.log’. However, when a backup is running and another backup(or a restore) is started, the first backup will continue to store the log in the same file(under suffix of ’-0.log’), but the one just started will be stored in the file under the suffix of ’-1.log’.
The plugin indicates the log file in a message in job log. By default, the location of log file will be: /opt/bacula/working/rhv/rhv-debug-X.log, but the user can modify this default value in file /opt/bacula/rhv_backend, or in each job with param log.
It’s recommended that the log file always be in /opt/bacula/working/rhv/.
RHV environment
The RHV Manager can return errors in some situations. The RHV REST API return code and messages do not always precisely reflect the cause of the problem. Given that general HTTP codes indicating rather broad error conditions are used, the plugin can not always react in a perfect manner. Instead, the plugin returns all available information about errors and warnings, but in many situations it will be necessary to check RHV logs to understand the cause of an operational error.
The most informative logs of RHV are usually vdc-log.txt and
/var/log/ovirt-engine/engine.log (for RHV Manager) and
/var/log/vdsm/vdsm.log (for virtualization hosts) since those
reflect the main flow of the application and if any error occurs, it
will generally be tracked in those logs.
Once the exact component that failed is known, it is possible to check the specific log file. The full list of RHV logs is described at redhat.com/…/17587#RHEV_Logs_Overview
Below we present some common errors and associated actions to resolve them.
Failed Transfer
If a disconnection happens when a disk image is being transferred by the ImageTransferService, the virtual disk remains in the state “Transfering via API” even if the backup job has terminated. This state blocks snapshot deletion. If a backup has suffered from non recoverable connection loss to the RHV Manager and this state remains for a virtual disk, a manual action on the RHV Manager can be performed to unblock the situation:
# log in to the RHV Manager shell, as root user
su postgres
psql -U engine -d engine
SELECT command_id FROM image_transfers;
# Get the command_id that is aborted
DELETE FROM image_transfers WHERE command_id='<UUID from above>';
# The state 'Transfering via API' will change to 'Locked' (2).
# Query the images table for locked images
SELECT image_group_id FROM images WHERE imagestatus = '2';
# Identify which one needs to be unlocked
UPDATE images SET imagestatus = '1' WHERE imagestatus = '2';
This will make the virtual disk inoperative, but it will allow either delete or commits the snapshots created previously.
In the RHV GUI, navigate to “Virtual Machines”, select the faulty one, select “Snapshots”, and perform a preview of a stable snapshot. Afterwards, “Commit” the action.
The plugin will automatically clear this situation with the following backup. This manual intervention is only necessary if there is no option of running a subsequent backup.
DSM <host> command ExtendImageTicketVDS Failed
The full message provided would be similar to
DSM <host> command ExtendImageTicketVDS failed: Image daemon request
failed: u'
status=404, code=404,
title=Not Found,
explanation=The resource could not be found.,
detail=No such ticket: a035901e-c3d6-4033-b0fa-8e127d422ccf,
reason=Not Found'
This error can be solved manually in the same way as the previous problem, and the plugin will also clear this situation with the following backup.
javax.net.ssl.SSLHandshakeException: sun.security.validator.ValidatorException
Here, the full error message would look like
javax.net.ssl.SSLHandshakeException:sun.security.validator.ValidatorException:
  PKIX path building failed:
    sun.security.provider.certpath.SunCertPathBuilderException:
      unable to find valid certification path to requested target
at
sun.security.ssl.Alerts.getSSLException(Alerts.java:192)
at
sun.security.ssl.SSLSocketImpl.fatal(SSLSocketImpl.java:1959)
at
sun.security.ssl.Handshaker.fatalSE(Handshaker.java:302)
at sun.security.ssl.Handshaker.fatalSE(Handshaker.java:296)
...
This error is related to the certificates used by RHV. A possible solution is shown here: stackoverflow.com/…/pkix-path-building-failed.
org.apache.http.NoHttpResponseException: <RHVM>:443 failed to respond
The full error is
org.apache.http.NoHttpResponseException: rhv.example.com:443 failed to respond
org.ovirt.engine.sdk4.Error
org.ovirt.engine.sdk4.Error: Failed to send request at
org.ovirt.engine.sdk4.internal.HttpConnection.send(HttpConnection.java:213)
at org.ovirt.engine.sdk4.internal.services.
  EventsServiceImpl\$AddRequestImpl.send(EventsServiceImpl.java:83)
...
This error happens when no certificate is present. The solution can be found in the SSLHandshakeException problem resolution.
HTTP Response Code is 409
The full error is:
org.ovirt.engine.sdk4.Error: HTTP response code is "409".
  HTTP response message is "Conflict".
at org.ovirt.engine.sdk4.internal.services.ServiceImpl.
  throwError(ServiceImpl.java:113)
at org.ovirt.engine.sdk4.internal.services.ServiceImpl.
  checkFault(ServiceImpl.java:40)
This can happen if a snapshot could not correctly get deleted.
As explained in section ch:fixlockedsnapshot, this can be manually resolved by commiting a snapshot preview in the RHV GUI.
The plugin will solve this situation manually with the following backup. A manual intervention is only necessary if there is no option of running that following backup.
HTTP response is 401. HTTP response message is “Unauthorized”
This error happens when RHVM credentials are incorrect.
HTTP 503 Code at Disk Download
This happens if the connection between RHV Manager and RHV virtualization host daemons is not working correctly. Usually this indicates a firewalling issue.
The solution is to ensure that the firewall service (firewalld is
active and correctly configured. For RHV operations, two ports–54321 for
vdsm and 54322 for ovirt-imageio– need to be accessible. To
ensure this, execute the follow commands on RHV virtualization hosts:
systemctl start firewalld
firewall-cmd --permanent --add-port=54321/tcp
firewall-cmd --permanent --add-port=54322/tcp
To check if this command has been effective:
ssystemctl restart firewalld
firewall-cmd --list-ports
The ports 54321/tcp and 54322/tcp must appear in the list of open ports.
In a production environment, it is reasonable to limit access to the
daemons affected only from trusted hosts or network segments. Please
refer to RHEL documentation of the firewall-cmd program, which
is available using man firewall-cmd.
VDSM hostTest command GetCapabilitiesVDS failed: Vds timeout occured
This error can happen if a host is not registered. It shouldn’t impact operations on other hosts.
To fix this situation it is usually necessary to confirm the host has been rebooted or shutdown and put it into maintenance mode after.
Can’t create any snapshot in a specific vm, but the vm can run
The origin of this error is unknown, this case is reported here. The simple explanation is that an attempted snapshot removal (which we have no logs of), corrupted the chain.
Note
You can download this article as a PDF
While it is technically possible to backup multiple VMs in one Bacula hypervisor plugin backup job (VMware, Hyper-V, RHV, Proxmox, etc), this is not necessarily the best way to perform VM backups. It is strongly recommended that one backup Job is created for each VM being backed up for the following reasons:
By default, if one of your VMs fails to backup in a “multi-VM” backup job, the main Bacula job will terminate “Backup OK – with warnings.” The JobStatus for jobs that terminate “Backup OK” and “Backup OK – with warnings” are not differentiated in the catalog. They are both ‘T’, so this means that you will have to carefully monitor your backup job logs in case some VM backups fail and pay attention to the JobErrors field in the job summaries.
To address this issue, there is a plugin option called “abort_on_error” in each of the Bacula hypervisor plugins, which causes Bacula to immediately fail the job as soon as an error is detected while backing up a VM. However, if you use this option, and the backup of VM number 11 in a list of 50 VMs fails, then the whole job will be failed, and VMs 12-50 will not be backed up during that job’s run.
A 1:1 configuration (one VM backed up per job) means that the “abort_on_error” option will make more sense to enable in each job so you will immediately know when a VM fails to backup since the Bacula job will terminate with a “Backup failed” message and ‘f’ in the catalog for the job.
With a 1:1 VM/Job configuration, re-running a specific VM backup job is simple to do after the cause of the failure is investigated and fixed.
In the example about the 50 VMs, without a 1:1 configuration, there is no way to re-run a backup of just the one VM that failed to backup.
Additionally, with a 1:1 VM/Job configuration, job metrics will have more meaning because each VM will be one job, and you will know to expect a specific number of jobs each night with each job representing one VM.
With a multi-VM per job configuration, each VM will be backed up “serially”, one at a time, disk by disk, VM by VM. A 1:1 configuration will allow several VM backups to be run concurrently which will reduce the overall time to perform the VM backups. Of course, you will need to pay close attention to SD and ESXi storage and networking resources, and adjust the number of concurrent jobs accordingly.
For some hypervisors (VMware, Proxmox, etc) Bacula provides automation scripts (eg: scan_datacenter.pl for VMware). These scripts are designed so that they will create 1:1 VM/Job configurations. If you plan to make use of these automation scripts, it is a good idea to already be thinking this way, and having your hypervisor plugin backup configurations in a 1:1 configuration from the beginning.
Future Development Directions
Some features are planned for further development of this plugin:
Backup and restore of RHV Manager Configuration and database.
Implement an option to control Storage Domain overcommitment.