Configuring New vSphere Host
EnterpriseBacula Enterprise Only
This solution is only available for Bacula Enterprise. For subscription inquiries, please reach out to sales@baculasystems.com.
On the BWeb main menu (left panel), expand “Virtual Machines” and click “VMware Center”. You will be taken to the page with the “vSphere Hosts” listing, which should currently be empty.
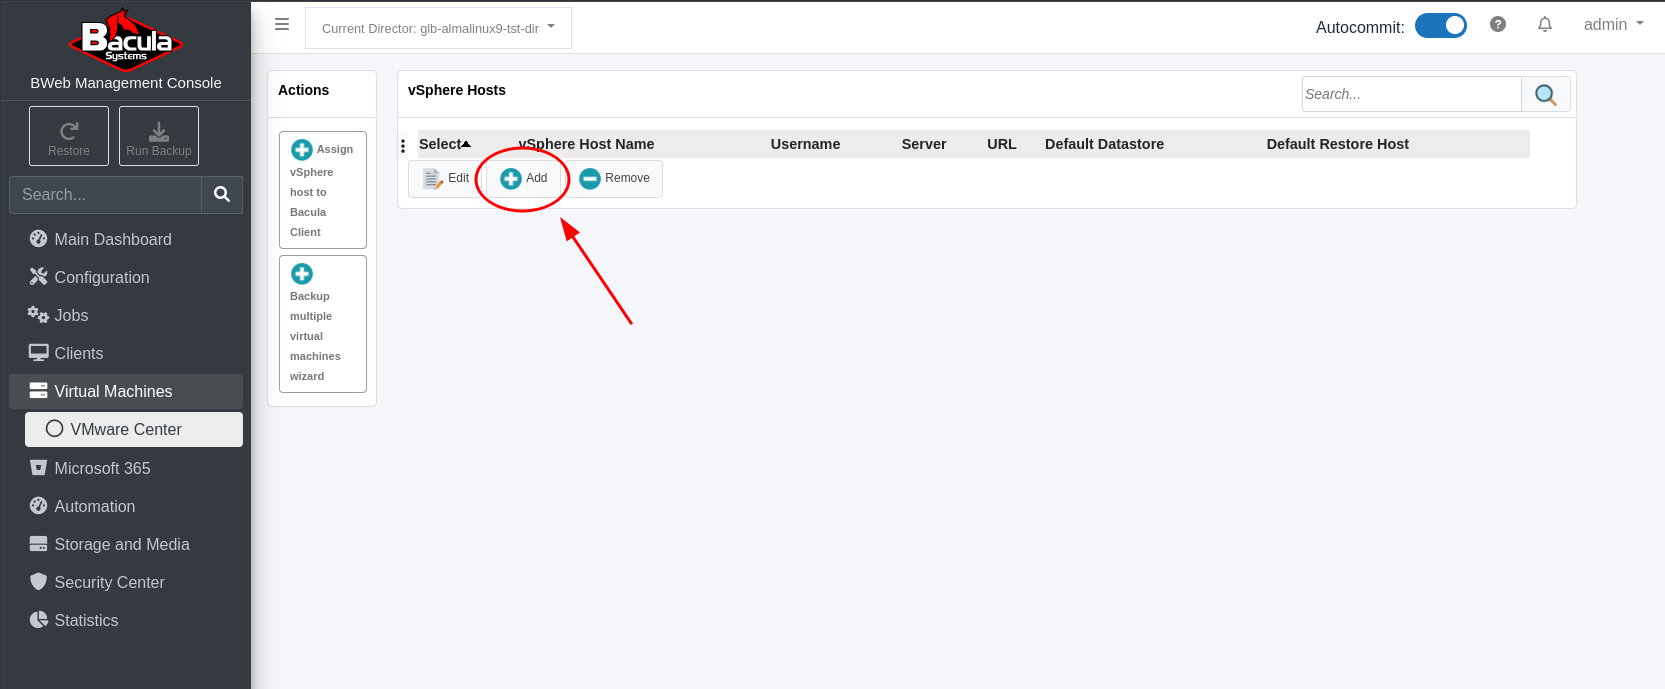
To add a new vCenter server or specific ESXi host to the list, click on the “Add” icon.
Fill in the fields in the pop-up form.
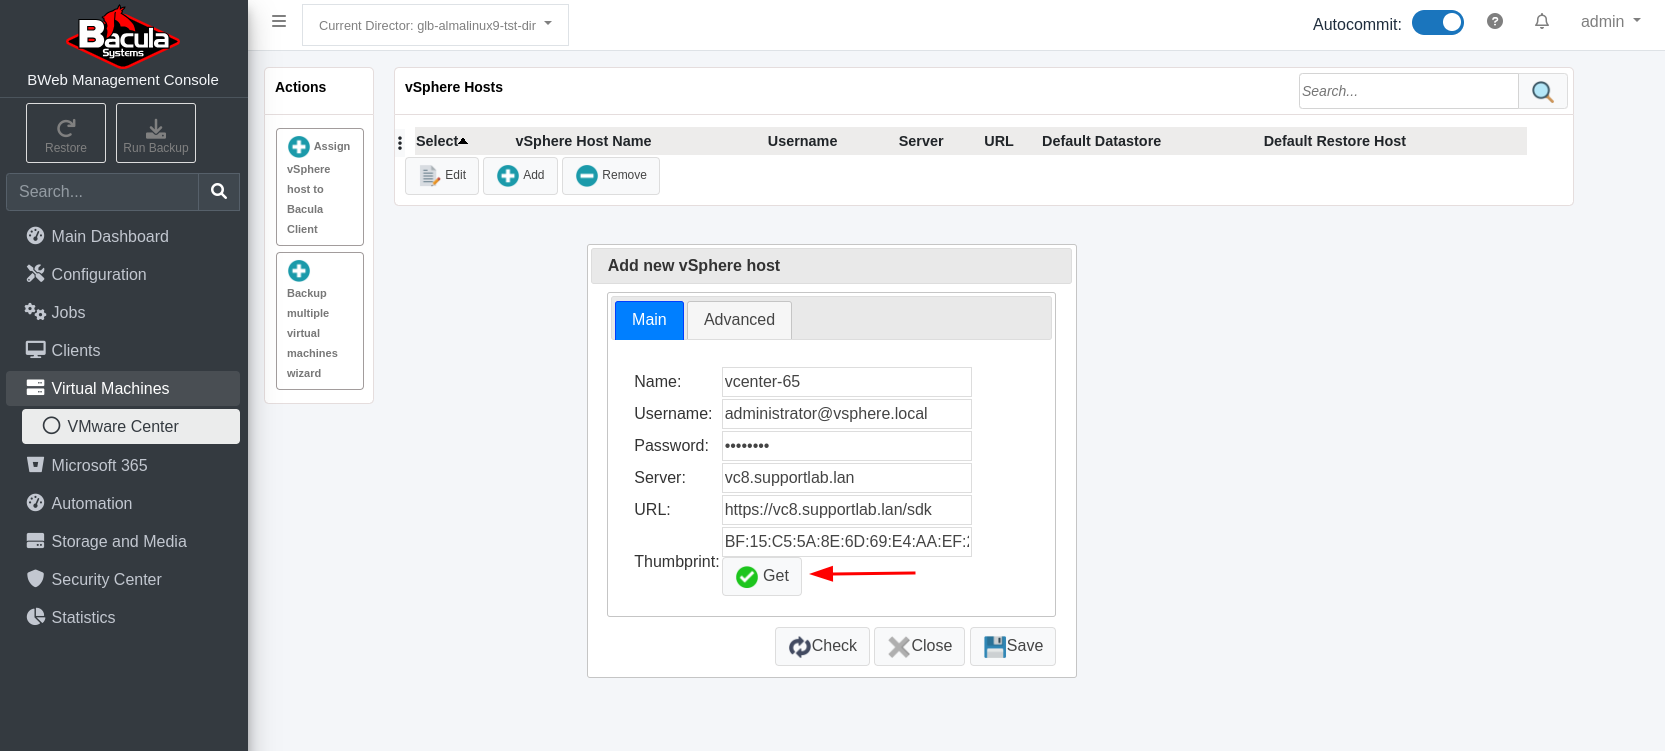
To get the “Thumbprint”, just click on the “Get” icon next to the Thumbprint field. Be sure that the “Server” IP address (or FQDN) is correct. It is important to verify this Thumbprint information now to prevent future issues or potential miscommunications with the wrong vSphere server.
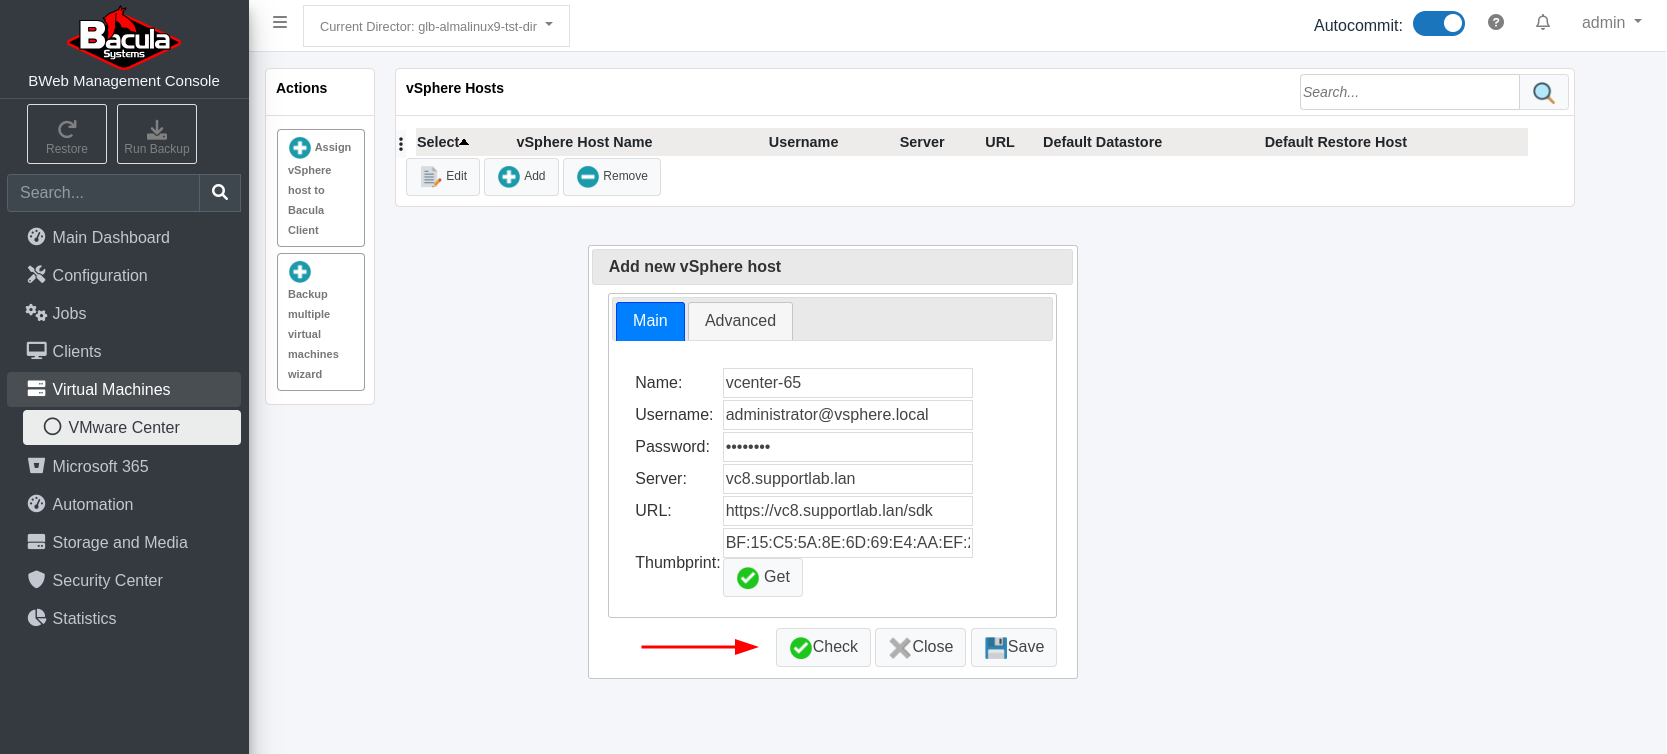
To verify that the information in the form has been filled in correctly for this vSphere host, click on the circular arrows (check) icon, and after a few seconds, the icon should turn into a green check mark as in the image below.
Click “Save” and you will be returned to the “vSphere Hosts” page, which should now be populated with this one (in this case called “vcenter-65”) vCenter host just created.
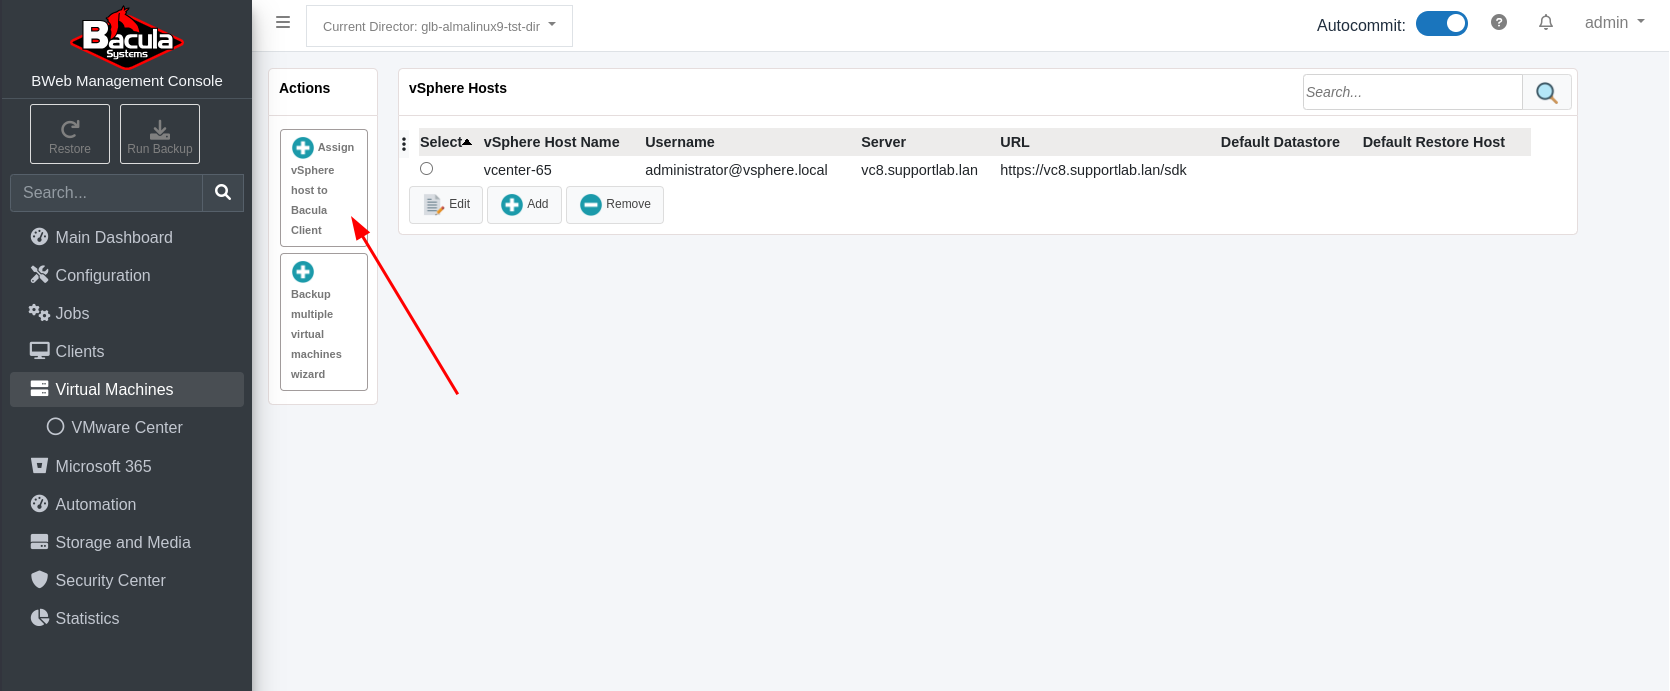
Next, we need to assign this vSphere (vCenter) host which we named “vcenter-65” to a Bacula FD with the vSphere plugin installed. To do this, click the “Assign vSphere host to Bacula Client” button in the upper left corner.
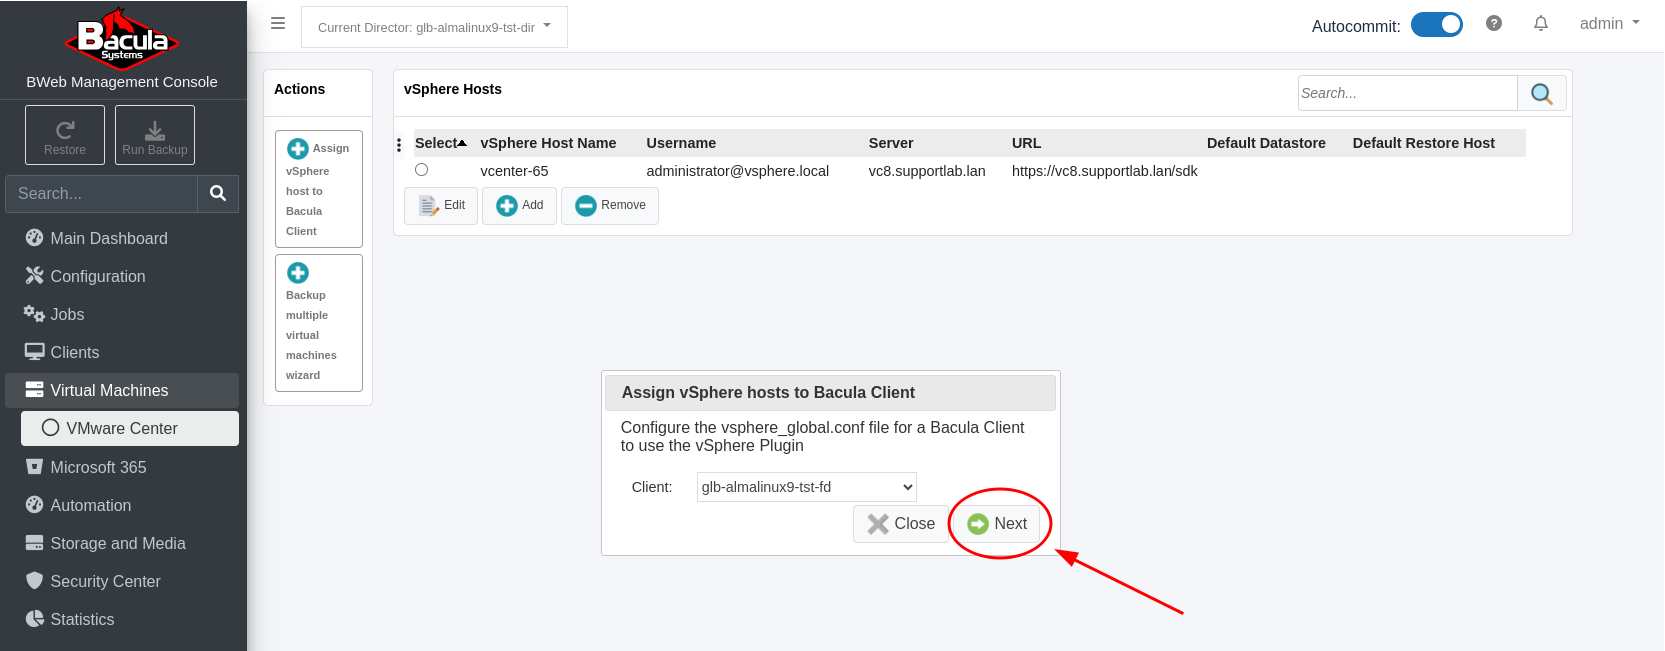
Select the correct Bacula Client from the “Client” drop-down list. In the screenshot, there is only one Bacula Client configured. A fully configured Bacula environment will have all of the Clients listed here to choose from.
Click “Next”, and you will be presented with a dialog box where the vSphere host(s) (shown here as vcenter-65) are shown in the “vSphere servers available” box. To assign this vSphere host to this FD, highlight it, then click the green arrow pointing to the “vSphere servers assigned” box.
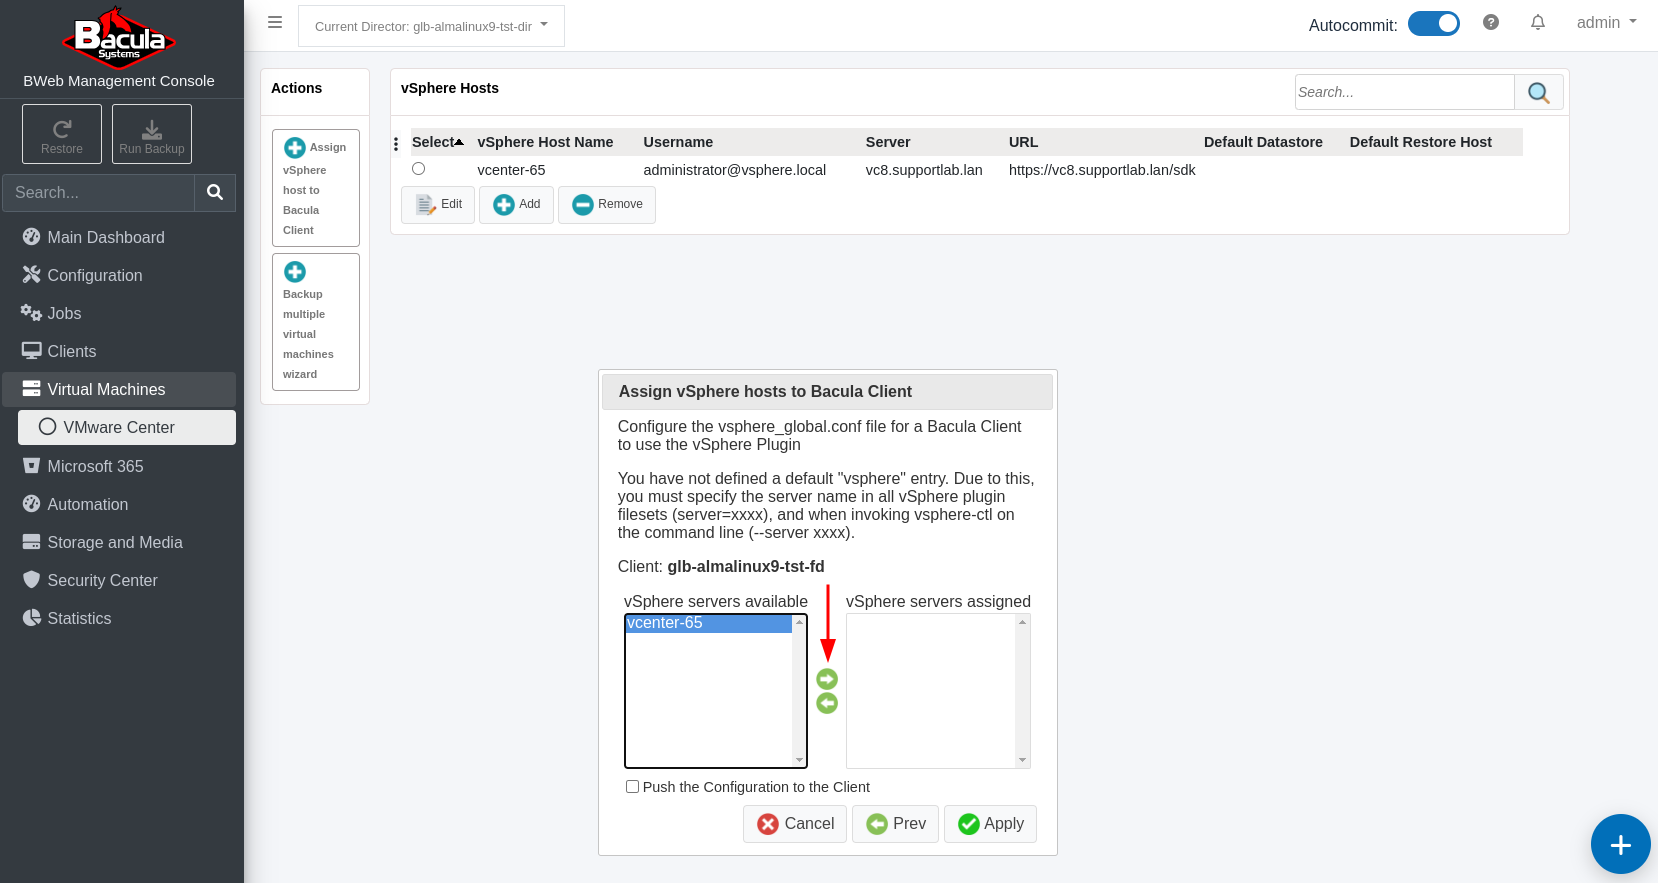
The “vcenter-65” vSphere host will be added to the “vSphere servers assigned” box on the right.
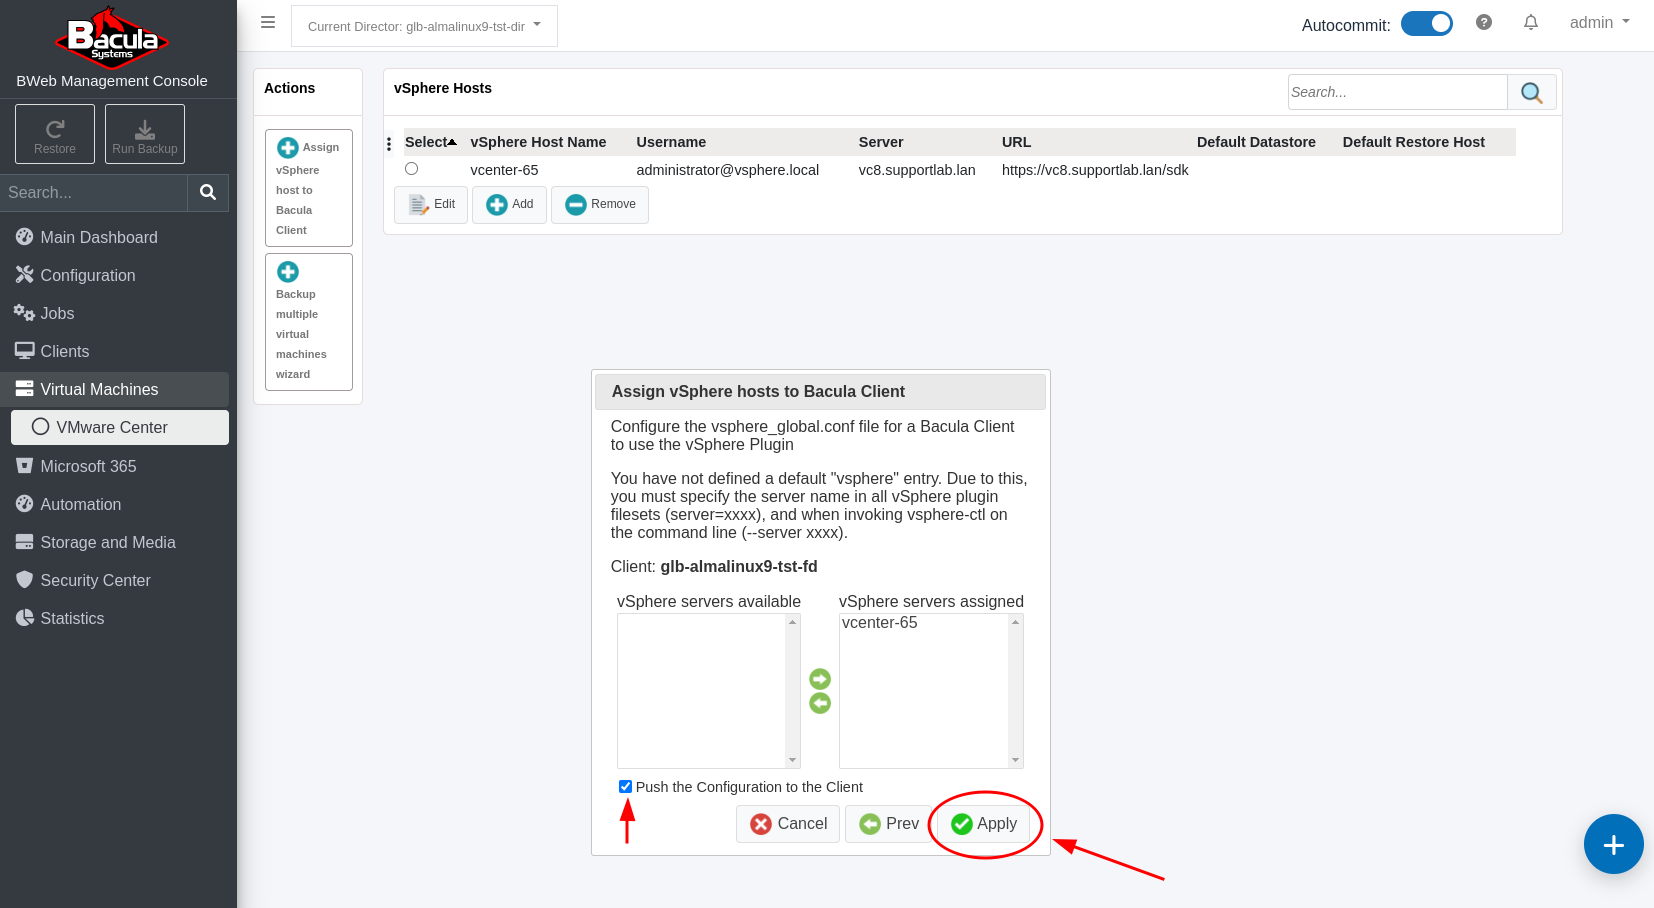
Be sure to check the “Push the Configuration to the Client” check box.
Click “Apply” and you will be taken to the “Push Configuration to the Client” page.
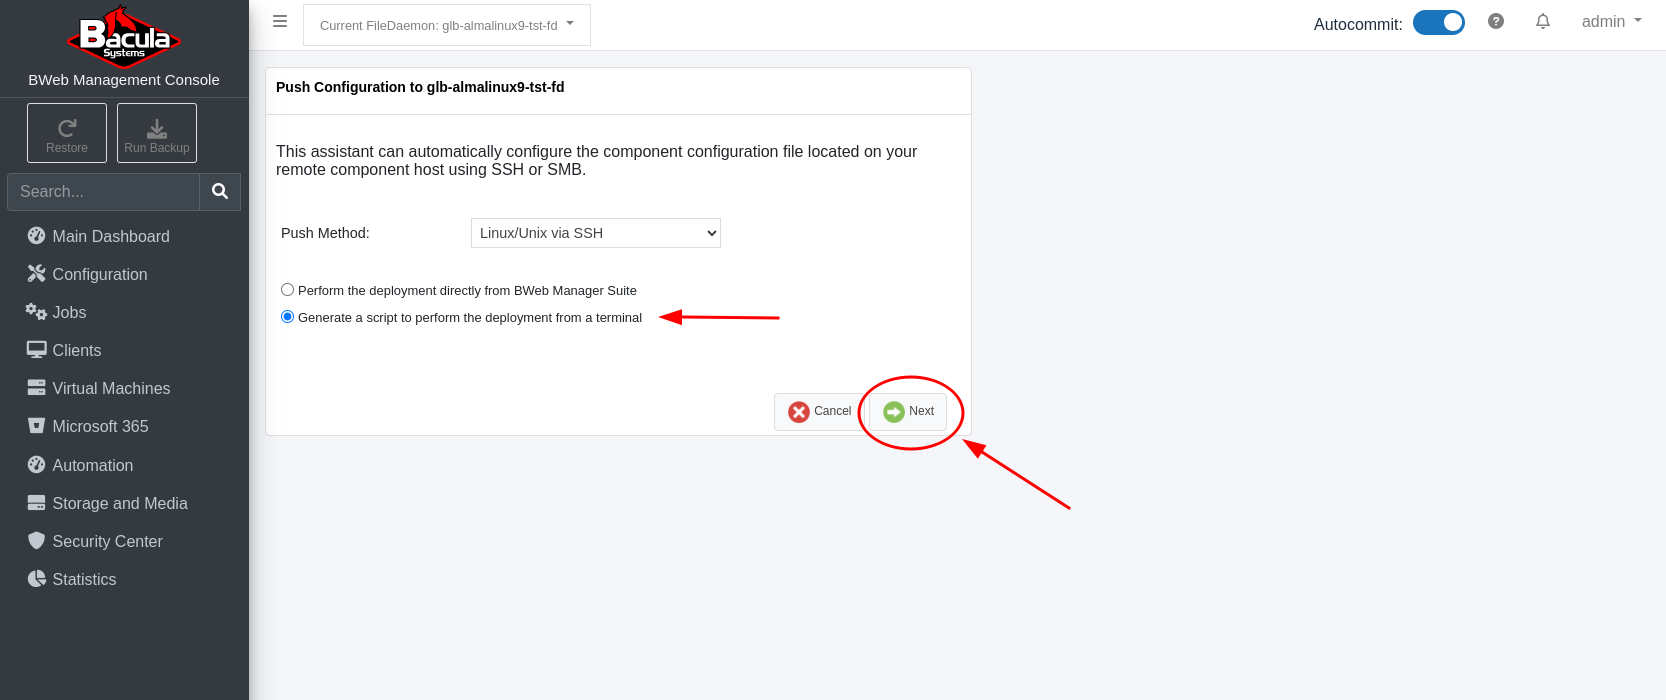
The settings on this page refer to the Bacula Client where the FD is running the vSphere plugin. It is the “Client” system we chose previously, and its name is displayed in the header of this dialog box.
Choose the Push Method, set it to Linux and check “Generate a script to perform the deployment from a terminal”. Click “Next”.
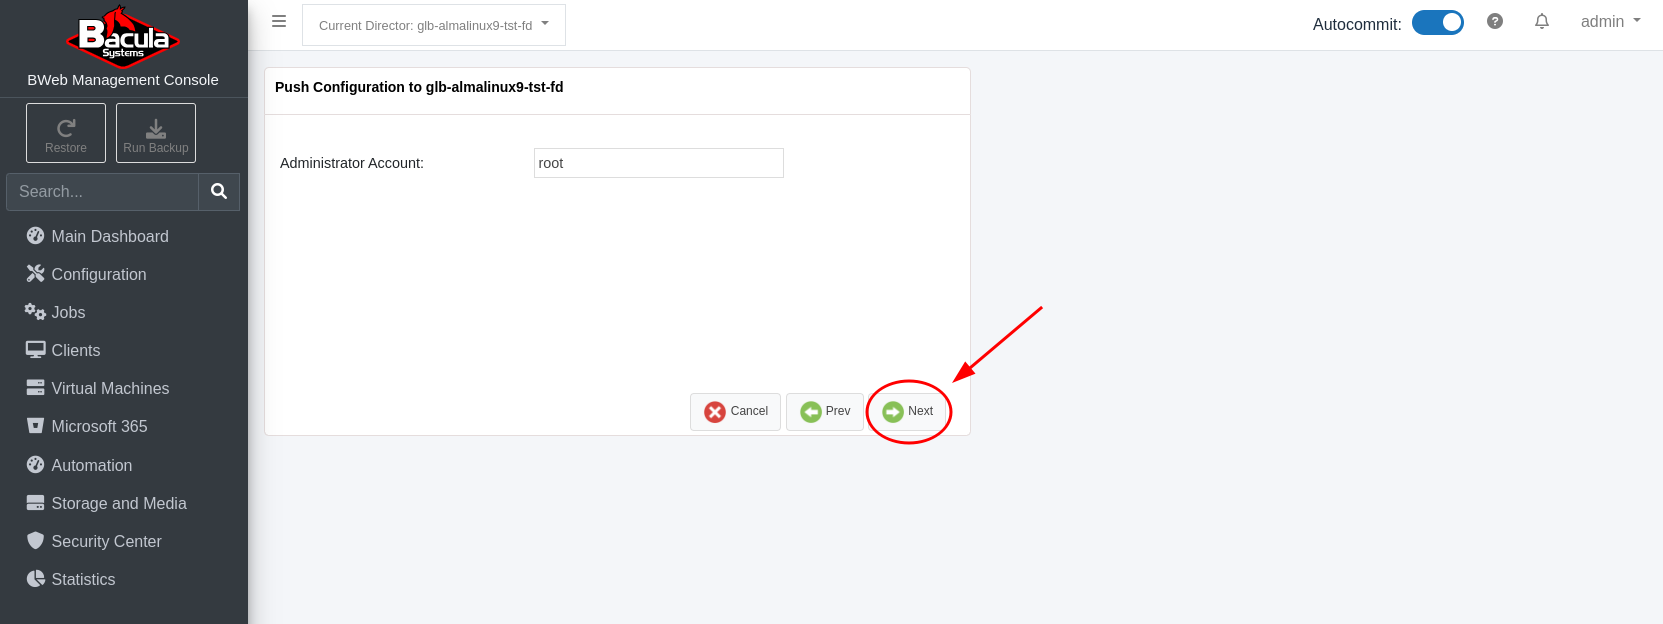
Set the “Administrator Account” to “root” for this Bacula Client FD.
Click “Next” and you will be presented with the “Push Configuration” dialog box where there will be a Linux command line script in the yellow box.
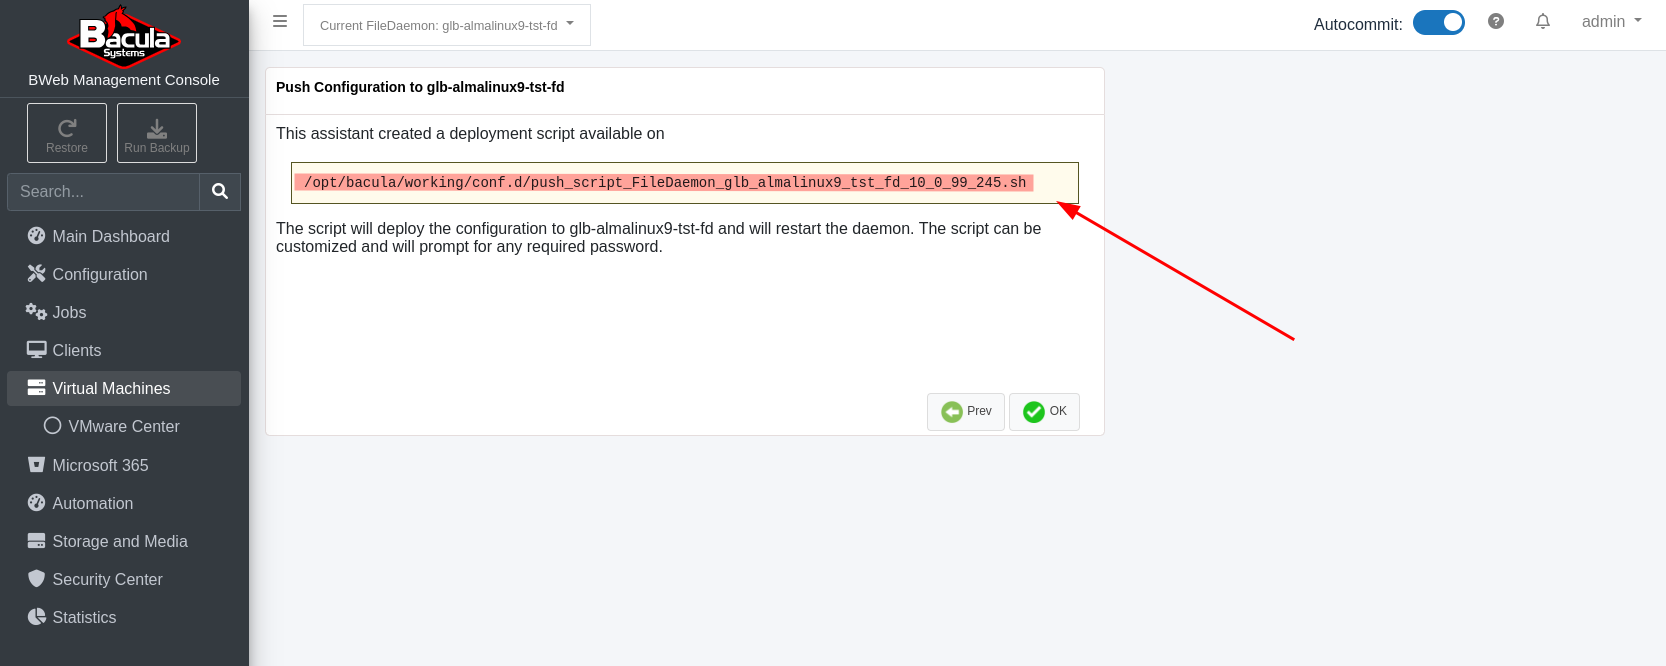
Copy the script path to the clipboard.
Next, ssh into your Bacula Director/BWeb server as root:
$ ssh root@10.0.99.245
root@10.0.99.245's password:
Activate the web console with: systemctl enable --now cockpit.socket

Last login: Wed Feb  7 10:27:54 2024 from 10.255.0.6
[root@glb-almalinux9-tst ~]#
Paste the command copied previously:
[root@glb-almalinux9-tst ~]# /opt/bacula/working/conf.d/push_script_FileDaemon_glb_almalinux9_tst_fd_10_0_99_245.sh
Hit <enter> and you will see something similar to the following output. This output shows that the script run on the Bacula Director/BWeb server copies a second script to the Bacula Client and then runs that script on the Client via ssh. This second script copies a correctly configured file into the “/opt/bacula/etc” directory on the Client and then restarts the Bacula FD:
INFO: Execute user script '/opt/bweb/bin/deploy_script_linux.sh'
INFO: Checking required files on 10.0.99.245
INFO: Copy configuration files
The authenticity of host '10.0.99.245 (10.0.99.245)' can't be established.
ED25519 key fingerprint is SHA256:B+W7gybwB/qYcXWWAMLwR1hElPS6gcupykIgMFtk3PU.
This key is not known by any other names
Are you sure you want to continue connecting (yes/no/[fingerprint])? yes
Warning: Permanently added '10.0.99.245' (ED25519) to the list of known hosts.
root@10.0.99.245's password:
bacula-push-50944.tar                         100%   10KB   9.1MB/s   00:00
INFO: Extract configuration files
INFO: Backing up original configuration from 10.0.99.245
tar: Removing leading `/' from member names
/opt/bacula/working/vsphere_vcenter-65/
tmp.ou8uyzscYk                                100%   36    70.9KB/s   00:00
tar: Removing leading `/' from member names
/opt/bacula/etc/vsphere_global.conf
tar: Removing leading `/' from hard link targets
Shared connection to 10.0.99.245 closed.
Shared connection to 10.0.99.245 closed.
tar: Removing leading `/' from member names
/opt/bacula/working/vsphere_vcenter-65/
/opt/bacula/etc/vsphere_global.conf
Shared connection to 10.0.99.245 closed.
INFO: Clean up temporary config files
Shared connection to 10.0.99.245 closed.
INFO: Restarting  service on 10.0.99.245
INFO: Clean up
The Bacula Client is now ready to run backup Jobs of VMware VMs managed by the vCenter server that we named “vcenter-65” in our “vSphere Hosts” listing.
At this point, you may manually create Jobs/Filesets to backup one or more VMs using the vSphere plugin on the Client. See the Creating a vSphere Plugin Backup Job and Fileset in BWeb section.
Alternatively, by clicking the “Backup multiple virtual machines wizard” button on the “VMware Center” page, you may create an automated configuration whereby Bacula will create a new Job and associated Fileset for each VM managed by this “vcenter-65” vCenter server. These Jobs/Filesets may be based on all VMs, some specific VM names, VM names using wildcards, VMs based on “VM Tags”, all VMs on one or more Datastores, or one or more Resource Pools. See the Creating An Automated vSphere Backup Environment Using BWeb section for more information about configuring automatic job creation.
When configured using this automated method, Bacula will automatically add a new Job and associated Fileset for each new VM found, and will disable (or remove) the Job/Fileset for any VM that has been decommissioned and is no longer available on this vCenter server.
See also
Next articles:
Go back to: BWeb VMware Center Module.