Standard Recovery Procedure
EnterpriseBacula Enterprise Only
This solution is only available for Bacula Enterprise. For subscription inquiries, please reach out to sales@baculasystems.com.
Using the Recovery Media
You now have a CDROM and an ISO image. For testing purposes, on physical servers, the CD-ROM is the best choice, while in virtual machines, the ISO image should be used. It is also possible to create a bootable USB flash drive from the ISO. Creating a bootable USB device from the ISO is described in a later chapter. If you need a bootable USB device, create it now before proceeding.
Starting the Recovery
Proceed by attaching the Recovery Media to your test recovery system, which should be set up with an empty disk (or several empty disks, if that matches your production needs). Make sure the test system will boot from the Recovery Media by setting the BIOS options accordingly. It may be necessary, for example, to disable secure boot while performing the recovery and re-enable it afterwards.
The actual recovery procedure is initiated and configured manually; although this has the disadvantage that physical or remote console access to the system is required, we consider this to be the safer approach for a procedure that could otherwise lead to data loss.
When your client to recover boots, it will start the minimal Windows on the Recovery Media, set up its network, and display the Bacula splash screen:
Recovery System Booted
Click “Next” and select your keyboard layout in the list. You can double click on the line to avoid to have to click the “Next” button. After that the program will restart to take the keyboard change into account and return to prompt you.
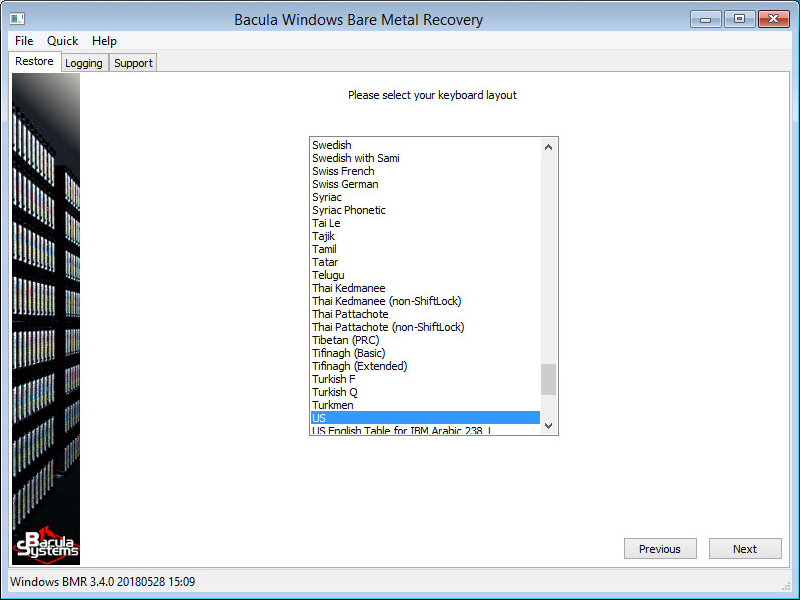
Select your Keyboard Layout
If your network is not configured with a DHCP server or if you did not pre-configure your ISO image with static addresses, you must configure a static IP address using the Network setup dialog box started from the Tools menu item in the File Menu.
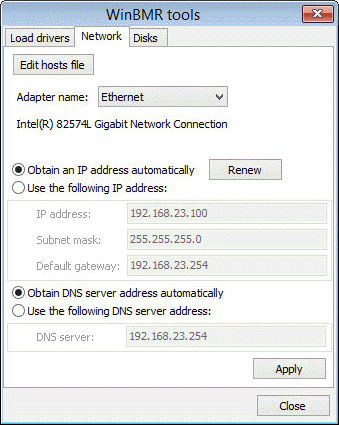
Configure the Network
WindowsBMR now lets you review and modify the Bacula configuration
that is stored on the Recovery Media. You can
pre-configure your Recovery Media using the configurator. See the
Configuring the WindowsBMR Rescue ISO to learn how and find some
information about the available configuration options.
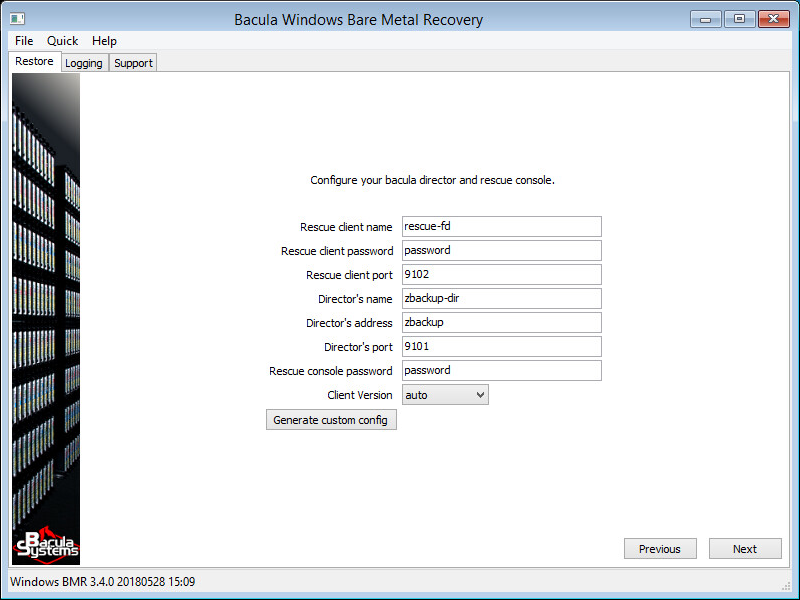
Configure Bacula
If the host cannot connect to your Director or if the Director cannot connect back to the recovery file daemon you will get an error message. Please read the message carefully to know which parameter is wrong and correct it. When your setup is OK, the program will go to the next screen.
When your director has more than one Catalog configured, WindowsBMR shows you this extra screen to select the catalog you want to use.
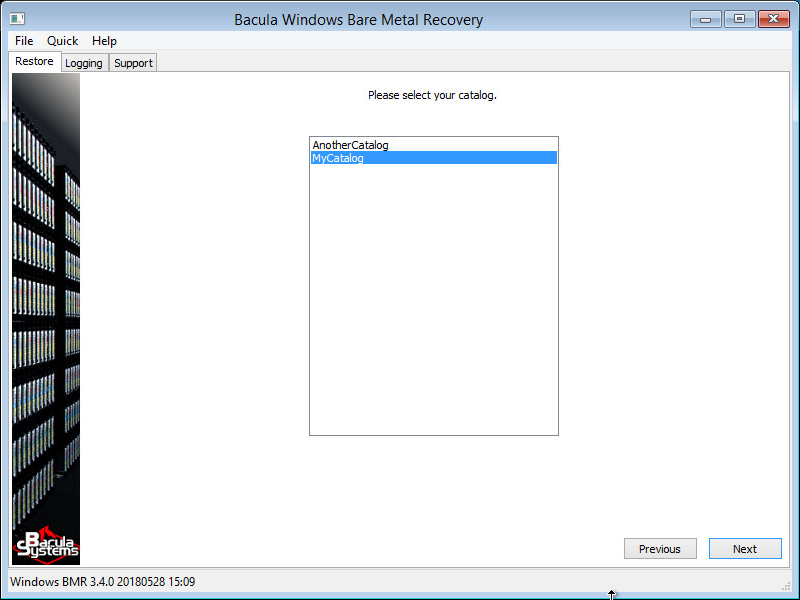
Catalog Selection
Then you will be presented with a screen to select the client you wish to recover. You can filter the clients by name using the Filter text box. The match doesn’t need to start at the beginning of the client name, but any sub string can match the filter. No wildcard characters are supported.
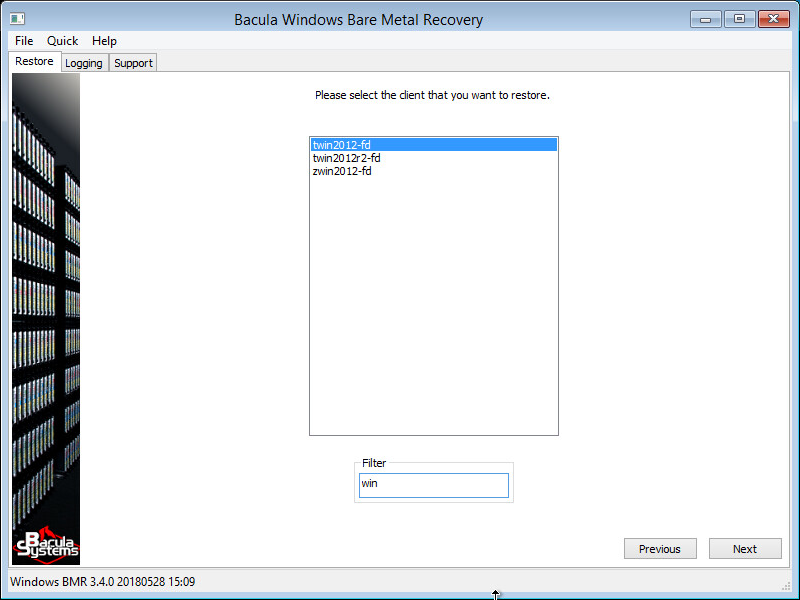
Client Selection
The next screen shows the date and time stamps of all successful backups
run from the selected client. The list displays the date, the job level,
Incremental or Full, the JobId and the name of the Job.
Unfortunately we cannot filter the jobs to display only valid
BMR-enabled backups in a reasonably short amount of time. If the
selected job is not a valid BMR-enabled backup, the program will ask you
to choose another one. At the bottom of the screen, the program will
automatically select a restore job template; you can choose a different
one if needed.
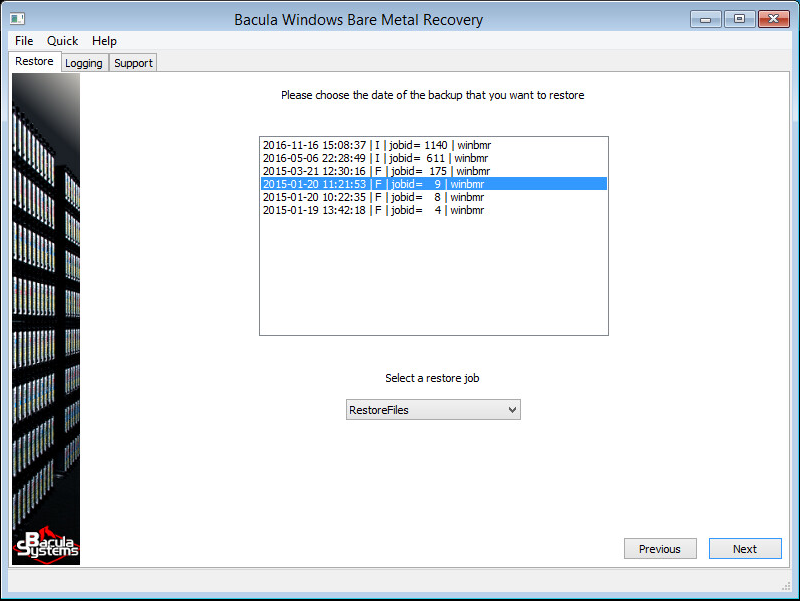
State to Restore
Information, both from the backed up and the local system, is then collected and the next three screens will help you create partitions, format them and select to which of them the data will be restored.
Managing Disk Drives
The BMR process will recommend that you remove any existing dynamic disk volumes on the destination disk and allow automatic partitioning. You can decide to use your existing partitions instead if you are confident they are correctly configured.
For most recoveries, the default settings on the next three screens are appropriate, so you can simply click Next to proceed. If the number of disks on the target host is different or if the disks are too small, then you will have to modify the configuration by making appropriate selections on these screens.
The screens have been designed to be very flexible and also allow partitioning operations to be done manually and finishing the restore within the tool. In most cases, however, the program will work correctly without extra operations.
To understand the details of these three screens it is important to be aware that a “Volume” is located on a partition or a dynamic disk and has been formatted and has a drive letter assigned. WindowsBMR can only handle “Volumes” that have a drive letter.
Some partitions that are not backed up by WindowsBMR (because they are not required), like the MSR, are not shown in the screens below, but they will be created because they are required. Other “system” partitions like the “EFI”, “System Reserved” and the “Recovery” partitions are usually hidden and not seen by the user. These partitions may be important in the boot process and are backed up by WindowsBMR. These can be excluded and merged with the C: drive at restore time. Most of the time, it is advisable to keep them in the restore process and the recovery will be successful.
Disk Matching and Partitioning
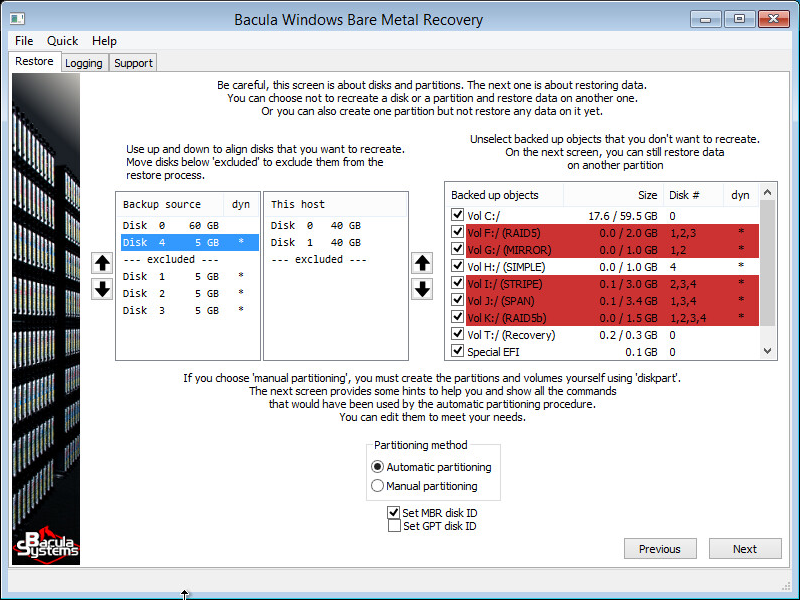
The first of the three screens mentioned is about disk matching and partitioning. The goal is to match disks of the source host (original machine backed up) with disks on the target host (machine to which you are restoring which is usually the same as the source host but could be a replacement machine). It is possible that disks on the target host are of different capacity and appear differently numbered than those of the source host.
Use the two lists on the left to do the matching. Use the arrows on both sides to move disks up and down. Disks below “–excluded–” will be ignored. If the exclusions are on the left, “volumes” that are located on them (the source host) will not be created and are displayed in red in the list at the far right.
Disks below the “–excluded–” bar on the right will be left untouched (if you have data on these disks they will normally be unchanged by the restore process).
Be careful that the bootable disk on the source is aligned with one on the target. Usually both “disk 0” have to be aligned.
The list on the far right displays the “Volumes” that have been backed up. If you unselect a volume, it will not be created. The fact that the volume will not be created does not imply data can not be restored to another location! For example, if you have a C: and a D: drive on the same disk, you can skip the creation of the D: drive but still restore data from D: to the C: drive.
The “dyn” column on the left tells you if a disk is part of a dynamic “Volume”, and the last column on the right tells you which of these dynamic “Volumes” are on which disks. The column “size” on the right shows two values, the first one is the space used on the volume and the second one the size of the source volume. The space used is only an estimate and should always be less or equal to the size needed for the restore.
If the disk to which you are restoring your data is of a different size, the size of the last partition will be automatically adapted to fit the new disk size.
The “Set disk ID” checkboxes at the bottom allow you to decide if the re-partitioned disks should be assigned their original disk IDs. Windows may encounter problems if two disks with the same disk ID exist on the same machine. Our default setting provides the best user experience. You should change this setting only if you are aware of the resulting consequences. Please contact support with any questions.
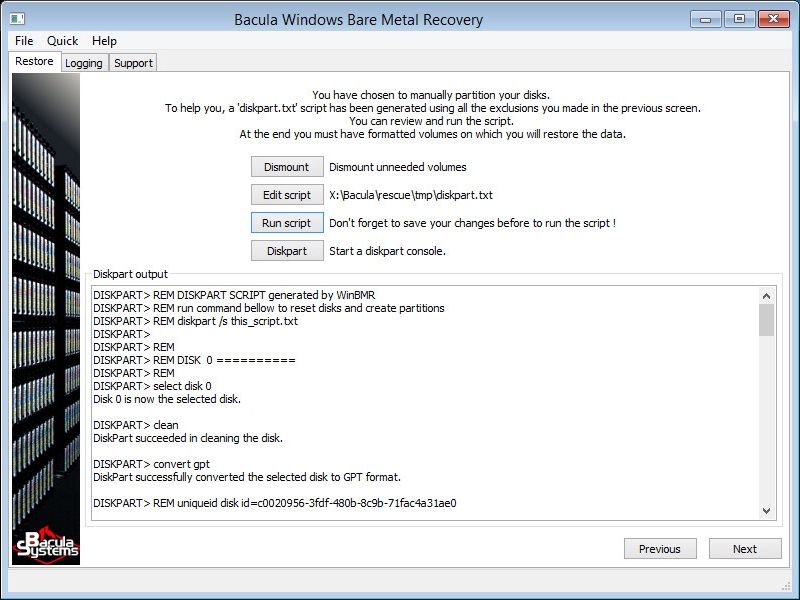
If this interface is not flexible enough for your needs, you can select the “Manual partitioning” radio button. If you want to create additional partitions, you must select the manual mode, as it is not possible to create new partitions with the current interface.
Manual Partitioning
At the end of the manual partitioning process, you must have created and formatted the “Volumes” to restore your data as well as all the system partitions. You must have assigned drive letters to be able to select them during the following steps.
To help you, this screen provides all the information that the auto-partitioning procedure would use. You are free to use your own tools, or even to have pre-partitioned the disk before booting the WindowsBMR media. Once the disk layout fits your needs, click “Next”.
The steps you can do are the following: First you should understand that simply clicking “Dismount”, then “Run Script” and then “Next”, will do exactly what “auto-partitioning” mode does.
The “Dismount” button un-mounts all drives. Only the X: drive will stay after this, even the CDROM drive letter will have been dismounted. This will avoid drive letter collision later on, but please be aware that you must not use drive X:.
A script “diskpart.txt” has been generated for you. You can push the button “Edit script” to edit it. The script has been generated using the information from the previous screen. If you have excluded disks or partitions you will see the changes in the script. The script contains some comments to help you. The original size of the partition and the disk ID are sometimes commented out. You can uncomment the line or copy the size into the “create partition” command.
The original script cleans up existing partitions on each disk it will re-partition. Thus you can run the script repeatedly, without the need to manually clean up partitions in between.
When done you must save the file and click the “Run script” button to run it. You will see the script output in the text area below. Since the program does not detect errors at this point, please read this output carefully and search for any errors then modify your script until you corrected any and all errors.
Keep in mind that WindowsBMR uses drive letters. You must format and assign a drive letter to all the volumes that you want to use during the restore process.
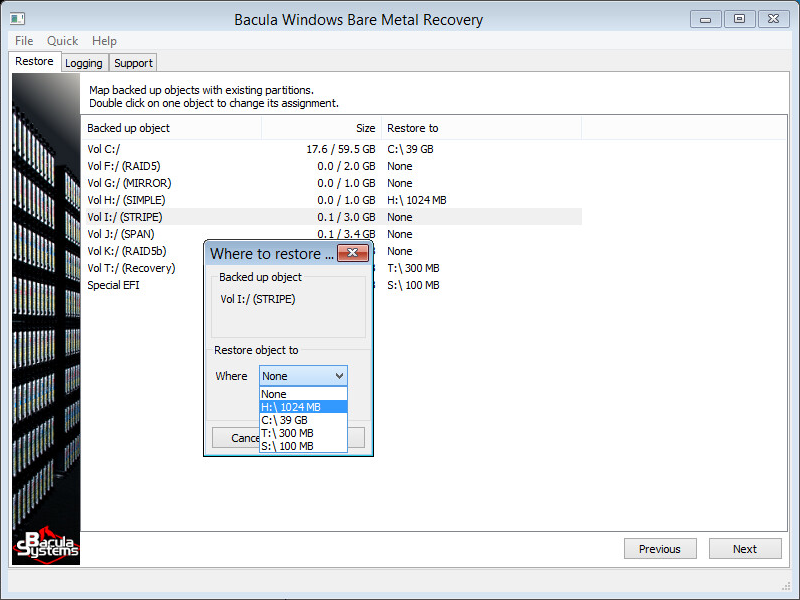
After the automatic or the manual partitioning of your disks, the “Volume matching” screen is shown.
Volume Matching
On this screen, you have to tell the program where you want to restore your data to. The objective is to match the drive letters of your source host to the drive letters of the target host. The program has automatically matched the “Volumes” using the same drive letters. Normally, C:/ (here we use the Bacula notation) will go to C:\ (with the Windows notation) and the same for other drive letters. If you have fewer disks or excluded some partitions, you will get orphaned “Volumes” that are going to nowhere (None). You can double-click on the right column to change the “Volume” assignment.
On the other hand, if you don’t want to restore a “Volume”, you can set it to None and possibly restore it later, after having rebooted the system.
Restore Progress
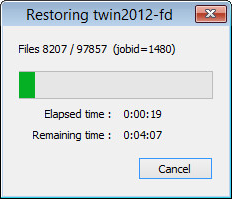
When ready, click “Next” to start the restore.
Restore Status
The window shows you the progress of the restore.
You can “Cancel” the process and go back to make further changes, and start a new restore process.
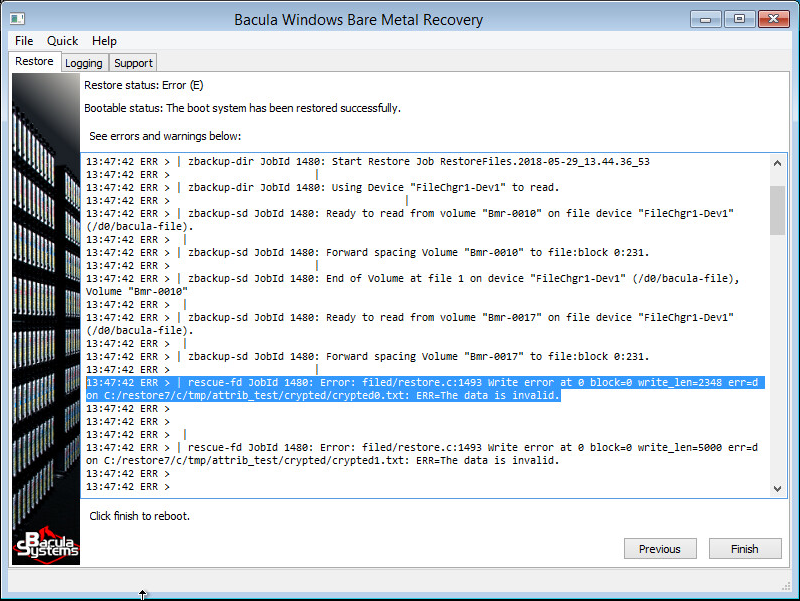
When done, the screen shows the status of the restore and the status of the process making the host bootable. Error messages and success status are only indicative – you can know the final status only after having rebooted. Check any error or warning messages (if any) to see if they are critical for you and ask our support team if you are worried.
Final
Click “Next” to reboot the system. If you have questions for our support team, download the log of the restore in advance, since our support may ask for it. See the Troubleshooting section to know how to get the bssupport.zip file.
When rebooting the machine don’t forget to remove the rescue BMR disk / USB key to prevent booting into the rescue system again.
If don’t want to reboot immediately, the command wpeutil reboot can
be used to reboot later and the command bsrescue will start the
bare-metal recovery program again.
Go back to: Windows BMR: Performing Recovery.