SuSE Enterprise Linux 11/12
You can install Perl dependencies through the SuSE channel, Bacula Systems repositories or via CPAN (Cf. section Dependencies).
You can enable the Bacula Systems Perl dependencies repository by configuring the following YaST configuration file on SuSE:
# cat /etc/zypp/repos.d/Bacula_Systems_DAG.repo
[Bacula_Systems_DAG]
name=Bacula Systems DAG
enabled=1
autorefresh=1
baseurl=https://www.baculasystems.com/dl/DAG/@PLATFORM@
path=/
type=rpm-md
keeppackages=0
Where @PLATFORM@ can be:
sles112
You can use yum (in this example, you need to replace @CUSTOMER@
with your private FRS url, @PLATFORM@ with your platform and the
version with the one matching your core Bacula Enterprise Edition
product):
[root@sles112-64 ~]# more /etc/zypp/repos.d/Bacula_Systems_bin.repo
[Bacula_Systems_bin]
name=Bacula Systems bin
enabled=1
autorefresh=1
baseurl=https://www.baculasystems.com/dl/@CUSTOMER@/rpms/bin/@PLATFORM@/6.6.6
path=/
type=rpm-md
keeppackages=0

[root@sles112-64 ~]# more /etc/zypp/repos.d/Bacula_Systems_bweb.repo
[Bacula_Systems_bweb]
name=Bacula Systems bweb
enabled=1
autorefresh=1
baseurl=https://www.baculasystems.com/dl/@CUSTOMER@/rpms/bweb/@PLATFORM@/6.6.6
path=/
type=rpm-md
keeppackages=0

[root@sles112-64 ~]# more /etc/zypp/repos.d/Bacula_Systems_perl.repo
[Bacula_Systems_perl]
name=Bacula Systems perl
enabled=1
autorefresh=1
baseurl=https://www.baculasystems.com/dl/DAG/@PLATFORM@/
path=/
type=rpm-md
keeppackages=0
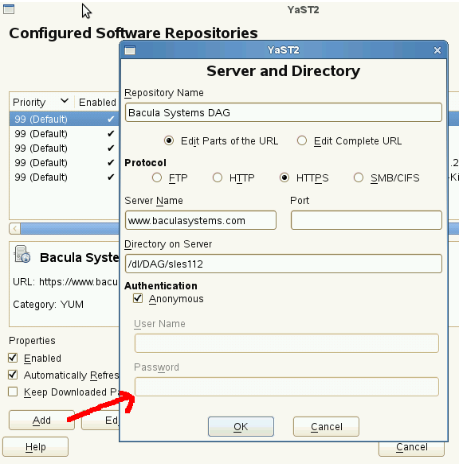
Figure 9: YaST Repository for Perl
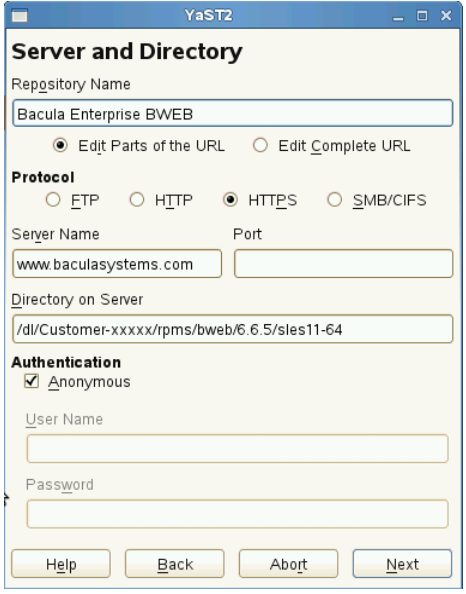
Figure 10: YaST Repository Example
# yast -i bacula-enterprise-bweb
Or you can install all dependencies manually using:
# yast -i perl-DBI perl-DBD-mysql perl-DBD-Pg perl-GDGraph \
   perl-HTML-Template perl-Time-modules gd perl-Date-Calc      \
   perl-Bit-Vector perl-Expect perl-GD  \
   perl-GD-Text-Util perl-IO-Tty perl-CGI-Session perl-JSON    \
   perl-JSON-XS lighttpd
Bacula Systems provides BWeb packages for SuSE Enterprise Linux. You
can download them and use rpm to install them:
# rpm -ivh bacula-enterprise-bweb_8.8.4.rpm
Depending on your installation, you may need to change the default
bconsole program and bconsole.conf file permissions to let the
bacula user account access them. (For a different bconsole
setup, see bconsole Configuration).
On SLES, it is required to add the /etc/sudoers.d to the sudo
configuration to restart bacula services through BWeb.
# mkdir /etc/sudoers.d
# chown 750 /etc/sudoers.d
# echo '#includedir /etc/sudoers.d' >> /etc/sudoers
Configure PostgreSQL Authentication
The default PostgreSQL authentication method on SuSE Enterprise Linux is
ident. This method will perfectly work with the bacula-dir
and the BWeb daemon running as the bacula user. Then you can skip
this section and come back later if you want to configure password
authentication.
In the file pg_hba.conf, the first record with a matching connection type, client address, requested database, and user name is used to perform authentication. There is no “fall-through” or “backup”: if one record is chosen and the authentication fails, subsequent records are not considered. If no record matches, access is denied.
However, you will need to add a password authentication to let another user connect to the catalog or connect to the catalog via TCP/IP.
Be careful, the order of each line is important in pg_hba.conf, make sure you read the documentation included on the top of the file before making any change.
postgres# cat /var/lib/pgsql/data/pg_hba.conf
# TYPE   DATABASE    USER    ADDRESS METHOD

# Let postgres user connect everywhere
local    all         postgres        ident

local    bacula      bacula          md5
local    all         all             ident

host    bacula      bacula  127.0.0.1/32 md5
...

postgres# psql
# ALTER USER bacula PASSWORD 'thisisapassword';


# using ident
postgres# psql -U bacula bacula
Password: ******

bacula=>

# using host
postgres# psql -U bacula -h localhost bacula
Password: ******

bacula=>
Load BWeb Specific Functions to Bacula Catalog
In BWeb 6.4 and later, you can load BWeb specific SQL functions using the following script:
root# /opt/bweb/bin/install_bweb.sh
If your BWeb version doesn’t have the install_bweb.sh script, you
can use the following procedure.
In some versions of PostgreSQL, you need to add the plpgsql language
to the bacula database using the postgres super-user.
# su - postgres
postgres# createlang plpgsql -Upostgres -d bacula
You then need to add BWeb specific tables to your Bacula Enterprise Edition catalog.
# su - postgres
postgres# psql -U bacula -f /opt/bweb/etc/bweb-postgresql.sql bacula
With a MySQL catalog, you need to update the catalog with the following command:
# mysql -u bacula bacula < /opt/bweb/etc/bweb-mysql.sql
IPtables and SELinux
SELinux and/or IPtables might need some configuration to run on your system, if you want to quickly see if BWeb is properly installed, you need to disable SELinux and IPtables.
To disable IPtables up to the next reboot:
# /etc/init.d/iptables stop
To configure IPtables permanently, you need to configure your system with a command such as:
# iptables -A INPUT -p tcp --tcp-port 9180 -j ACCEPT
# /etc/init.d/iptables save
To disable SELinux up to the next reboot:
echo 0 >/selinux/enforce
To disable SELinux permanently, you need to configure the SELINUX
parameter in /etc/selinux/config.
Start BWeb Service
By default, BWeb is using a dedicated service that you can start with
# /etc/init.d/bweb start
We strongly advise you to secure the default configuration file
/opt/bweb/etc/httpd.conf by setting credentials and/or https
navigation. Detailed instructions are available at the bottom of the
configuration file.
BWeb should be accessible through http://yourhost:9180/bweb/
If you want to install BWeb from sources, read Installation from Source.
Online Documentation
BWeb can display documentation about directives and resources, the
documentation package can be found on your download area in the
docs directory. Just untar it in the html directory, /opt/bweb/html by default.
Go back to Installation with Packages chapter.