Exporting Volumes and Multiple Sites
If you use an autochanger and tape Volumes, you may want to export Volumes to another site to make room in your autochanger or for security of your Volumes. BWeb has several screens to help manage multiple sites. It is possible to let BWeb chose the best Volume export candidates (e.g. Volumes marked Full and long retention periods), and BWeb can also chose the best candidates for importing into your autochanger (e.g. expired media or very old Volumes).
Also available is a simple workflow that permits one to track and record each Volume movement.
Exporting Volumes
You must first select the Volumes to export by one of the following:
location
Pool
the Export screen
Then you must click on the “Eject” button  . If your Autochanger
has an import/export tray, the Volume or Volumes selected will be
automatically put there.
. If your Autochanger
has an import/export tray, the Volume or Volumes selected will be
automatically put there.

Figure 51: Moving Volumes to the import/export tray
Use the Volume movement management screen (Cf. figure 52)
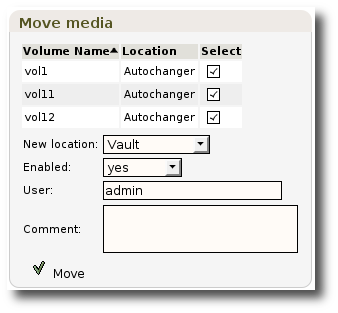
Figure 52: Moving a Volume
You must specify the Volume destination (new location). When clicking on the “Move”, you can send an email with important information (Cf. figure 53), to the people in charge of physically moving Volumes, or you can confirm that the move was actually made (“Update now”).
Once the Volume or Volumes are out of the autochanger, you should synchronize the autochanger and the catalog as documented in Managing the autochanger. See figure 55 for a picture of how the workflow for moving media works.
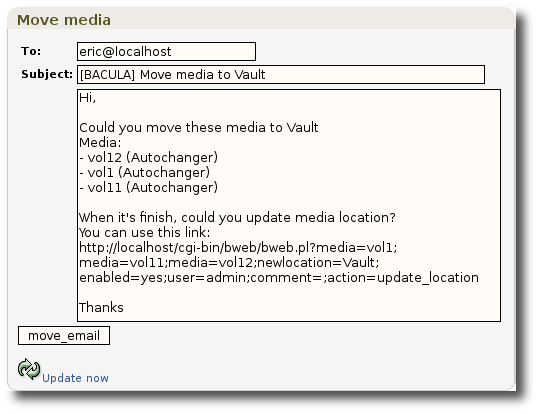
Figure 53: Sending an Email for moving a Volume
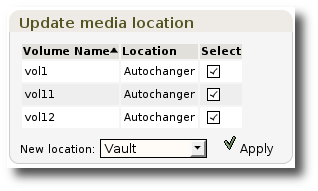
Figure 54: Confirmation of Volume movement
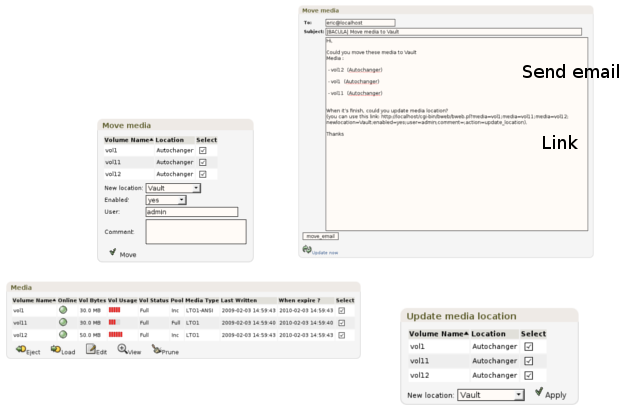
Figure 55: Workflow of moving Volumes
Importing Volumes
Importing  Volumes follows the same workflow diagram as exporting
(Cf. Exporting Volumes and figure 55). Once the
Volumes are in the import tray of your autochanger, you can click the
button “Clear I/O” on the Autochanger \(\rightarrow\)
YourAutoChanger screen to ask BWeb to put
Volumes follows the same workflow diagram as exporting
(Cf. Exporting Volumes and figure 55). Once the
Volumes are in the import tray of your autochanger, you can click the
button “Clear I/O” on the Autochanger \(\rightarrow\)
YourAutoChanger screen to ask BWeb to put
Help managing the autochanger contents
BWeb can help you manage the contents of your autochanger by selecting the best volumes to import for use with your future backups.
Automatic exporting
In the Media menu \(\rightarrow\) Eject Media, BWeb can select a list of Volumes for you that can possibly be moved out of your autochanger to make room for other Volumes. To do so, you must chose a Pool, a Media Type, and the Volume’s current location (Cf. figure 56).
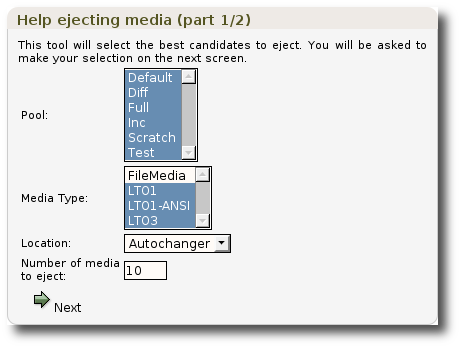
Figure 56: Selection criteria for exporting Volumes
The candidate Volumes are sorted by their retention period, and their use (the number of times mounted in a drive) (Cf. fig 57).
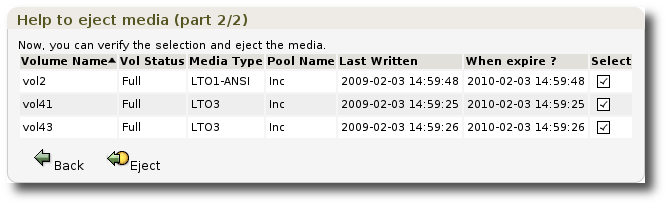
Figure 57: List of media to Export
Clicking on the export button will start the process of question
and answers for exporting Volumes according to the workflow defined
above (Cf. Exporting Volumes). Note: BWeb will not let you export
more Volumes than your export tray will hold.
Automatic Importation
In the Media menu \(\rightarrow\) Load Media, BWeb will select for you a list of Volumes possible to import back into your autochanger for use in future backups. You must choose a Pool, a Media Type, the current Volume location, and whether or not you want to include Volumes that will expire in the near future (Cf. figure 58).
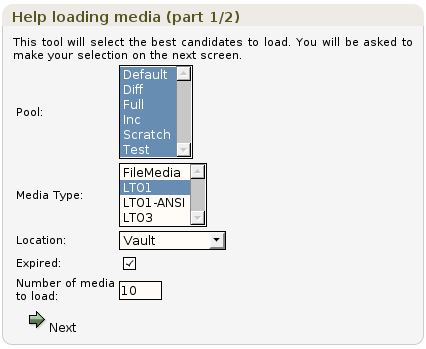
Figure 58: Selection criteria for importing Volumes
The candidate Volumes will be presented sorted by their usage (number of hours writing and number of times mounted in a drive) (fig 59).
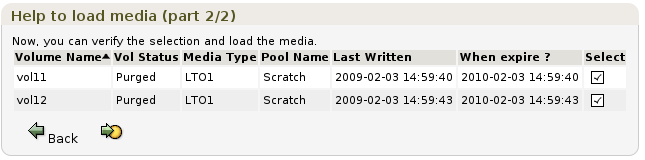
Figure 59: Volumes selected for importing
Clicking on the import button will start the workflow question
and answers described above (cf. Exporting Volumes)
See also
Go back to:
Go to:
Go back to the Administration Functions chapter.
Go back to the Bweb Management Suite chapter.
Go back to the Bacula Enterprise User Interfaces.