Managing Restores
BWeb has a dynamic interface that permits a natural navigation in the directory structure of the Job. By default the list of directories and files are automatically presented considering all the different FileSets and the date specified. For example if you have divided your backup in several Jobs to improve backup speed or to simplify restores as follows:
FileSet {
 Name = "FS1"
 Include { File = /usr }
}
FileSet {
 Name = "FS2"
 Include { File = /home }
}
In the above case, both /usr and /home will be displayed on the
same screen. This feature can be modified using the options menu (4).
Starting a restore
The restore interface can be accessed from Jobs \(\rightarrow\) Web Restore.
Zone |
Information |
|---|---|
1 |
List of Clients defined by the Director. The list utilizes an automatic filter when you begin entering the name |
2 |
For each Client, this zone gives the list of Backups recorded in the catalog. If you click on a Differential or Incremental Job, you will see all the files since the last Full backup. |
3 |
The current directory and file. Clicking on “Change location”, will cause BWeb to show the selected directory. |
4 |
Options for navigation. By default, BWeb will only show the most recent version of your selection. You can can choose to show all versions of your files in the “File Version” panel. By default, BWeb will combine all the FileSets in the current view taking into account the backup level (Full, Differential, Incremental). It is also possible to show only the Job selected. |
5 |
When your selection is made, this button will start the restore of the selected files in zone (9) |
6 |
List of the backed up directories. It is possible to go directly to a path in zone (3) |
7 |
List of files present in the chosen directory. The panel has a regex filter option and supports directories with a large number of files. In the filter zone, pressing on “Enter” applies the filter to the elements shown in the list. Clicking on the reload button applies the filter to the catalog. |
8 |
Listing of available versions of a file. The panel permits rapid viewing of the different versions of a file as well as the name of the Volume and the on-line availability(only available for tape media). To list all the versions of a file, you must select the option: “See all file versions” in the menu (4). |
9 |
Selection zone of files to restore. You should drop and drag directories (6) and files (7 or 8) to be saved into this zone. It is possible to delete one or more entries with the “Del” key. |
After selecting your files, the start restore screen will permit you to modify the restore options such as the destination client, or to relocate the restored files (Cf. figure 42). The list of Volumes needed will permit mounting them if necessary. Note, the current list of Volumes does not take into account the directories selected.
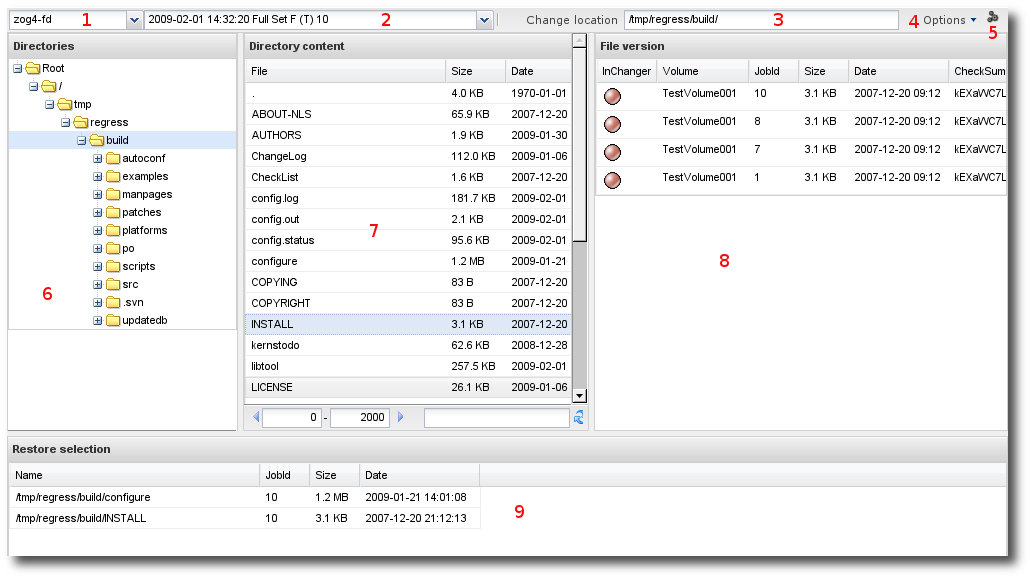
Figure 41: Web Restore Interface
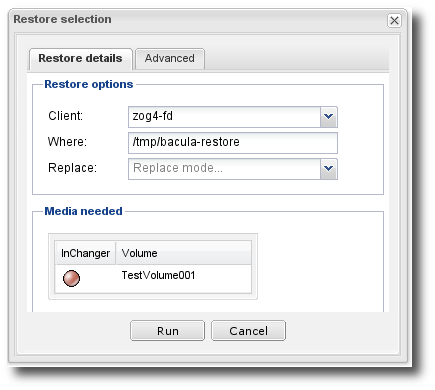
Figure 42: Restore Options
Finding a version of a File
Once you have found the file to restore, the panel (8) should present a list of all the versions found in the catalog. By default only the latest versions (having a different checksum) are displayed. The options menu permits you to display all available versions. Note, you can only restore one version of a file in any given restore Job.
Optimization of Restored
BWeb tries to select the best version possible for a file. However, it can sometimes be useful to specifically select the files by their location in order to minimize the number of Volumes necessary to effect the restore.
Relocating Files
The tab “Advanced” on the start screen for a restore permits you to manage the relocation of files (where the files are restored). The main options permit you to remove a part of the path of a file (Strip prefix), add a prefix or a suffix to each file (Add prefix et Add suffix), or to construct more complicated expressions using the Where regexp fields (see the Bacula manual for more information). The following example (Cf. figure 43), permits to restore a file originally on drive C\(:\) to drive D\(:\) on a Windows machine.
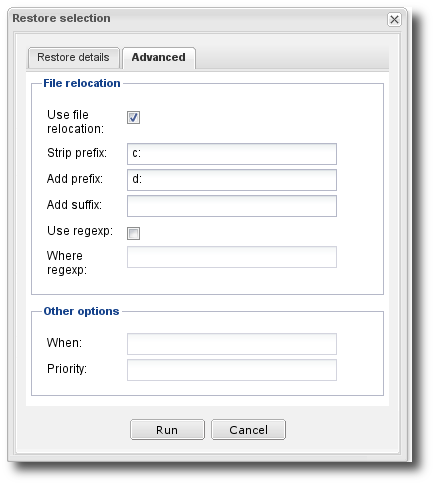
Figure 43: Relocalization of files
Note, on Windows you must use “/” and and not “\(\backslash\)” in the destination field.
Consulting the restore log
Accessing the restore logs is done in the same way as accessing other logs: by the history menu (See Viewing Job history and logs).
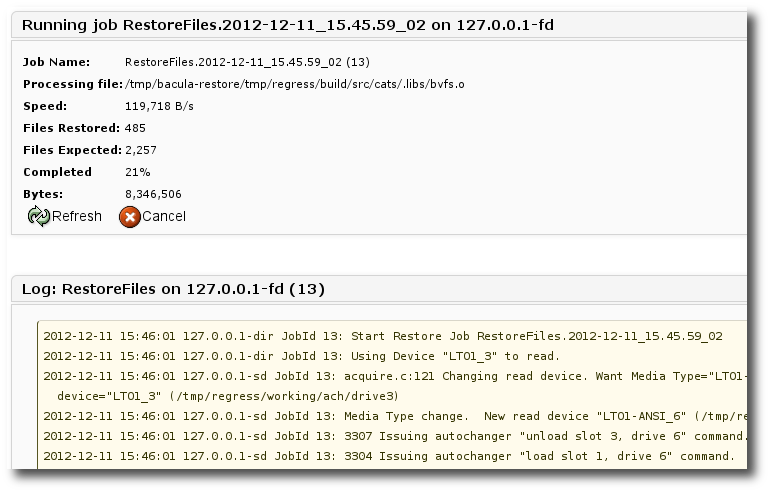
Figure 44: Restore
Viewing the restored files list
To view the list of files actually restored, you must configure the in
your client to send the messages of type restored to the Director
(see below). Be aware that the list of restored files can be very long
and thus slow down your restore job.
# bacula-fd.conf
Messages {
  Name = Standard
-  director = zog4-dir = all, !skipped, !restored
+  director = zog4-dir = all, !skipped
}
Copying the log to a file
The text can be copied into a file and used in an email.
See also
Go back to:
Go to:
Go back to the Administration Functions chapter.
Go back to the Bweb Management Suite chapter.
Go back to the Bacula Enterprise User Interfaces.