Managing Volumes
The following section provides information about managing tape media with Bacula and BWeb.
Volume Life Cycle
Figure 45 describes the lifecycle of media.
Status
Information
Unknown
The Volume is not known to Bacula. You must label it using BWeb or
bconsolewithlabel barcodescommandAppend
The medium is directly usable by Bacula.
Used
The Volume is not usable by Bacula. A limit set by the administrator has been exceeded (maximum size, utilization period, number of jobs, number of files, etc.) The Volume can be removed.
Full
The Volume is full and can be removed.
Purged
The data is still on the Volume, but the retention period has expired. The Volume can be put back into the autochanger to be reused (overwritten). When Purged is set, the Volume will be automatically moved to the Pool specified by the RecyclePool directive.
Recycled
If a Volume is marked to be recycled, it will be placed in the Recycle state before being once again placed in Append mode.
Error
The Volume is in error. Error does not always indicate that it was a hardware error. If you want to reuse the Volume after verification that it is OK, you can reset it to Append status.
Pruning deletes records from the catalog when the retention period has expired. It is a safe form of Purging.
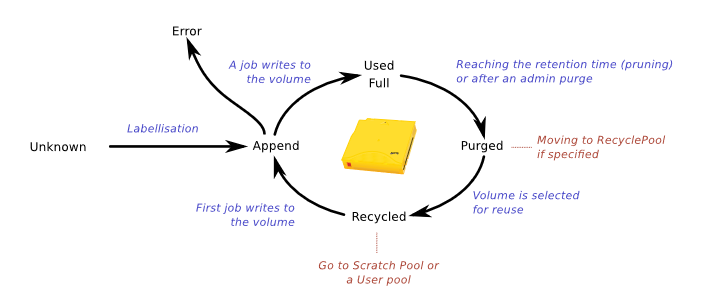
Figure 45: Life Cycle of a Volume
Viewing cassettes by Pool
With BWeb, under Media \(\rightarrow\) Pools, you can see the list of Pools defined in the Director (see figure 46). There is a different entry for each Media Type.
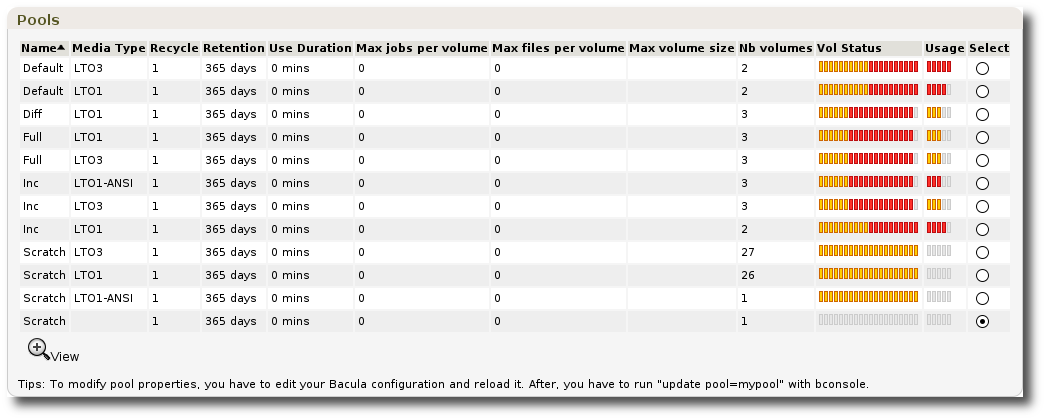
Figure 46: Listing Pools
You can easily estimate the capacity and the occupation percentage of your Pool with Usage. It calculates the estimated Volume capacity using the average size of all Volumes of the same Media Type marked as Full.
The Vol Status section gives you a listing by status of the Volumes in the Pool. A tooltip will show you the exact count (e.g. 1 Full, 2 Append, 1 Purged).
Volume List
The list of Volumes is available in several places including menu: Media \(\rightarrow\) All Media. This list permits a rapid overview of the Volumes known to the Director. It is possible to filter the display via the Filter menu on the left, where you can specify the media type, its physical location, its status, … It is also possible the select several Volumes at the same time for pruning.
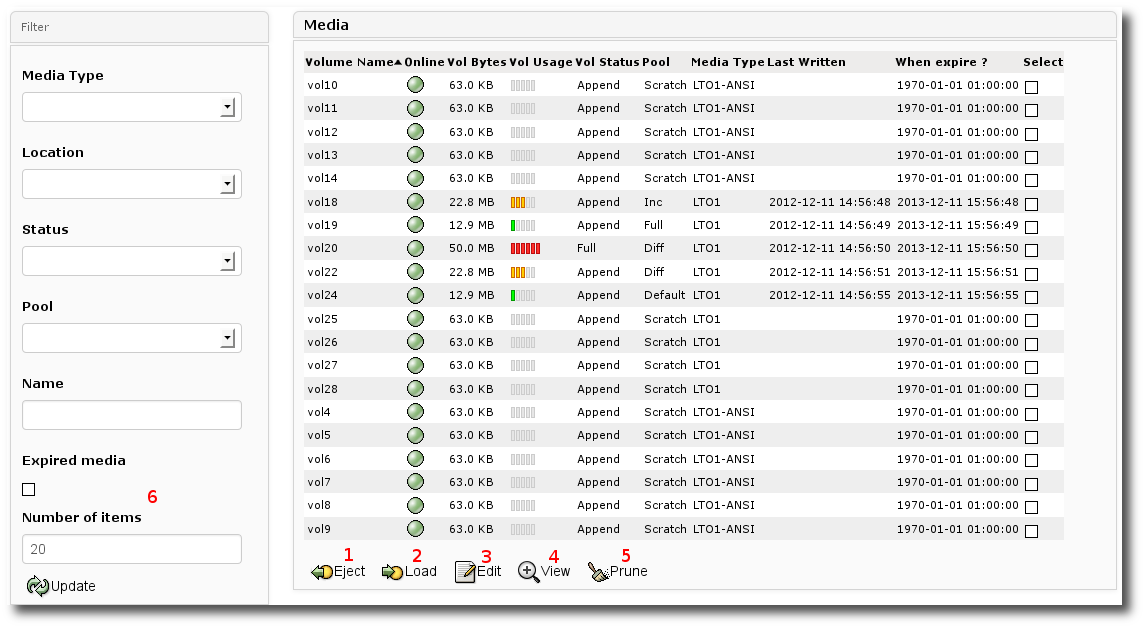
Figure 47: Volume List
The table 7 below describes the several labels displayed on figure 47.
Zone |
Information |
|---|---|
1 |
Ejection of Volumes to the import/export tray |
2 |
Start introduction of selected Volumes |
3 |
Edit properties of selected Volumes |
4 |
Display information about selected Volume |
5 |
Start a prune of selected Volumes (respects retention periods) |
6 |
Display only Volumes marked Full or Used having an expired retention period |
Viewing Volume expiration dates
The expiration date is show on all the Volume displays. You can sort the column entitled When expire ? to know when the Volumes will be available for reuse.
You can also filter the Volume display to show only Volumes that are expired (Cf. figure 47, field 6).
Viewing Volume properties
To view the Volume properties, you can:
use the search box at the top left
use the “Show Volumes” found in the backup log
select the Volume on the Pools screen
select the Volume on the location screen
The figure 48 shows the volume properties interface while the table 8 explains its content.
Zone |
Information |
|---|---|
1 |
Eject the Volume (put it in the import/export tray) if the Volume is online |
2 |
Edit the Volume properties |
3 |
Purge the Volume (disregards retention periods). You must confirm this request. |
4 |
Start pruning a Volume (respecting retention periods) |
5 |
Show the log of Volume movements from place to place |
6 |
Show the backup log |
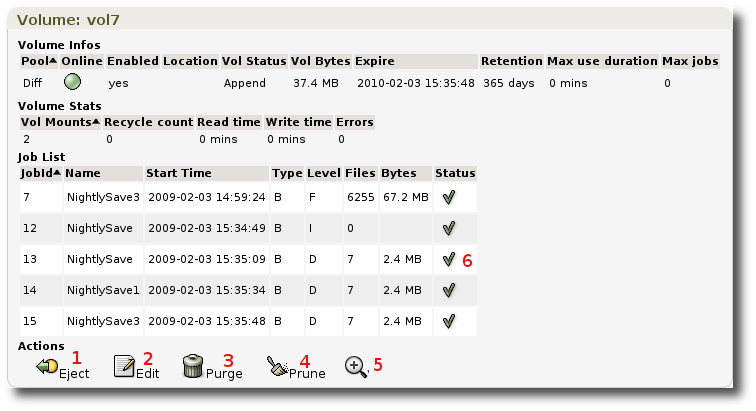
Figure 48: Volume Properties
Modify the Volume properties
Certain properties of a Volume are not shown on the properties screen
(cf. figure 49), for example, the
number of files on a Volume. These advanced properties can be modified
with caution using bconsole and the update volume command.
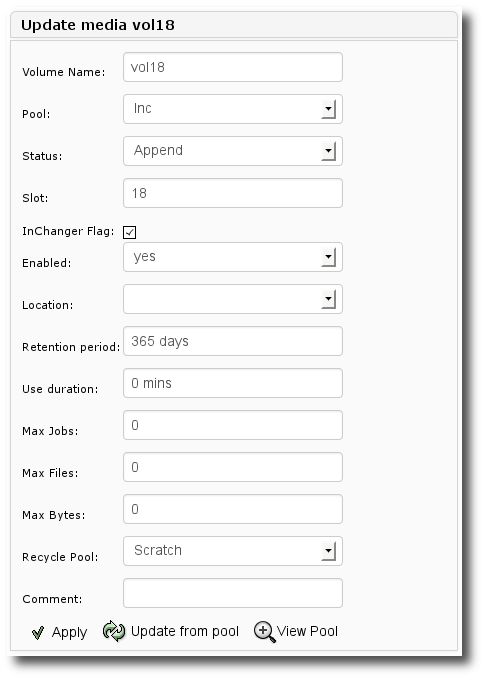
Figure 49: Modify Volume properties
Managing the autochanger
BWeb permits you to manage an autochanger with a barcode reader, multiple drives, and an import/export tray. The screen (See figure 50), found under Autochanger \(\rightarrow\) YourAutoChanger, permits you to:
show the list of slots and their contents (9) ;
move Volumes from the import/export tray to free slots (3) ;
detect synchronization problems with the catalog (7) ;
synchronize the catalog with the contents of the autochanger (
update slots) (4) ;view which drives are occupied (8) ;
move selected Volumes from their slots to the import/export tray (2).
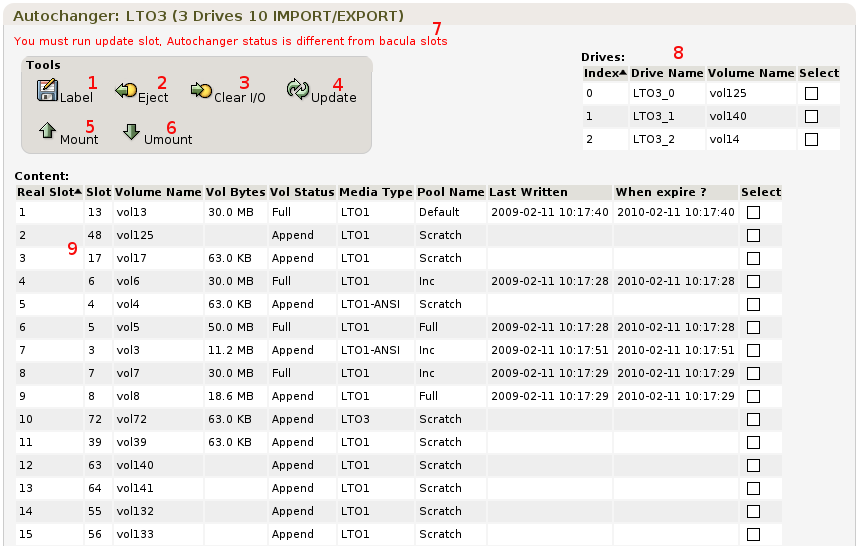
Figure 50: Managing an autochanger
Labeling Volumes in an autochanger
BWeb facilitates adding new Volumes to Bacula’s catalog. The new Volumes will by default be added to the Scratch pool.
Use the BWeb’s eject screen (Cf. Exporting Volumes) to make room in your autochanger, if necessary.
Place fresh Volumes in the import/export tray of your autochanger (if the autochanger has one).
Move the new Volumes into the free slots with the “Clear I/O” button on the Autochanger \(\rightarrow\) YourAutoChanger screen.
The new Volumes should be shown as “Unknown”
Select the new Volumes.
Select a free drive.
Click on “Label”
The labeling operation can be rather long depending on your configuration, and it can even block the display until the end of labeling all volumes. If you have a lot of volumes to label, we suggest you label in groups of five at a time. If you label a large number, you may want to modify your Web server configuration to increase the “Timeout” setting for running scripts.
Deleting Volumes
This function is not available with BWeb. You must use the command
delete volume=R30001 in bconsole to delete a Volume from the
catalog. It is not necessary to have the Volume in the autochanger.
Managing Scratch Volumes
The Scratch pool permits simplifying management of tape Volumes. Using the Scratch pool is not mandatory and must be setup by the Bacula administrator.
To make a backup using the Scratch pool, if there is not a Volume in the current Pool with status Append, Purged, or Recycled, Bacula can select a Volume from the Scratch pool. When you label new Volumes using BWeb, they will automatically be placed in the Scratch pool. If you use the RecyclePool option, you can force a purged Volume to be automatically returned to the Scratch pool.
BWeb automatically manages Scratch pool Volumes. A screen allows you to make room in your autochanger by automatically selecting Volumes to eject and will propose the best Volumes to import (Cf. Exporting Volumes and Multiple Sites).
See also
Go back to:
Go to:
Go back to the Administration Functions chapter.
Go back to the Bweb Management Suite chapter.
Go back to the Bacula Enterprise User Interfaces.