High Availability: Catalog Setup Example
CommunityEnterpriseThis section provides an example on how to assemble and configure the components described in the previous section to build a distributed and clustered PostgreSQL architecture with a master, several read-replicas and using a WAL-based logical replication of the data.
Note
This is not intended to be an in-depth guide to PostgreSQL high availability. Instead, it aims to help the reader to consolidate the main concepts and to understand how the different layers interact.
To simplify the scenario, this example uses only three nodes:
One node with PostgreSQL, Patroni, Etcd, HAProxy and Keepalived.
A second node with the same stack; together with the previous one, these form the Catalog Cluster.
A third node containing the full Bacula stack; the Bacula Director connects remotely to the Catalog Cluster.
Note that it is possible to deploy all the components on separate hosts, and some components can also run in containers. The only strict recommendation is to run exactly one Patroni instance per PostgreSQL instance. Components such as Keepalived and HAProxy may be deployed separately, but they are commonly installed together. The etcd cluster may run on the same or on dedicated hosts, and Keepalived and HAProxy could also be deployed in external components.
For simplicity, the connections between services are not using SSL and the corresponding certificates, but all services can be configured to use them and this is highly recommended in production.
The following example configurations are based on Ubuntu Server 24.04. However, all the implied tools are available in mostly every other Linux distribution. The different programs can also be built and installed independently from their source code.
Architecture Overview
Nodes (physical or VMs on Ubuntu 24.04):
catalog01
192.168.1.151— Patroni/PG/etcd member/haproxy/keepalived/bacula-fdcatalog02
192.168.1.152— Patroni/PG/etcd member/haproxy/keepalived/bacula-fdvirtualip (catalog01 and catalog02):
192.168.1.160dirtoha
192.168.1.180— bacula-dir/bacula-SD/bacula-fd/bweb
Components:
An etcd cluster across the two Catalog nodes
Patroni service on each db node, manages local postgres instance
PostgreSQL 16 on each node
HAProxy and Keepalived for VIP and routing (Bacula and BWeb connect to VIP)
A Bacula FD is added to each Catalog node for catalog backup purposes
A Bacula Director with BWeb connects remotely to the Catalog in HA mode
Replication behavior:
Patroni handles streaming replication (asynchronous by default; synchronous replication can be enabled by requiring at least one synchronous replica)
Replication slots created automatically to prevent WAL removal before replica receives them
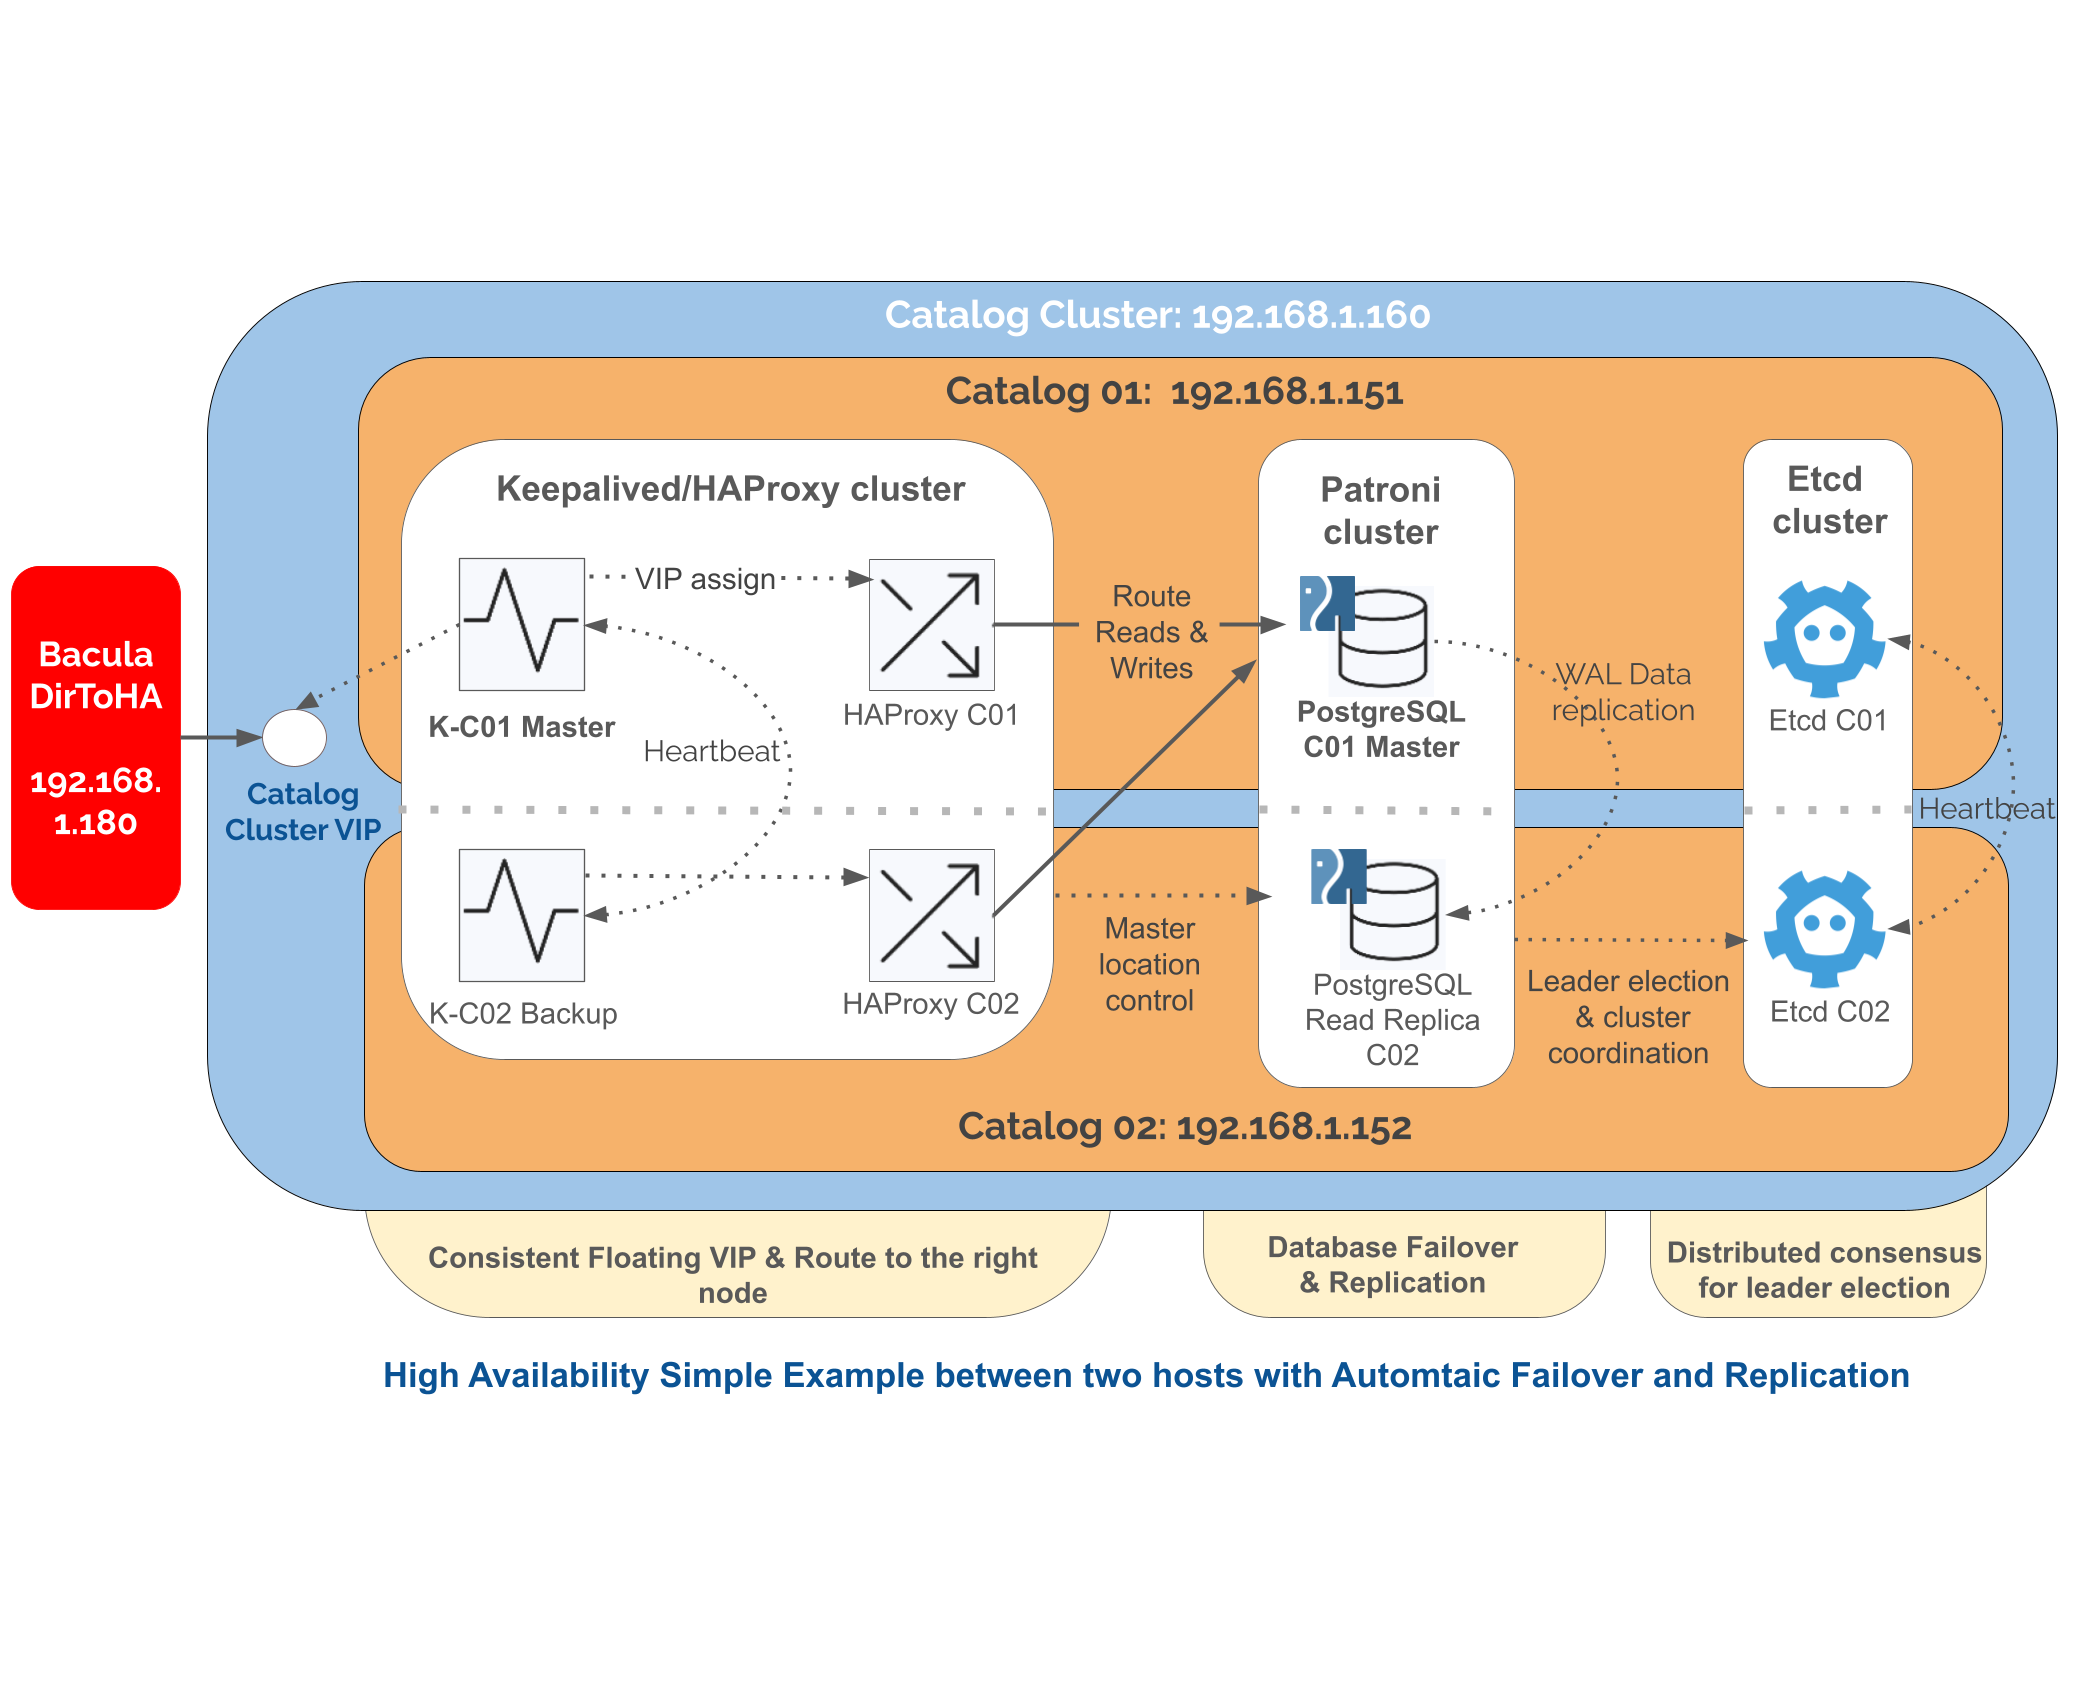
PostgreSQL HA Simplified Example
High-level Steps
Prepare and install PostgreSQL and Bacula.
Set up etcd on each Catalog node.
Set up Patroni on each Catalog node.
Set up HAProxy + Keepalived in Catalog nodes and configure VIP for clients (Bacula).
Connect the remote Bacula node with the Catalog VIP.
Perform tests and checks.
Setup
1. Preparation and installation of PostgreSQL and Bacula.
Update your system on all three nodes:
apt -y update
apt upgrade
Then install the Bacula Director on all three nodes. To install Bacula Director with BIM, follow the instructions presented here.
Some details to consider:
On both Catalog nodes, we use BIM to simplify the Catalog installation, but you can perform a manual installation if you prefer.
On both Catalog nodes, you also need to install the File Daemon. Click here here for details on File Daemon installation process.
On the Bacula Director node (dirtoha in this setup), we install BWeb as well. We can complement the installation with the locally deployed Catalog, follow the guide here. We will change the Catalog later.
Next, on the Catalog nodes, open the ports required by the different services (this example uses UFW firewall here):
# Enable ports
ufw allow 2379,2380,5432,5433,8008/tcp

# Enable multicast traffic in the interface and network where Keepalived service will work
ufw allow in on enp0s3 from 192.168.1.0/24 to 224.0.0.18 comment 'keepalived multicast'

# Enable firewall
ufw --force enable
Port association:
ETCD uses
2379to offer the serviceETCD uses
2380for internal communication among etcd nodesPostgreSQL is served in
5432HAProxy proxies the PostgreSQL service in port
5433(in production, HAProxy typically runs on separate hosts and may use the same PostgreSQL port on the frontend)Patroni REST API is served in port
8008Keepalived uses
multicasttraffic to communicate its nodes
2. Setup ETCD.
On each Catalog node, install etcd:
# Adjust the version with the most recent one or the one you prefer
ETCD_VER="3.5.11"
cd /tmp
wget -q "https://github.com/etcd-io/etcd/releases/download/v${ETCD_VER}/etcd-v${ETCD_VER}-linux-amd64.tar.gz"
tar xzf etcd-v${ETCD_VER}-linux-amd64.tar.gz
mv etcd-v${ETCD_VER}-linux-amd64/etcd* /usr/local/bin/
mkdir -p /var/lib/etcd
On node catalog01, create the systemd service unit with the following content in /etc/systemd/system/etcd.service:
[Unit]
Description=etcd key-value store
After=network.target

[Service]
User=root
Type=notify
Environment="ETCD_NAME=db1"
Environment="ETCD_DATA_DIR=/var/lib/etcd"
Environment="ETCD_INITIAL_ADVERTISE_PEER_URLS=http://192.168.1.151:2380"
Environment="ETCD_LISTEN_PEER_URLS=http://192.168.1.151:2380"
Environment="ETCD_ADVERTISE_PEER_URLS=http://192.168.1.151:2380"
Environment="ETCD_ADVERTISE_CLIENT_URLS=http://192.168.1.151:2379"
Environment="ETCD_LISTEN_CLIENT_URLS=http://192.168.1.151:2379,http://127.0.0.1:2379"
Environment="ETCD_INITIAL_CLUSTER=db1=http://192.168.1.151:2380,db2=http://192.168.1.152:2380"
Environment="ETCD_INITIAL_CLUSTER_STATE=new"
Environment="ETCD_INITIAL_CLUSTER_TOKEN=pgcluster"

ExecStart=/usr/local/bin/etcd
Restart=always
RestartSec=5

[Install]
WantedBy=multi-user.target
On catalog02, create the corresponding one, adjusting the name and the IP addresses:
[Unit]
Description=etcd key-value store
After=network.target

[Service]
User=root
Type=notify
Environment="ETCD_NAME=db2"
Environment="ETCD_DATA_DIR=/var/lib/etcd"
Environment="ETCD_INITIAL_ADVERTISE_PEER_URLS=http://192.168.1.152:2380"
Environment="ETCD_LISTEN_PEER_URLS=http://192.168.1.152:2380"
Environment="ETCD_ADVERTISE_PEER_URLS=http://192.168.1.152:2380"
Environment="ETCD_ADVERTISE_CLIENT_URLS=http://192.168.1.152:2379"
Environment="ETCD_LISTEN_CLIENT_URLS=http://192.168.1.152:2379,http://127.0.0.1:2379"
Environment="ETCD_INITIAL_CLUSTER=db1=http://192.168.1.151:2380,db2=http://192.168.1.152:2380"
Environment="ETCD_INITIAL_CLUSTER_STATE=new"
Environment="ETCD_INITIAL_CLUSTER_TOKEN=pgcluster"


ExecStart=/usr/local/bin/etcd
Restart=always
RestartSec=5

[Install]
WantedBy=multi-user.target
Because the cluster is being created, we set up cluster state to new.
Once it has been created, it can be changed to existing.
Once installed, enable and start the service.
systemctl daemon-reload
systemctl enable etcd
systemctl start etcd
You can verify the ETCD cluster health with:
root@catalog01:~# etcdctl member list
1aff923be86916cb, started, db1, http://192.168.1.151:2380, http://192.168.1.151:2380, false
6250d387d4559954, started, db2, http://192.168.1.152:2380, http://192.168.1.152:2380, false

root@catalog01:~# etcdctl endpoint health
127.0.0.1:2379 is healthy: successfully committed proposal: took = 3.427043ms
root@catalog01:~# etcdctl --endpoints=192.168.1.152:2379 put test3 test3
OK

root@catalog01:~# etcdctl --endpoints=192.168.1.151:2379 get test3
test3
test3
Once everything is fine, adjust the cluster status to existing by modifying the cluster
status value, again in /etc/systemd/system/etcd.service:
...
Environment="ETCD_INITIAL_CLUSTER_STATE=existing"
...
Then, restart the service:
systemctl restart etcd
3. Set up Patroni.
Install the tool and its dependencies on both Catalog nodes, and create the required directories:
sudo apt install python patroni python3-psycopg
mkdir -p /etc/patroni /var/log/patroni
useradd -r -M -d /var/lib/postgresql patroni
Patroni is able to store and distribute PostgreSQL configuration and can also set it up from scratch. In this example, however, we start from an existing PostgreSQL database installation created by the Bacula Installation Manager. As a result, the process is slightly different.
First, create the users that Patroni will use to connect to the PostgreSQL instances and manage
status and replication. Connect to each PostgreSQL instance on each Catalog node
(using psql command) and run:
-- Patroni superuser
-- Replace pat_admin and PATRONI_SUPERUSER_PASSWORD accordingly
CREATE USER pat_admin WITH SUPERUSER ENCRYPTED PASSWORD 'Admin@Bacula25';

-- Patroni replication user
-- Replace PATRONI_REPLICATION_USERNAME and PATRONI_REPLICATION_PASSWORD accordingly
CREATE USER pat_replica WITH REPLICATION ENCRYPTED PASSWORD 'Admin@Bacula25';

-- Patroni rewind user, if you intend to enable use_pg_rewind in your Patroni configuration
-- Replace pat_rewind and PATRONI_REWIND_PASSWORD accordingly
CREATE USER pat_rewind WITH ENCRYPTED PASSWORD 'Admin@Bacula25';
GRANT EXECUTE ON function pg_catalog.pg_ls_dir(text, boolean, boolean) TO pat_rewind;
GRANT EXECUTE ON function pg_catalog.pg_stat_file(text, boolean) TO pat_rewind;
GRANT EXECUTE ON function pg_catalog.pg_read_binary_file(text) TO pat_rewind;
GRANT EXECUTE ON function pg_catalog.pg_read_binary_file(text, bigint, bigint, boolean) TO pat_rewind;
Next, configure Patroni on each node. Create the configuration file /etc/patroni/patroni.yml.
For catalog01:
scope: bacula_cluster
namespace: /db/
name: catalog01

restapi:
    listen: 0.0.0.0:8008
    connect_address: 192.168.1.151:8008

etcd3:
    hosts:
       - 192.168.1.151:2379
       - 192.168.1.152:2379

bootstrap:
    dcs:
        ttl: 30
        loop_wait: 10
        retry_timeout: 10
        maximum_lag_on_failover: 1048576
        postgresql:
            use_pg_rewind: true
            parameters:
                wal_level: replica
                hot_standby: "on"
                max_wal_senders: 10
                max_replication_slots: 10
                wal_keep_size: 256MB

postgresql:
    listen: 0.0.0.0:5432
    connect_address: 192.168.1.151:5432
    data_dir: /var/lib/postgresql/16/main
    bin_dir: /usr/lib/postgresql/16/bin/
    config_dir: /etc/postgresql/16/main/
    authentication:
        replication:
            username: pat_replica
            password: 'Admin@Bacula25'
        superuser:
            username: pat_admin
            password: 'Admin@Bacula25'

tags:
    nofailover: false
    noloadbalance: false
    clonefrom: false
    nosync: false

log:
    type: plain
    dir: /var/log/patroni
    level: DEBUG
For catalog02:
scope: bacula_cluster
namespace: /db/
name: catalog02

restapi:
    listen: 0.0.0.0:8008
    connect_address: 192.168.1.152:8008

etcd3:
    hosts:
        - 192.168.1.151:2379
        - 192.168.1.152:2379

bootstrap:
    dcs:
        ttl: 30
        loop_wait: 10
        retry_timeout: 10
        maximum_lag_on_failover: 1048576
        postgresql:
            use_pg_rewind: true
            parameters:
                wal_level: replica
                hot_standby: "on"
                max_wal_senders: 10
                max_replication_slots: 10
                wal_keep_size: 256MB

postgresql:
    listen: 0.0.0.0:5432
    connect_address: 192.168.1.152:5432
    data_dir: /var/lib/postgresql/16/main
    bin_dir: /usr/lib/postgresql/16/bin/
    config_dir: /etc/postgresql/16/main/
    authentication:
        replication:
            username: pat_replica
            password: 'Admin@Bacula25'
        superuser:
            username: pat_admin
            password: 'Admin@Bacula25'

tags:
    nofailover: false
    noloadbalance: false
    clonefrom: false
    nosync: false

log:
    type: plain
    dir: /var/log/patroni
    level: DEBUG
Explaining every parameter is outside the scope of this setup example. The configuration files above primarily:
connect Patroni with the underlying PostgreSQL instance (address, port, data directory)
connect Patroni with the etcd cluster we configured beforehand
define the users Patroni uses to connect for management and replication
define the behavior of the cluster in terms of synchronization, replication, etc.
establish where the REST API is served so other Patroni nodes and other services can consume it
define the logging behavior
For a complete list of options, refer to the official Patroni documentation.
Once the YAML configuration files are in place, create the service units, so Patroni can be handled through Systemd in /etc/systemd/system/patroni.service:
[Unit]
Description=High availability PostgreSQL Cluster
After=syslog.target network.target

[Service]
Type=simple
User=postgres
Group=postgres
Environment=PATH=/usr/local/bin:/bin:/usr/bin:/usr/local/sbin:/usr/sbin:/usr/lib/postgresql/16/bin/
ExecStart=/usr/bin/patroni /etc/patroni/patroni.yml
KillMode=process
TimeoutSec=30
Restart=no

[Install]
WantedBy=multi-user.target
Now, disable PostgreSQL as it will be handled by Patroni. We are not interested either in these nodes in bacula dir or sd, so we will disable them as well. Then, we will enable and start Patroni on both nodes:
systemctl daemon-reload

# Disable postgresql
systemctl disable postgresql

# Disable and stop bacula-dir and bacula-sd
systemctl disable bacula-dir bacula-sd
systemctl stop bacula-dir bacula-sd

systemctl enable patroni
systemctl start patroni
At this point, the cluster is running. However, we started from two nodes both with data, as we installed PostgreSQL through BIM. As a result, we need now to choose one of the nodes as the first primary or master node, and discard the data from the other.
To do this, connect to catalog02 and run the following Patroni command:
patronictl -c /etc/patroni/patroni.yml reinit bacula_cluster
You can then check the Patroni cluster health:
root@catalog02:~# patronictl -c /etc/patroni/patroni.yml list
+ Cluster: bacula_cluster (7509821870589132491) ---+----+-----------+-----------------+
| Member    | Host           | Role    | State     | TL | Lag in MB | Pending restart |
+-----------+----------------+---------+-----------+----+-----------+-----------------+
| catalog01 | 127.0.0.1:5432 | Leader  | running   |  1 |           | *               |
| catalog02 | 127.0.0.1:5432 | Replica | streaming |  1 |         0 |                 |
+-----------+----------------+---------+-----------+----+-----------+-----------------+

root@catalog02:~# patronictl -c /etc/patroni/patroni.yml topology
+ Cluster: bacula_cluster (7509821870589132491) -----+----+-----------+-----------------+
| Member      | Host           | Role    | State     | TL | Lag in MB | Pending restart |
+-------------+----------------+---------+-----------+----+-----------+-----------------+
| catalog01   | 127.0.0.1:5432 | Leader  | running   |  1 |           | *               |
| + catalog02 | 127.0.0.1:5432 | Replica | streaming |  1 |         0 |                 |
+-------------+----------------+---------+-----------+----+-----------+-----------------+
You can also review the logs in /var/log/patroni/patroni.log:
# In the master we see
2025-11-12 15:49:11,422 INFO: Lock owner: catalog01; I am catalog01
...

# In the replica we see
2025-11-12 15:52:02,015 INFO: Lock owner: catalog01; I am catalog02
2025-11-12 15:52:02,015 DEBUG: does not have lock
...
Replication status can also be tracked directly in PostgreSQL on the master node:
postgres=# SELECT * FROM pg_stat_replication;
pid  | usesysid |   usename   | application_name |  client_addr  | client_hostname | client_port |         backend_start         | backend_xmin |   state   | sent_lsn  | write_lsn | flush_lsn | replay_lsn | write_lag | flush_lag | replay_lag | sync_priority | sync_state |          reply_time
------+----------+-------------+------------------+---------------+-----------------+-------------+-------------------------------+--------------+-----------+-----------+-----------+-----------+------------+-----------+-----------+------------+---------------+------------+-------------------------------
1592 |    25202 | pat_replica | catalog02        | 192.168.1.152 |                 |       50708 | 2025-11-12 11:41:22.512199+00 |              | streaming | 0/60E0A38 | 0/60E0A38 | 0/60E0A38 | 0/60E0A38  |           |           |            |             0 | async      | 2025-11-12 15:50:37.078039+00
4. Setup HAProxy + Keepalived
First, install both software packages in both Xatalog nodes:
apt-get install -y haproxy keepalived
Now, configure each HAProxy on each node by adding the following configuration to the end of the /etc/haproxy/haproxy.cfg file:
frontend postgres_frontend
    bind *:5433
    mode tcp
    default_backend postgres_backend

backend postgres_backend
    mode tcp
    option tcp-check
    option httpchk OPTIONS /primary     # patroni endpoint, we use OPTIONS, as GET generates tracebacks when used with Patroni
    http-check expect status 200        # only master returns 200
    timeout connect 5s
    timeout server 30s
    server catalog01 192.168.1.151:5432 port 8008 check verify none
    server catalog02 192.168.1.152:5432 port 8008 check verify none
This configuration means:
The frontend of the proxy (where the clients such as Bacula can connect) will be served on port 5433
For the backend, we check the Patroni endpoint
/primaryto know which one is the the master (so to which one the traffic should be redirected)We indicate our two Catalog nodes so the check can be done on both
As a result, any request to HAProxy on port 5433 is automatically redirected to the PostgreSQL node that is acting as primary in the moment. HAProxy supports additional load-balancing modes, but that is out of scope of this guide and is not required for most Bacula deployments.
Now, set up Keepalived. On catalog01, insert the following contents in /etc/keepalived/keepalived.conf:
global_defs {
    enable_script_security
    script_user keepalived_script
}

vrrp_script check_haproxy {
    script "/etc/keepalived/check_haproxy.sh"
    interval 2
    fall 3
    rise 2
}

vrrp_instance VI_1 {
    state MASTER
    interface enp0s3
    virtual_router_id 51
    priority 100 # The one with hightest up sooner. Max is 255
    advert_int 1
    authentication {
        auth_type PASS
        auth_pass BacChaME # Needs to be 8 alphanumeric characters(!)
    }
    virtual_ipaddress {
        192.168.1.160
    }
    track_script {
        check_haproxy
    }
}
With this configuration, Keepalived is started only if HAProxy is up, which is checked with the check_haproxy.sh
script. On the other hand, we indicate the Virtual IP configuration with the desired IP address
and we set priorities and configuration to indicate Keepalived how to behave if more than one
node is alive.
In this setup:
catalog01is the MASTER of the whole cluster when available (stateMASTER)catalog01has priority 100 in the cluster, which is higher than any node with a lower priority. Here, this is redundant with the state, but we need to remember that we can have any number of nodes.
The script to check HAProxy will contain:
#!/bin/bash

# Port of the fronted to check (HAProxy)
PORT=5433

# Check service
if ! pidof haproxy > /dev/null; then
    echo "HAProxy is not running!"
    exit 1
fi

# Check if HAProxy is listening where we expect
if ! ss -ltn | grep -q ":${PORT}"; then
    echo "HAProxy is not listening on port ${PORT}"
    exit 2
fi

# All good
exit 0
Now, configure Keepalived on node catalog02 as well, adjusting the state parameter and priority:
global_defs {
    enable_script_security
    script_user keepalived_script
}

vrrp_script check_haproxy {
    script "/etc/keepalived/check_haproxy.sh"
    interval 2
    fall 3
    rise 2
}

vrrp_instance VI_1 {
    state BACKUP
    interface enp0s3
    virtual_router_id 51
    priority 50     # The one with hightest up sooner. Max is 255
    advert_int 1
    authentication {
        auth_type PASS
        auth_pass BacChaME  # Needs to be 8 alphanumeric characters(!)
    }
    virtual_ipaddress {
        192.168.1.160
    }
    track_script {
        check_haproxy
    }
}
Enable and start both services on both nodes:
systemctl enable haproxy keepalived
systemctl start haproxy keepalived
You can check Keepalived status and confirm the roles on each node:
# catalog01 is master
root@catalog01:~# journalctl -u keepalived
nov 12 11:41:15 catalog01 systemd[1]: Started keepalived.service - Keepalive Daemon (LVS and VRRP).
nov 12 11:41:17 catalog01 Keepalived_vrrp[946]: Script `check_haproxy` now returning 0
nov 12 11:41:19 catalog01 Keepalived_vrrp[946]: VRRP_Script(check_haproxy) succeeded
nov 12 11:41:19 catalog01 Keepalived_vrrp[946]: (VI_1) Entering BACKUP STATE
nov 12 11:41:20 catalog01 Keepalived_vrrp[946]: (VI_1) received lower priority (50) advert from 192.168.1.152 - discarding
nov 12 11:41:21 catalog01 Keepalived_vrrp[946]: (VI_1) received lower priority (50) advert from 192.168.1.152 - discarding
nov 12 11:41:24 catalog01 Keepalived_vrrp[946]: (VI_1) received lower priority (50) advert from 192.168.1.152 - discarding
nov 12 11:41:25 catalog01 Keepalived_vrrp[946]: (VI_1) Entering MASTER STATE

# catalog02 is backup state
root@catalog01:~# journalctl -u keepalived
nov 12 11:41:12 catalog02 systemd[1]: Started keepalived.service - Keepalive Daemon (LVS and VRRP).
nov 12 11:41:14 catalog02 Keepalived_vrrp[990]: Script `check_haproxy` now returning 0
nov 12 11:41:16 catalog02 Keepalived_vrrp[990]: VRRP_Script(check_haproxy) succeeded
nov 12 11:41:16 catalog02 Keepalived_vrrp[990]: (VI_1) Entering BACKUP STATE
nov 12 11:41:22 catalog02 Keepalived_vrrp[990]: (VI_1) Entering MASTER STATE
nov 12 11:41:25 catalog02 Keepalived_vrrp[990]: (VI_1) Master received advert from 192.168.1.151 with higher priority 100, our>
nov 12 11:41:25 catalog02 Keepalived_vrrp[990]: (VI_1) Entering BACKUP STATE
5. Connect Bacula to the remote Catalog.
Now, switch the node to run Bacula and BWeb and modify the configuration.
First, we need to modify the Catalog configuration so it points to our remote Catalog:
root@dirtoha:~# cat /opt/bacula/etc/conf.d/Director/jubu-dir/Catalog/BaculaCatalog.cfg
Catalog {
    Name = "BaculaCatalog"
    DbName = "bacula"
    Password = "xxxxxxx"
    User = "bacula"
    DB Address = 192.168.1.160
    DB Port = 5433
}
Then, access BWeb and adjust the same configuration through the Configuration –> BWeb configuration page:
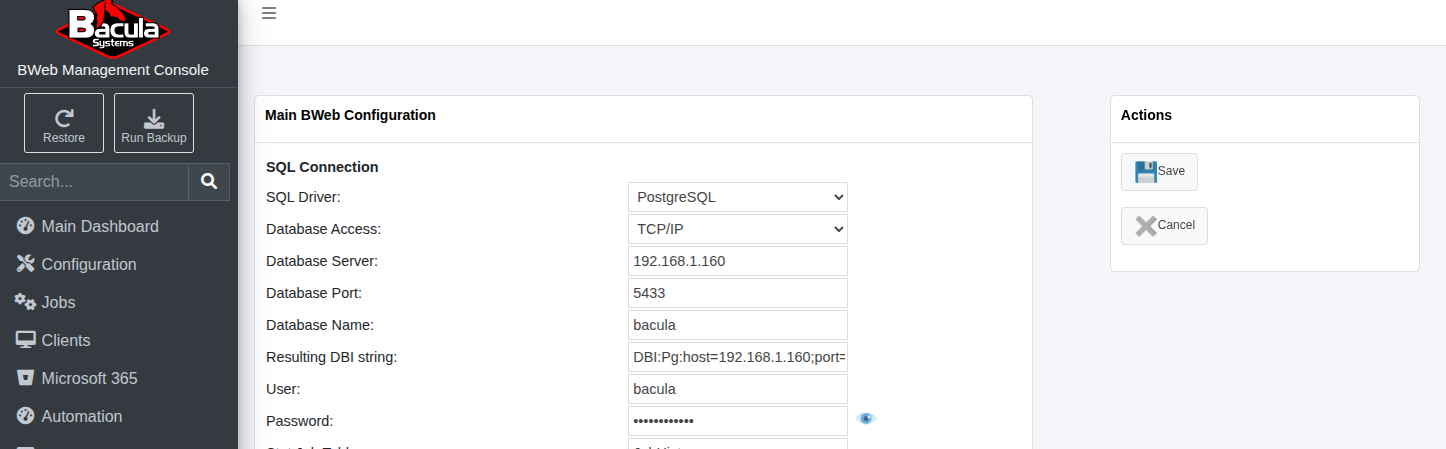
BWeb connection to the remote Catalog
Set the connection type to TCP/IP and then enter the same parameters used in the Bacula Director.
Finally, add a new client named catalog-fd and set the Catalog VIP address:

Catalog FD
Adjust the bacula-fd.conf files on each Catalog node so that the password the one configured for this client.
Finally, change the predefined BaculaDirectorCatalog so it uses the catalog-fd client.
This allows you to back up the remote Catalog.
In production, it would be necessary also to adjust the Storage destination so it is outside
the Bacula host in a secured external location.
At this point, this Bacula instance uses a Catalog that is in high availability with all the benefits described at the beginning of this section.
See also
Previous articles:
Go back to: High Availability.